

Looking for a Team Fortress 2 Optimization Guide or just want help getting into the game? TF2 has been out since 2007 but has reigned in Steam’s Top 10 Most Played Games ever since, and has been one of my personal favorites for the past ten years. Stick around and I’ll walk you through everything you need to know to get into Team Fortress 2!
Guide Goals and Contents
This is my definitive guide to Getting Into Team Fortress 2. As a long-time player of Team Fortress 2, including many years spent in the game’s community-run competitive leagues as a decently high-ranking Spy player, I have a lot of knowledge about this game to share with you. This includes how to get the game running well, what settings you need to change, and a run-down of how each of the nine classes in the game are played by or against you.
I’ve divided this guide into 7 distinct sections, organized in rough order-of-importance:
Table of Contents
In the Optimization Guide section, I’ll be breaking down how to optimize the game’s graphics and performance for your PC, including the use of community-made performance configs. This is where to go if you want more FPS in TF2.
The Recommended Settings section isn’t actually for graphics, but instead key in-game settings you should change for an improved experience while actually playing the game. This includes things like recommended Field of View, viewmodel settings, and essentials like enabling raw input.
The rest of the sections are pretty self-explanatory in their headings, and dive deeper into my game knowledge, so I’ll just let the Table of Contents or the guide itself do the talking from here. Whether you read some of it or all of it, I hope that this guide helps make it easy to get into Team Fortress 2!
Getting Into Team Fortress 2: Optimization Guide
When it comes to optimization, TF2 can actually be a surprisingly challenging game to run at framerates higher than 60 or without sharp dips. While the game was initially released way back in 2017, the updates it has received since then have made its Steam Recommended Specs long obsolete. It’s still running on the original Source engine as well, which is fairly CPU-bound, and has become extremely CPU-bound for Team Fortress 2 in particular, thanks again to all those updates I just mentioned.
GPU-wise, TF2 isn’t all that demanding. It was originally a game for Xbox 360-tier hardware, and for the most part that still shows in its graphics. It’s still clean and HD, especially on higher settings, but most of the in-game graphics settings are unlikely to improve performance very much for modern graphics cards, which can often get similar FPS at most presets. The biggest optimizations to be made are CPU-bound, and the best ones require you to do it yourself.
How, then, do you optimize Team Fortress 2? You get a performance config. These days, you get mastercomfig.
In the past, TF2 performance configs were text-only and pasted into your autoexec.cfg file (the first configuration file the game will run upon launch). Mastercomfig is different because it uses a VPK mod format, wherein you drop a VPK file into the TF/Custom folder.
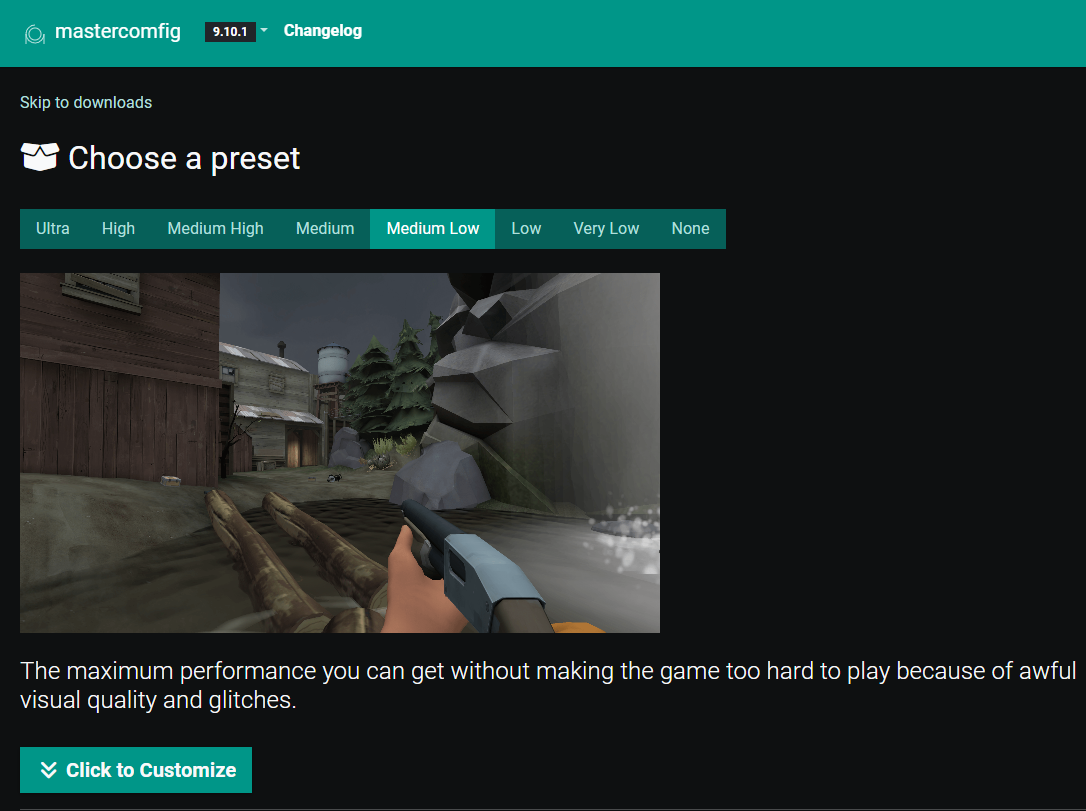
I recommend the Medium Low Preset. By using console settings like disabling ragdolls and gibs at lower Presets and loading virtually seamlessly with the game, Mastercomfig enables some pretty great performance in TF2, and will get you much more frames than just using in-game low settings.
Whichever Preset you use, I also recommend the “Ultra” texture quality setting under “Click to Customize” and “Modules”.
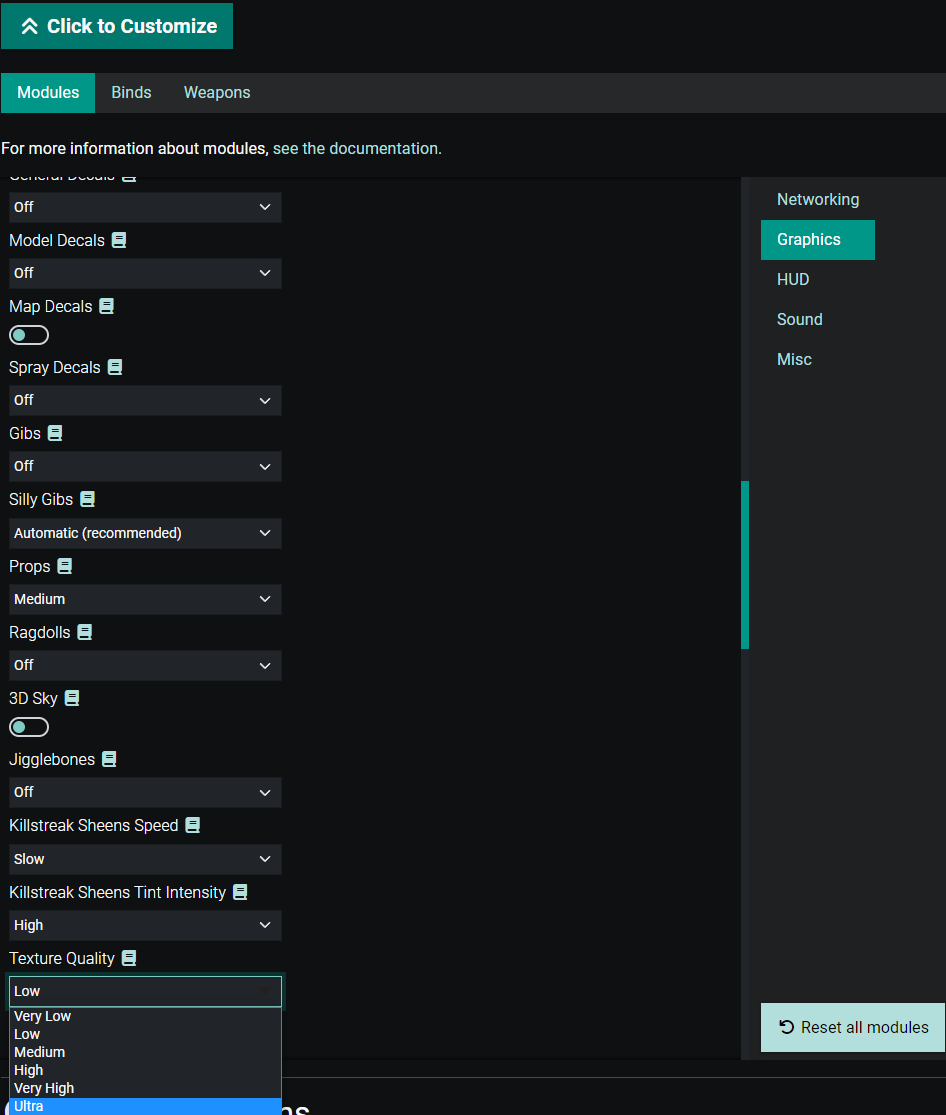
The “Ultra” texture setting is actually the recently-unlocked mat_picmip -10 console command, which isn’t available in the in-game gfx settings menu but disables texture compression for a much clearer, readable and sharp-looking game. On a modern GPU, enabling this setting should make minimal to no performance impact— it may even improve performance!
A video by s4videos on YouTube breaking down the visual changes introduced by mat_picmip -10/Ultra Textures.
The only real caveat of mastercomfig is that installing it requires a few extra steps compared to just tweaking in-game settings, and the fact that you’ll need to make a new “overrides” folder in your cfg folder if you still want your own personal autoexec.cfg or class-specific config. Fortunately, the mastercomfig Docs are incredibly thorough and should help you through any tweaking or troubleshooting you need during or after the installation.
Getting Into Team Fortress 2: Recommended Settings
Since the config stuff covers all your graphical settings, you may be wondering why there’s still a “Recommended Settings” section here. That’s because there are a whole litany of other settings that you should probably change for an ideal experience, and I’ll just be listing them here:
- Field of View “90” — Under Options, Video, Advanced. One of the few GFX settings not touched by mastercomfig.
- Raw Input — Under Options and Mouse. Enables clean raw input from mouse-to-game.
- Disable Mouse Acceleration — Same location as above. Prevents mouse acceleration from adding inconsistency to your aim.
(Note: the following options are all under the “Advanced Options” button on the main menu.)
- Automatically Reload — There is almost no benefit to manually reloading in TF2, except perhaps in niche cases as the Spy class. Even so, this is probably best left enabled.
- Fast Weapon Switch — Enable this or you will be losing fights.
- Display Damage Done as Text — Damage numbers will appear over an enemy whenever you shoot or otherwise hit them.
- Accumulate Combat Text Damage — Damage numbers add up as you hit an enemy repeatedly.
- Damage Text Doesn’t Prevent Overhead Effects — Indicators like “CRIT!” for hitting a headshot remain visible alongside damage numbers.
- Spy: Enable Concise Disguise Menu — Turns Spy’s disguise menu from using all 9 number keys to just 3. Highly recommended for optimal Spy play.
- Medic: Medigun Continues Healing Without Holding Down Fire Button — Play Medic without giving your pointer finger RSI.
- Medic: Injured Teammates Automatically Call Out — You can set the percentage to your preference. If you set it low enough, you can pretty much have a real-time map of your teammates at all times.
- Use Glow Effects — Glow effects highlight objectives and other key elements.
- Enable Teammate Glow Effects After Respawn — Glow effects on teammates after spawn can quickly show you where your team is located, how many buildings you have, how many people are alive, etc. Too good to disable.
- Viewmodel FOV — 75 if standard viewmodels, 60 if using minimal viewmodels.
- Other Settings — Personal preference, but I recommend “Enable minimal viewmodels” for centered, minimally-invasive viewmodels. This is the setting I’m using in my videos throughout this article.
Getting Into Team Fortress 2: Economy Explained, You Don’t Need To Spend Money!
If you’re new to Team Fortress 2 or particularly used to the modern Free-To-Play business model, you may be worried that TF2 is going to require a lot of money to get into and actually enjoy. Fortunately, that actually isn’t the case!
Allow me to break it down.
The majority of the microtransactions in TF2 are for purely cosmetic items, which can be freely traded or even re-sold once acquired. Alternative weapons can also be purchased and traded, but this is not the only way to acquire those weapons: many are also unlockable through achievements, in-game contracts, and even just random drops you get for playing. A quick visit to scrap.tf and you can trade whatever weapons you don’t want for weapons you do want at a 1:1 rate.
While those alternative weapons do impact gameplay, for the most part they are all what you would consider sidegrades or alternative playstyles. Many of the best weapons in the game are fully Stock weapons due to how versatile and well-balanced they are. Of the unlockable weapons, the melee weapons do have some utility and feature creep compared to stock melee, but primaries and secondaries are largely all sidegrades, not straight upgrades.
I’ve been playing TF2 since 2012, and never felt the urge to spend money for any kind of competitive advantage. I only spend money on cosmetics and Stranges (weapons that count your kills), and even then only a few times a year. You don’t need to spend any money if you don’t want to, either.
Getting Into Team Fortress 2: Tips For Casual Play
If you’re just hopping into Team Fortress 2, you may not know exactly what’s expected of you. Fortunately, TF2 isn’t a game where the players take things particularly seriously, so you don’t need to worry about getting yelled at for not playing properly in the majority of servers and scenarios. However, it’s still good to have an idea of how you should be playing the game, so I’m going to break down a few integral concepts to casual TF2 play that should help improve your experience.
Team Composition and Class Switching
Outside of competitive formats with fixed team compositions, understanding how to balance classes and when to switch class is one of the most important skills for you to pick up in Team Fortress 2. No matter what your favorite class is, chances are you’ll have something important to learn from another class that will help improve your overall game sense and performance, even when playing your original class.
Take it from me, a Spy main. Spy and Sniper are notorious for being popular among newer players but also fairly difficult to actually play effectively, resulting in many of the worst team compositions being stacks of Spies and Snipers who aren’t actually accomplishing anything. Branching out to other classes as needed to help my team served to greatly improve my Spy play whenever Spy did fit into the team composition.
So, what’s the ideal team composition? That’s hard to say, and can change depending on map and scenario. However, I can give a rough order of classes that should be prioritized on a common 12 man TF2 team:
- At least one Medic, for their healing and Ubercharge/Kritz charge/etc pushes.
- On larger maps (especially 5CP and Payload), at least one Engineer for their teleporters and Sentry/Dispenser support. Stacking one or two more Engineers can also make a very formidable defense.
- Soldiers, Demomen, and Heavies are all good to have, though some variety might be needed if one is stacked too high (ie too many Heavies will be Sniper food but be instant death for anyone who actually goes near them).
- Scout and Pyro are generally-effective classes (Scout especially), but lose effectiveness when stacked, especially against Engineers.
- Spy and Sniper are the last priority, and there usually shouldn’t be more than 2 each, or 3 combined. While they are great Pick-Support classes, their limited utility in direct combat makes them less effective at pushing and holding objectives, and thus they should not be stacked.
Situational Awareness and Flankers
Team Fortress 2 may look like your average cartoony FPS, but its DNA is firmly rooted in classic arena shooters like Quake. That means that you actually do need to be looking up and around you on a very regular basis, because people can be blasting around the map at all times without the restrictions of cooldowns.
Soldiers and Demomen can explosive jump at very high speeds to get above and behind you, and Spies are capable of disguising as teammates and turning invisible to avoid your detection. Other classes have good mobility options, too.
As a game, TF2 will steadily teach you to regularly turn around and check your surroundings, even in the middle of a fight. This practice is key to staying alive against good players.
Picking Your Fights
As tempting as it is to take every fight in TF2, especially when you’re on a hot streak, it’s important not to take every fight that presents itself to you. Even if it initially seems favorable (perhaps an isolated class you feel well-equipped to fight), where you are on the map and when can be the difference between a mostly-safe 1v1 and being ambushed by 3 other players halfway into the fight.
Always pick your fights carefully, and be ready to retreat if you’re obviously outgunned or outnumbered. Waiting to have the numbers of your team on your side at a pivotal moment can be the difference between winning and losing the whole game.
Playing The Objective
Last but not least, let’s talk about playing the objective.
On Payload Offense, this means making sure the cart is being pushed when there isn’t a hold actively preventing that from happening. When the cart reaches a hold on Payload, that’s a sign to stop pushing and regroup with your team to take down the enemy defense before returning attention to the cart.
On Payload Defense, 5CP, KOTH, and Attack/Defend, playing the objective means making sure that a teammate is always touching the objective to reverse any capture progress, especially on last points. Leaving a final point unattended (with or without a Payload) for just a few moments can spell the end of the game. Until you are confident that the game is not 2-5 seconds of cap time away from victory, do not leave that last point alone.
Finally, on CTF, playing the objective is just…well, taking or protecting the flag (in this case, the Intelligence briefcase). Like most CTF game modes in other games, the flag is a mobile, capture-able objective in TF2.
Getting Into Team Fortress 2: How To Play Every Class
Note: Team Fortress 2 usually is not balanced around hard counters, ie Overwatch or a MOBA. Even if your class is weak against another class, you will usually have some kind of recourse to overcome the gap through skill or cunning. I’m also recommending these weapons as sidegrades for a reason, don’t feel like you need any of these weapons to play well— often times, stock actually is the best option.
Image Credit For Class Headshots: Fight Songs TF2 Soundtrack Vinyl
Scout
Scout is TF2’s best duelist at a high level of play, owing to his superb movement speed, double-jump, and high burst damage through his Scattergun. However, his low health pool of 125 HP can make him feel like a glass cannon, especially if you’re newer to the game and aren’t yet used to dancing in the air around your enemies.
Regardless, if a speedy shotgun character with excellent mobility and dueling potential sounds good to you, Scout may be the class to try out. You’ll need to do a lot of work developing your aim and your movement, but it’ll pay off in many victories in the long-term. Besides combat capabilities and speed, Scout also has the nifty perk of a 2X capture rate on control points and Payload carts, which is great for objective play.
The main weakness of the Scout is when dealing with players of a similar or higher skill level, or an Engineer simply existing on the map, as Scout has almost no options for dealing with sentries. Sans stock Pistol, I suppose, but that won’t take a Sentry down particularly quickly, especially not if it has any degree of team support attached to it.
Stock Scout has incredible movement, versatility, and damage output that makes him easily capable of taking down multiple enemies in rapid succession.
Class Is Weak Against:
- Engineer
- Heavy
- Skilled Combat Class Players
Class Is Strong Against:
- Demoman
- Pyro
- Spy
- Anyone Who Can’t Keep Up
Recommended Sidegrades:
- Force-a-Nature: A Scattergun replacement with extremely high knockback on every shot, able to propel enemies off ledges or the Scout himself for an extra jump. Good damage but limited ammo makes it less ideal for dealing with multiple targets or extended fights.
- Mad Milk: A secondary Pistol replacement that allows you to douse enemies with…a dubious milk-like substance. This substance heals you and your teammates whenever you damage the doused enemy, so it can be great for helping keep yourself or your team healthy.
- Crit-a-Cola: Another secondary replacement, this time a consumable drink that temporarily makes all of your attacks mini-crit. However, you will also take mini-crits during the duration, and for a brief amount of time afterward. A very high risk-reward weapon, but fun for making decisive plays.
- Pretty Boy’s Pocket Pistol: Heals a small amount of health per pistol shot connected. Like the Stock Pistol, effective for peppering enemies at range.
- Flying Guillotine: The Guillotine does good damage on hit and continues to stack Bleed damage afterward, making it a good weapon for initiating or even fleeing fights.
- Boston Basher: Apply Bleed to yourself or an enemy on hit. Self-damage can be exploited with a Medic to build Ubercharge faster.
- Fan ‘O War: Mark someone for Death (Mini-Crits) by tapping someone with this. Don’t swing it more than once, as its damage is too low to reasonably kill on its own.
Scout’s already-powerful qualities can be enhanced with the right unlocks. For example, Mad Milk gives him AND his teammates a lot of extra survivability.
Soldier
Soldier is one of the most flexible, mobile, generally-applicable combat classes in the game. Boasting a beefy health pool, a wide variety of unique unlockable weapons, and one of the best primary weapons in the game (the stock Rocket Launcher), Soldier is pretty hard to beat as an all-around package.
Whether you’re a beginner just starting out or an experienced player with great game sense, Soldier is a great class to pick up.
Rocket Jumping and the height advantage that comes with it is a great option for aggressing enemies and defending positional advantages.
Class Is Weak Against:
- Pyro
- Heavy
Class Is Strong Against:
- Engineer
- Sniper
- Spy
Recommended Sidegrades:
- Direct Hit: Worse for crowd control due to reduced splash, but great for 1v1s due to much higher damage.
- Liberty Launcher: Ideal for a jump-heavy playstyle without using Gunboats, since it also reduces self-damage.
- Black Box: Good for staying healthy due to the health-on-hit mechanic, but a poor choice for protracted fights due to having one less rocket.
- Gunboats: Trading a Shotgun for 60% self-damage reduction from rocket jumps. Ideal for a player who wants to fly.
- Buff Banner: A support-oriented secondary that grants higher damage to yourself and surrounding teammates when charged.
- Concheror: Similar to the above, but provides a speed boost and small heal-on-hit properties to yourself and surrounding teammates.
- Panic Attack: Like the Shotgun, but you can switch to and from it faster, and it has a fixed spread pattern on all servers. Great with the Direct Hit.
- Disciplinary Action: Roll out faster with your teammates by whipping them.
- Escape Plan: Run away from scary situations more effectively by pulling this out at low health.
- Market Gardener: Style on your enemies with full critical melee damage as long as you’re mid rocket jump. Takes practice, but it’s pretty good!
An example of the Direct Hit and Buff Banner combination in action. The higher raw damage of the Direct Hit fills the Banner faster, and makes the subsequent mini-crit boost even more powerful, at the cost of having a secondary Shotgun for self-defense.
Pyro
Pyro is an offensive support class built around fire damage-over-time through his Flamethrower and various Flare Gun secondaries, as well as a unique projectile-reflecting, player-pushing airblast that can be used for both counterattacks and defending against Ubercharge pushes.
Pyro is likely the weakest duelist of the offensive classes, but airblast and fire damage still make him formidable. Plus, Pyro has many support-oriented weapons, and is naturally suited to exposing and igniting Spies, even invisible or disguised ones.
Class Is Weak Against:
- Scout
- Sniper
- Engineer
- Heavy
Class Is Strong Against:
- Spy
- Soldier
- Demoman
The Pyro’s high direct flame damage combined with the player-pushing airblast gives him a lot of combo potential and utility. As a bonus, afterburn ignites disguised and invisible Spies, while airblast makes reflected projectiles mini-crit and can also extinguish your own teammates who are lit aflame.
Recommended Sidegrades:
- Dragon’s Fury: A Flamethrower replacement that shoots short-range fireballs. Good damage if you have the aim, but stock Flamethrower requires less effort for a similar result.
- Degreaser: A Flamethrower with a higher ammo cost for airblast and less afterburn damage, but much faster weapon switch time. Ideal for combo’ing flame and airblast damage with secondary shotguns and Flare Guns.
- Backburner: Like the Flamethrower, but airblast is more expensive and enemies pretty much die instantly if you attack them from behind with this.
- Phlogistinator: Like the Flamethrower, but with no airblast at all. Builds a Phlog Charge of Full Crits for a full 10 seconds, enabling an entire team to be melted if no Sentries are nearby or the Pyro is being Ubered by a Medic.
- Thermal Thruster: A rechargeable Jetpack Secondary for getting into places the Pyro otherwise couldn’t reach.
- Gas Passer: A rechargeable Gas Can secondary that douses enemies in gas, making them ignite and take fire damage-over-time if hit. Great for crowd control and holding chokes.
- Detonator: A secondary Flare Gun with manual detonation that enables some tricky Pyro-specific jumps.
- Reserve Shooter: A shotgun secondary that does Mini-Crit damage to anyone forced upward by airblast or explosions, making for a lethal Pyro combo, especially with Degreaser.
- Powerjack: A melee that boosts Pyro’s run speed and even heals on kill, but also increases damage vulnerability while active. Use with caution near enemies!
- Homewrecker: A Pyro Melee that exists solely to make Spies and Engineers miserable. Does ridiculous damage to Sentries and can one-shot enemy Spy sappers on friendly Engineer buildings.
Using combinations like Phlogistinator’s high damage charge with the improved mobility offered by something like the Detonator or Thermal Thruster enables the Pyro to rampage from unexpected places.
Demoman

Demoman is a class built around two powerful projectile weapons (Grenade and Stickybomb Launchers), which gives him astonishing damage output, explosive jumping capability, and crowd control at the cost of some close-range dueling capabilities.
If you’re willing to do away with “Demolitions”, you can also opt for a melee-centric “Demoknight” playstyle (essentially another class) that uses powerful Shields and Swords to do high melee damage. In place of sticky bomb or grenade bomb jumping, Demoknights can Shield Charge off slanted surfaces to be sent flying into the air— this is called “Trimping”.
Demoman is one of the hardest classes to play effectively, but also one of the most powerful.
Class Is Weak Against:
- Scout
- Pyro
- Sniper
Class Is Strong Against:
- Engineer
- Heavy
- Spy
Demoman’s Stock Grenade and Sticky Launchers are the best raw damage primaries in the game.
Recommended Sidegrades:
- Iron Bomber: Grenade Launcher with a smaller hitbox but no roll, allowing you to set temporary traps or explosive jump points with one click. Pretty good overall, and sounds amazing to fire.
- Loch-n-Load: Faster Grenades that do more damage to buildings at the cost of less ammo.
- Loose Cannon: No Grenades— you’re now dealing with a big slow Cannonball that can double-”donk” players if fired with the correct spacing and timing. Also does incredibly high knockback.
- Scottish Resistance: A Stickybomb Launcher replacement that isn’t as good in direct battle but lets you set multiple, independent traps all around the map. Being able to detonate specific clusters of stickies instead of all of them at once turns Demo into an even more formidable defender.
- Half-Zatoichi: A katana that one-shot-kills other katana users, self-damages you if you put it away before killing someone, and heals you on every kill. Fun weapon for any playstyle, even regular Demoman, but also popular for Knight players.
- Scotsman’s Skullcutter: A straightforward Axe that does 20% more damage but reduces walking speed by 15% while active. Works with any Demo playstyle, but favored most by Knights.
Recommended Sidegrades (Demoknight or Hybrid Knight Playstyle):
- Wee Booties/Bootlegger: Increases Turn Speed and Control for Shields and restores 25% Shield Charge on melee kill.
- Chargin’ Targe: The first Shield Charge weapon introduced, grants damage resistance and critical swings at the end of a charge.
- Splendid Screen: Another Shield Charge weapon, this time with less damage resistance but more shield impact damage and a faster Shield Charge recharge time. Still has a critical swing at the end.
- Tide Turner: Yet another Shield Charge weapon, now with the weakest resistances and only a mini-crit swing at the end. However, it provides full Turn Speed and Control on its own, and killing enemies with it will refill 75% of your Charge meter immediately. Probably the best overall Shield.
- Eyelander: The first sword for Demoman, adding a unique Head-collecting mechanic per kill that increases Demo’s health and movement speed. Combined with the right Shield, can turn Demo into a real tanky melee monster.
- Persian Persuader: Refills Shield Charge on hit instead of kill and takes Charge from ammo sources, too. However, greatly reduces your maximum ammo, so isn’t optimal for a Hybrid playstyle.
Half-Zatoichi’s Health Restore alongside Tide Turner’s turn control and full Shield Charge per-kill with the addition of the Booties synergize for an incredibly mobile, dangerous melee specialist.
Heavy
The Heavy Weapons Guy is TF2’s tank class, boasting the highest health pool and close-to-mid-range DPS of any class in the game thanks to his Minigun. These strengths do come with the downsides of limited mobility and slower movement speed, though, which makes Heavy a big target for flankers and Snipers. Additionally, certain explosive classes— particularly the Demoman— can put out enough damage to beat a Heavy in a fight if he also makes good use of his surroundings.
Most of Heavy’s weaknesses disappear when paired with a Medic, though, boosting his effective health from 300 HP to 450 HP. Heavy is by far one of the best classes to build a team around, and while the best Heavy players are ones with great game sense, he’s still a good class with which to learn the fundamentals of the game, too.
The Heavy’s high, consistent damage output paired with a Medic makes him a truly formidable juggernaut.
Class Is Weak Against:
- Sniper
- Spy
- Demoman
Class Is Strong Against:
- Pyro
- Scout
- Soldier
Recommended Sidegrades:
- Tomislav: A quieter, faster-to-swap-to, more accurate-at-range Minigun with slightly less damage. Still a great option, especially for a more independent playstyle.
- Brass Beast: A louder, higher-damage Minigun that also gives you extra damage resistance while active. Great for Heavy players who want to pretend to be a Sentry.
- Natascha: A Minigun that slows players down on hit. Comes with a damage penalty, but the slowdown and the sheer psychological damage compensate for that.
- Sandvich: Great for quickly healing yourself or your teammates in a fix.
- Gloves of Running Urgently: Reduces health but increases speed while active, ideal for reducing roll out time on larger maps.
- Fists of Steel: Reduces damage from all sources except melee while active, making Heavy even tankier. Pairs well with Buffalo Steak (a secondary that grants Mini-Crits) for silly Melee Heavy plays.
- Killing Gloves of Boxing: Gives 5 seconds of full crits on kill. Pairs well with Buffalo Steak, mentioned above.
Combining Tomislav with unique melee and secondary loadouts (like Buffalo Steak and Fists of Steel) will allow you to switch back to your Minigun faster after making your plays.
Engineer
Engineer is a support class with a decent penchant for skirmishing on the side, especially if you choose the right loadout. Engineer’s game is all about funneling team traffic through Teleporters and reinforcing team holds through Sentries and Dispensers.
While Engineer might sound a little basic on paper, he requires a great deal of resource management and game sense in order to be played effectively. An Engineer in the right hands can be an insurmountable wall or ridiculous spawn-camping demon.
Level 3 Sentries are great for holding down a choke and punishing overextenders. Once you run out of building options as Engineer, you also have a powerful Shotgun in reserve to resort to in those scenarios.
Class Is Weak Against:
- Demoman
- Soldier
- Spy* (better direct combat tools favor Engineer in a fight, but Spies will rarely initiate a straightforward 1v1)
- Organized Team Pushes (especially with Medic)
Class Is Strong Against:
- Scout
- Pyro
- Disorganized Teams
Recommended Sidegrades:
- Widowmaker: An infinite ammo shotgun, if you hit all of your shots. Fueled by the Engineer’s metal, so don’t expect to build many sentries if you miss with this thing a lot.
- Frontier Justice: A shotgun that gets revenge crits whenever your sentries are destroyed. Great for punishing people for playing the game.
- Rescue Ranger: A projectile for repairing buildings at a distance with an insane “teleport that building into my hands” alt-fire. That alt-fire and picking up your buildings will now mark you for death (Mini-Crits), though, so be careful!
- Wrangler: A secondary replacement that lets you manually aim and fire your Sentry and gives it a shield for damage resistance. Pretty good.
- Short Circuit: A secondary replacement that lets you fire short-range electric bolts (that can track cloaked Spies) and long-range electric balls (that can eat enemy rockets, pipes, and bombs). Kinda busted, to be honest, but too good not to use in moderation.
- Gunslinger: A Wrench replacement that turns your arm into a mechanical hand, slightly raises your health, and gives you Mini-Sentries. Mini-Sentries deploy faster and may not do as much damage, but can rack up plenty of kills with the right positioning.
- Southern Hospitality: A Wrench replacement that applies Bleed damage-over-time on hit, ideal for dealing with pesky Spies and other players who get too close to you.
Mini Sentries have great utility, and are capable of holding down an area and killing enemies while you’re off supporting your team.
Medic
Medic is by far the most impactful class in the game, and that’s no exaggeration. Even his basic role as a healer is incredibly powerful, and pretty much guarantees that if only one team is running Medic, that’s the one that is going to win. Besides healing, Medic is also instrumental to enabling big team pushes by filling “Ubercharge”, which can be used to various effects (full invincibility on the stock Medi Gun) to empower teammates through tough chokes.
I wish I had more to say about Medic, but that’s really what it boils down to. Getting great at Medic requires building solid game sense and positioning, which other classes will help you build.
Healing multiple targets will help build Medic’s Ubercharge, which can be used to make otherwise-impossible pushes, faster.
Class Is Weak Against:
- Spy
- Sniper
- Scout
- Soldier
- Organized Teams
Class Is Strong Against:
- Engineers
- Organized Teams
Recommended Sidegrades:
- Crusader’s Crossbow: A projectile that does more healing or more damage at a distance, depending on who it hits. The Skilled Medic’s primary.
- Blutsauger: Fancy yourself a Battle Medic? These syringes heal you on hit.
- Kritzkrieg: A Medi Gun alternative that replaces the Ubercharge with a Kritz Charge. Full Crits can wipe teams in a matter of seconds.
- Quick-Fix: A Medi Gun alternative with a much faster heal rate, but no invulnerability to speak of. Even the Quick Fix Charge is just…even faster healing, not actual invuln. Quick Fix also allows you to share explosive jump height with healing targets!
- Ubersaw: Fill your Charge by hitting enemies with this. Pretty much the best Medic melee.
- Amputator: Mostly useless, but has a special taunt that can be activated for an AoE heal. Good to use near guarded chokes to heal many teammates at once.
Ubersaw can get you out of quite a few tough spots, even with Quick Fix. With the full invulnerability of the Stock Medi Gun, this combination would work even better, albeit with a slower base heal rate.
Sniper
Depending on the player, Sniper varies from one of the most incredibly powerful classes in the game to almost useless. The skill ceiling for Sniper is fairly high, but climbing it will reward you with the best pick utility in the game, outstripping even that of the Spy and Soldier. All a great Sniper needs is a second and a sightline to make a game-winning kill.
Sniper is a pretty straightforward class, especially if you’ve played other FPS games. Shoot heads to get kills and do so from as far away as possible and you’re pretty much playing Sniper as intended. Not much advice here besides playing other classes to build better game sense, which will help you stay alive as a Sniper.
Sniper is by far the best long-range combatant in the game, capable of picking off multiple targets across the map in rapid succession in the right hands.
Class Is Weak Against:
- Better Snipers
- Scout
- Soldier
- Demoman
- Spy
- Players With Good Movement
Class Is Strong Against:
- Worse Snipers
- Heavy
- Medic
- Engineer
- Players With Predictable Movement
Recommended Sidegrades:
- Huntsman: A Rifle replacement that goes full Bow and Arrow. Mostly just a fun alternative playstyle, but still quite powerful, especially if you get used to hitting Huntsman headshots.
- Bazaar Bargain: A Rifle that decreases your charge time as you rack up more headshots. This makes it possible to kill targets with more health (like Heavies at 300 HP) much faster.
- Machina: A Rifle with a penetrating shot and 15% damage boost on full charge. ‘Special Beam Cannon’, anyone?
- Razorback: Only recommended to use if you’re playing near your team, as a Spy can simply shoot you 3 times in the back if you use a temporary backstab shield as an excuse to play without awareness.
- Jarate: A great support weapon for your team or an emergency damage boost in close fights. Best used in conjunction with the Bushwacka.
- Cleaner’s Carbine: Best used in conjunction with the Bushwacka.
- Bushwacka: A melee weapon that turns all Mini-Crits into Full Crits. Supremely deadly when paired with any weapon that applies Mini-Crits.
- Tribalman’s Shiv: A melee weapon that does Bleed damage-over-time. Great for posthumously finishing off low-health targets or revealing pesky Spies.
While The Huntsman is a slower projectile, it can still be deadly at a close range. Additionally, Bushwacka’s synergy with Jarate or Carbine turns Sniper into a terrifying melee combatant.
Spy
Spy is a class focused on stealth, and gradually reducing your enemies’ ability to make good and calm decisions. He is also the one class in the game who has an always-guaranteed Instant Kill, via his Backstab mechanic. While Spy is the weakest class in the game in direct combat, he has the benefit of being able to see the exact health numbers of any enemy player, making it easy to pick and choose targets who are already weakened. He can even track Medic’s Ubercharge, helping determine when their team will most likely push!
While Spy isn’t particularly fast or agile, he does have a Disguise Kit and Invis Watch that provide great mobility. Most experienced players won’t be fooled by a disguise for more than about a second of looking at it (and may just shoot you anyways, since there’s no friendly fire in this game by default), but disguises will protect your from enemy sentries. Disguising as a Scout can also help you more easily hide behind small props and obstacles, though you will be distinctly slower than an actual Scout.
Invis Watch is a superb movement tool, since it makes you completely invisible as long as you don’t come into contact with enemies or enemy fire. However, it’s a limited resource that needs to be managed intelligently and refilled with ammo packs frequently. Other watches have different rules and cloak mechanics, but in general you’ll want to develop good Invis Watch movement and cloak management to get a solid grasp of the Spy class.
Cloaking in one direction and changing direction shortly after (an ‘illusion’) is a great way to avoid enemies who are aware of your presence. You can also bait aware enemies into showing you their backs for an instant kill ‘trickstab’. Backstabs register within a 180 degree angle of the target’s back, starting from the center of their FOV.
Class Is Weak Against:
- Pyro
- Scout
- Combat Classes In General
- Aware Players In General
Class Is Strong Against:
- Sniper
- Engineer * (better direct combat tools, however often distracted by buildings)
- Heavy* (particularly skilled/aware Heavies are a threat even at range)
- Medic
- Unaware Players In General
Recommended Sidegrades:
- Dead Ringer: Temporary feign death effect with damage resist. Good for pestering but unlikely to fool experienced players. No manual cloak refill requires a patient and passive playstyle when you do not have cloak.
- Cloak and Dagger: Stay invisible pretty much as long as you like. Great for choosing the exact moment to strike, but can limit your overall mobility due to limited-by-movement cloak gauge.
- Ambassador: Difficult to use, especially with its nerfs, but still a worthwhile upgrade to stock Revolver in any fight where you open with a headshot. Mind the crosshair shrink as the .95s accuracy cooldown before you can headshot again.
- L’Etranger: A bit weak, but great synergy with CnD and Invis due to extended cloak and shots replenishing cloak. Mostly unneeded once you learn proper cloak management and map ammo refill locations.
- Spy-cicle: A great knife sidegrade for preventing an immediate death to Pyros, but not a be-all, end-all option, especially not against particularly savvy Pyros. Best used with a high-damage primary weapon like Ambassador or Stock Revolver.
- Conniver’s Kunai: A strong knife sidegrade, but one that doesn’t work nearly as well against skilled players and teams. Once confident in trick-stabbing and general Spy capabilities, though, this is a great choice.
A demo of the Ambassador in action. While you shouldn’t usually be in direct fights as a Spy, opening a fight with a headshot sends quite the message!
Getting Into Team Fortress 2: Tips For Competitive Play
Interested in competitive TF2 or just generally improving at the game? The following tips should help.
Learn To Comm Effectively
Effective comms are efficient and inform your teammates of potential threats as quickly as possible. Besides calling out specific classes, ie “Spy on our Medic”, you’ll also want to be able to make sensible callouts for specific spots on the map. If you don’t have an accepted shorthand for a certain spot on the map, make sure you use a word that makes sense in context. (ie, ‘bathhouse’ on Lakeside) If all else fails, you can also just made a directional call based on the direction your team is facing when you exit spawn. (ie, “Scout on our left flank”, “Soldier behind us”, etc).
Besides planning strategies and pushes, your callout comms should ideally be 5 words or less and said quickly enough to alert your teammates before they die to whatever you’re warning them about.
Learn Advanced Movement or Other Tech For Your Class
Once you’re comfortable with the game, it’s time to start exploring advanced tech, especially movement tech.
If you’re playing Soldier or Demoman in a competitive context, it’s absolutely vital that you know how to efficiently roll out to fights using your explosive jumping capabilities. Classes without explosive jumps can still work on surfing explosives fired at them via air-strafing (a great technique for Medics and Spies to escape deadly situations), and generally working on moving unpredictably and making intelligent use of the terrain.
For a detailed rundown on movement and movement mechanics, I highly recommend checking out the Comp.TF page on TF2 Movement.
This video was uploaded in 2010, but is still considered the definitive Jumping tutorial. Taught me how to do it!
Don’t Forget To Keep It Fun
Last but not least, don’t forget to keep it fun!
Competitive TF2 is great and, in my opinion, an even better gaming experience than regular old TF2. But it isn’t worth it if you and your teammates aren’t having fun, because it isn’t like you’re going to be making money off of playing this game competitively anytime soon. TF2’s competitive scene is community-run, and while there are some prize pools here and there, the game isn’t a major enough eSport to justify treating it like a job.
Have fun pushing yourself with people who also enjoy pushing themselves, and you’ll have a good time. As soon as it stops being fun, take a step back, go back to regular TF2, even consider switching to a few different classes. Maybe take a break from the game altogether. The worst mistake you can make as a competitive TF2 player is forcing yourself to play when you aren’t having fun.
Getting Into Team Fortress 2: Finding Community Servers
One of the best parts of playing Team Fortress 2 is that you don’t actually have to use the in-game Casual or Competitive Matchmaking to get a game. In fact, matchmaking usually has at least a small degree of cheating bots infesting it. They’re usually easy to kick from a server as they appear, but it’s been a consistent problem for the game ever since the source code leaked a few years ago.
Instead of risking cheaters and enduring long queue times, consider trying out Community Servers. All you need to do is navigate to the Server List and start looking around. I would just recommend setting your Ping Limit to below 100 and checking the following boxes: “Server not full”, “Has users playing”, “Not password protected”.
Following these guidelines and setting whatever other filters you might want (ie, typing jump_ into the map field to see all servers running custom Rocket Jump maps), you should be equipped to find some nice community servers to hang out in. Community servers are great for fostering regulars and faster skill development due to the larger concentration of experienced players— it’s the best part of the game!
Parting Words & Extra Resources
And that’s it! I’m a little winded after writing all that out, but I covered just about everything I could think of with this guide. Except MvM, I guess, but I can sum that up in about two sentences: it’s a PvE game mode that doesn’t really reflect the rest of the game and has a small number of people taking it way too seriously. MvM is best played with friends, don’t bother with randoms.
There we go, that’s about everything you need to know. Have fun jumping in, and feel free to use any of the resources linked below if you want more information about TF2!
- Team Fortress Official Wiki — Officially-owned Wiki with detailed-up-to-date pages on all classes and weapons.
- HUDS.TF — A place where you can get custom HUDs for TF2. All of my videos in this article were recorded using a custom HUD!
- Scrap.TF — Community-run item exchange site with much better rates than in-game crafting or Steam Community Market. Go here if you want to trade toward items in TF2.
- Comp.TF — Community-run Wiki with a focus on competitive TF2 play and advanced mechanics.
- RGL.GG — The current main TF2 competitive league.