

In this article, we’re going to teach you how to optimize Doom Eternal: The Ancient Gods.
We don’t just mean the graphics settings, though you can go ahead and click here to skip to that part if you like. The biggest adjustments are fairly simple to make, fortunately- you’ll be ready to play in no time.
We’re going to help optimize your mindset and fundamental assumptions to have the smoothest-possible learning curve when playing The Ancient Gods. This game is hard, much harder than Doom Eternal, and so this is an important step for making it easier to learn the game.
Table of Contents
Optimizing Gameplay: This Isn’t DOOM 2016 Anymore, But It’s Not Doom Eternal Either
Walking into Doom Eternal, many players were offput by how much it had changed compared to Doom 2016, and felt discouraged from continuing.
While we think that mentality can be overcome with the right approach, those players definitely won’t be happy with the approach taken by The Ancient Gods, which doubles down on Doom Eternal’s weapon-switch-centric design with even more difficult and frantic encounters. For players who adapted to it, though, Eternal offered a huge breath of fresh air to the FPS genre, which was becoming dominated by me-too battle royales and military shooters.
Even those players may not be prepared for what The Ancient Gods has in store.
Make no mistake: this is still very much Doom Eternal, and if you’re excellent at that game you’ll probably be fairly good at this one, too. A lot has changed, though, and some of you may want to be aware of that before hopping into it.
An extended sample clip of the opening arena fight of the game.
1: Doom Eternal’s Mechanics Have Been Applied To 2016’s More Free-Flowing Level Design
The Ancient Gods is divided into three colossal levels, many of which have various branching points for nonlinear paths to the same objectives. The first level, UAC Atlantica, immediately displays this by dropping you onto an oil rig with multiple paths to multiple encounters right away. The closest level in the main game to this design is Super Gore Nest.
The Eternal structure of 10 set enemy encounters isn’t here anymore- there are a lot more surprise encounters during traversal sections here than there were during Eternal. There’s even a few Marauder ambushes!
2: 2016’s Level Design Changes How You Manage Resources & Approach Fights Compared To Doom Eternal
Individual combat arenas tend to be smaller than the ones in Eternal and closer to the design of 2016, including a much higher density of ammo pickups. This means that the game doesn’t have to be quite as chainsaw-heavy as it used to be (especially since you start with all of your fully-upgraded weapons, sans Crucible, from the endgame of Eternal), and due to the higher concentration of problematic Heavy enemies (like Cyber Mancubus), the tactic of stockpiling Chainsaw ammo for a free kill has once more returned to prominence.
Playing the regular Eternal way of simply using the free chainsaw 1-pip recharges is still valid, of course- and probably better if you have the right mastery of the other mechanics at your disposal, like grenades and Blood Punch.
A quick demonstration of grenades/other methods to stagger enemies and Blood Punch being used to destroy weakpoints.
3: The Difficulty Has Skyrocketed- So Listen To What The Game Is Trying To Tell You When You Die
Many people peg frustration down to simple salt or lack of skill, but in most cases gamers only become frustrated when they haven’t been given the right tools to succeed or properly taught how to use them.
The Ancient Gods gives you everything you need to do well, but you must play it like The Ancient Gods, which means constantly weapon switching, targeting weak points, and using your full arsenal (Flame Belch and grenades included!). Trying to stick to only one weapon or tactic (and especially only one position) will ensure you have a very bad time in this game- so when you die, listen!
The fundamental assumption of Doom games is that you want to be challenged and you want to excel in response to those challenges. With Eternal and The Ancient Gods, that assumption has been stretched to include fast weapon switching and weak-point targeting, making a far easier game for open-minded gamers with quick reflexes but a much harder one for stubborn gamers. Just because it works in other shooters doesn’t mean it’ll work here- so listen to the game!
4: Remember: It’s Okay To Take Breaks or Lower Difficulty! No One Is Watching!
Last but not least, don’t be afraid to turn down the difficulty. Having an ego can help in some situations, but games are supposed to be fun, and you will improve the most when you’ve found the right balance between challenge and resistance. Lowering the difficulty to find that point is completely fine- and if you feel like it’s too easy, you can always turn it back up to Nightmare/Ultra-Nightmare and tackle it that way!
It’s your game. Play it your way, and don’t let petty ego get in the way. No one is watching.
Extra Tip: Recommended Weapon Mods & Runes
While you’ll often find yourself needing to switch weapons, Mods and Runes don’t generally need to be switched- especially if you’re comfortable enough with rapid weapon switching and have the right Mods selected in the first place.
Here are our recommendations for (default) weapon mods- feel free to switch when necessary, but try to keep your weapons on these mods for the most utility!
- Shotgun – Sticky Bombs for both easily destroying enemy weak points (esp Cacodemons) and easily generating large masses of armor when used with Flame Belch. May want to switch to Auto Shotgun later in the game for larger enemy waves/enemies with increased resistance to Plasma and etc. Nevertheless, Sticky Bombs are more universally-applicable.
- Heavy Cannon – Precision Bolt for destroying enemy weak points, especially for Heavy Demons like the Arachnotron and Mancubus.
- Plasma Rifle – Microwave Beam, due to the higher concentration of Heavy/Super Heavy demons. Microwave Beam gives you a visible health meter and will briefly stun all enemies, regardless of weight class. (You don’t have to hold it until it kills- it’s best used for just a moment mid-combo). It’s also a necessary tool for killing enemies introduced later in the DLC- needing to switch this mod too often could be a problem.
An example of the Microwave Beam’s utility for both checking enemy health and stalling Heavy Demons. Note that the Blood Punch nearly killed this demon on its own!
- Rocket Launcher – Lock-On Burst, due to the higher concentration of Heavy/Super Heavy demons. Efficient killing options are a must-have in The Ancient Gods, and Lock-On Burst is one of the best.
- Super Shotgun (No Mods, Already The Perfect Weapon)
- Ballista – Arbalest, for killing the higher concentration of Aerial Heavies (Cacodemons, Pain Elements, & Others) as well as Heavies/Super Heavies in general. Destroyer Blades can serve as a BFG-lite in a pinch, but when you’re playing at the level this game expects of you, you don’t really need it.
- Chaingun – Energy Shield, for improved survivability against Super Heavies. Mobile Turret adds an overheating limitation and doesn’t actually do that much more damage- meanwhile, a shield offers obvious value in what is effectively a super-hard postgame campaign.
- BFG or Unmakyr? – If you’re confident in your ammo management, Unmakyr is great for focusing down Super Heavy demons, whereas BFG is mainly a quick wave-clear tool with very limited resupply.
Our recommendations for Runes are, in order of preference:
Our selection of starting (Base) Runes. Later in the game, you will also unlock Support Runes- and we’ll leave those up to you.
Feel free to experiment with these runes according to your playstyle, by the way- even if we don’t think they’re particularly meta, that doesn’t mean you might not like them!
- Air Control – The most important. You’ll really need to work on your movement and evasiveness to make it through Ancient Gods, and Air Control provides a vital leg up in this area.
- Blood Fueled – Offers a speed boost for a speedy escape after a Glory Kill. While you are invulnerable during a Glory Kill, enemies will still close the distance during the animation. This lets you compensate for that.
- Equipment Fiend – Rapid-recharging Flame Belch and grenades will give you much more armor to work with and area control, provided you can keep track of them.
- Punch & Reave – Essentially turns Blood Punch into an instant Glory Kill, so long as it’s used on a sufficiently large group of light enemies/sufficiently weakened Heavy enemies. Having regular Glory Kills are probably better for most players, though- read the Savagery entry to get our input.
- Chrono Strike – Best used with Precision Bolt for rapid destruction of weak points or even Super Shotgun for a great slow-motion movement option. Somewhat reduced in utility by the Ballista, though.
- Savagery – As nice as faster Glory Kills may sound on paper, Glory Kill animations provide a key purpose in gameplay: giving you a moment to catch your breath and check your cooldowns. For most players, this is actually worse! Plus, Punch & Reave is better if you just want health back more quickly.
- Dazed and Confused – Keeps enemies in the dazed Glory Kill state for much longer. Limited utility due to the state’s already-long window and the fact that enemies can still be fairly quickly killed after leaving the dazed state.
- Seek & Destroy – Allows for Glory Kills to be initiated from a longer distance. Considering Dash’s constantly-recharging nature and the much wider utility of other movement options, this one is fairly unnecessary at best.
- Saving Throw – Outside of Ultra Nightmare, this is essentially an ego-saving tool and little else. There are no penalties for dying in Eternal, and chances are that if you died you were the one at fault. Accept the L. Do use this in Ultra-Nightmare, though!
Extra Tip: Rebind Your Controls For Fast Weapon Switching (And Use Mouse Buttons If You Have Them)!
A particularly vital tip for The Ancient Gods, especially for tackling higher difficulties, is fast weapon switching. You want to take down those weak points fast and keep that DPS high, right? Fast Weapon Switching is critical.
On PC, you can rebind your weapons to any key you want in Game Settings -> Controls, but you’ll mainly want to keep them around your WASD. (We recommend keeping the first 3-4 weapons on their default slots and rebind the rest to keys like Q, E, R, Z, X, C, Shift, and CTRL. You may also have mouse buttons you can use for the same purpose, and you can even use your mouse wheel!
On PC, what matters is rebinding your keys so that any weapon can be reached with ease at any time. Quake Vets may have a preference for Rocket Launcher on Q and Ballista on R, for instance. Make sure that all binds on keyboard and mouse can be reached without moving your hand from moving/aiming!
If you have 2 extra mouse buttons, we recommend binding one of them to firing your grenade and the other to changing grenade type- this allows you to launch grenades while still firing other weapons and using your movement keys!
On console, you can tap R1/RB to toggle current and previous weapon, as well as hold it to trigger the weapon wheel. Enabling the Fast Weapon Wheel option allows you to skip the time-slow weapon wheel, but whether you’ll want to do this will depend on personal preference.
Extra Tip: HUD Feels Too Intrusive? Turn Some (or All) of It Off!
Especially for players who liked the more exploratory nature of Doom 2016, the HUD of Doom Eternal can feel excessive to deal with at times. If you want to up your immersion without compromising your ability to track cooldowns, we recommend setting the “Combat” HUD preset found in Game Settings -> UI and tweaking individual options from there.
Extra Tip: Exploit Weapon Wheel Time-Freeze For Style or Evasion!
Even if you have quick-switch set up on PC, setting aside an extra bind for the weapon wheel (which slows down time) can be useful for briefly slowing down time as long as the button is held. You’re still able to move during this time-freeze, so you can use this to easily dodge a dense-looking wall of projectiles in a stylish manner.
Additionally, you can use this window to evaluate the ammunition available in each of your weapons without needing to switch them- a useful ability that is somewhat lost when switching to a quick-switch-only playstyle.
A quicker arena run showing off a switching-heavy playstyle.
Optimizing Graphics/Performance (PC Only): What To Change & What To Leave Alone
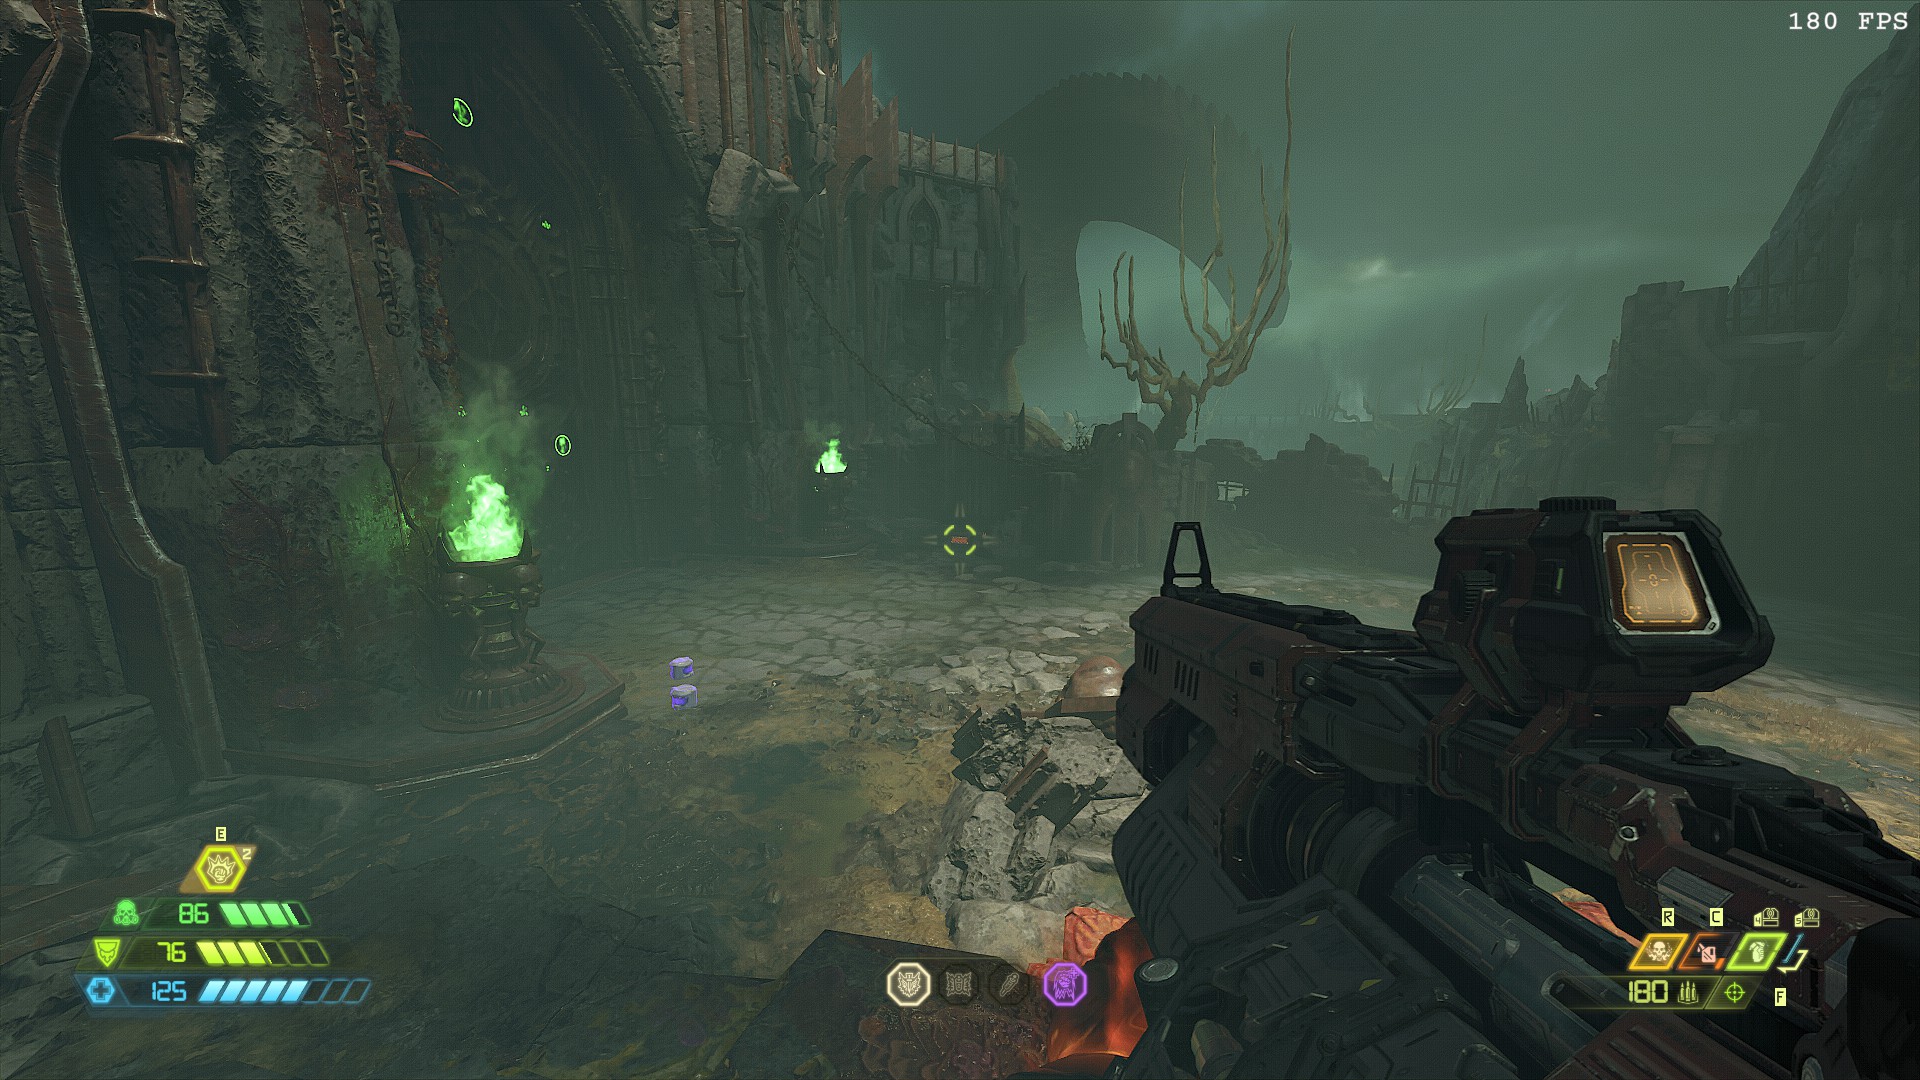
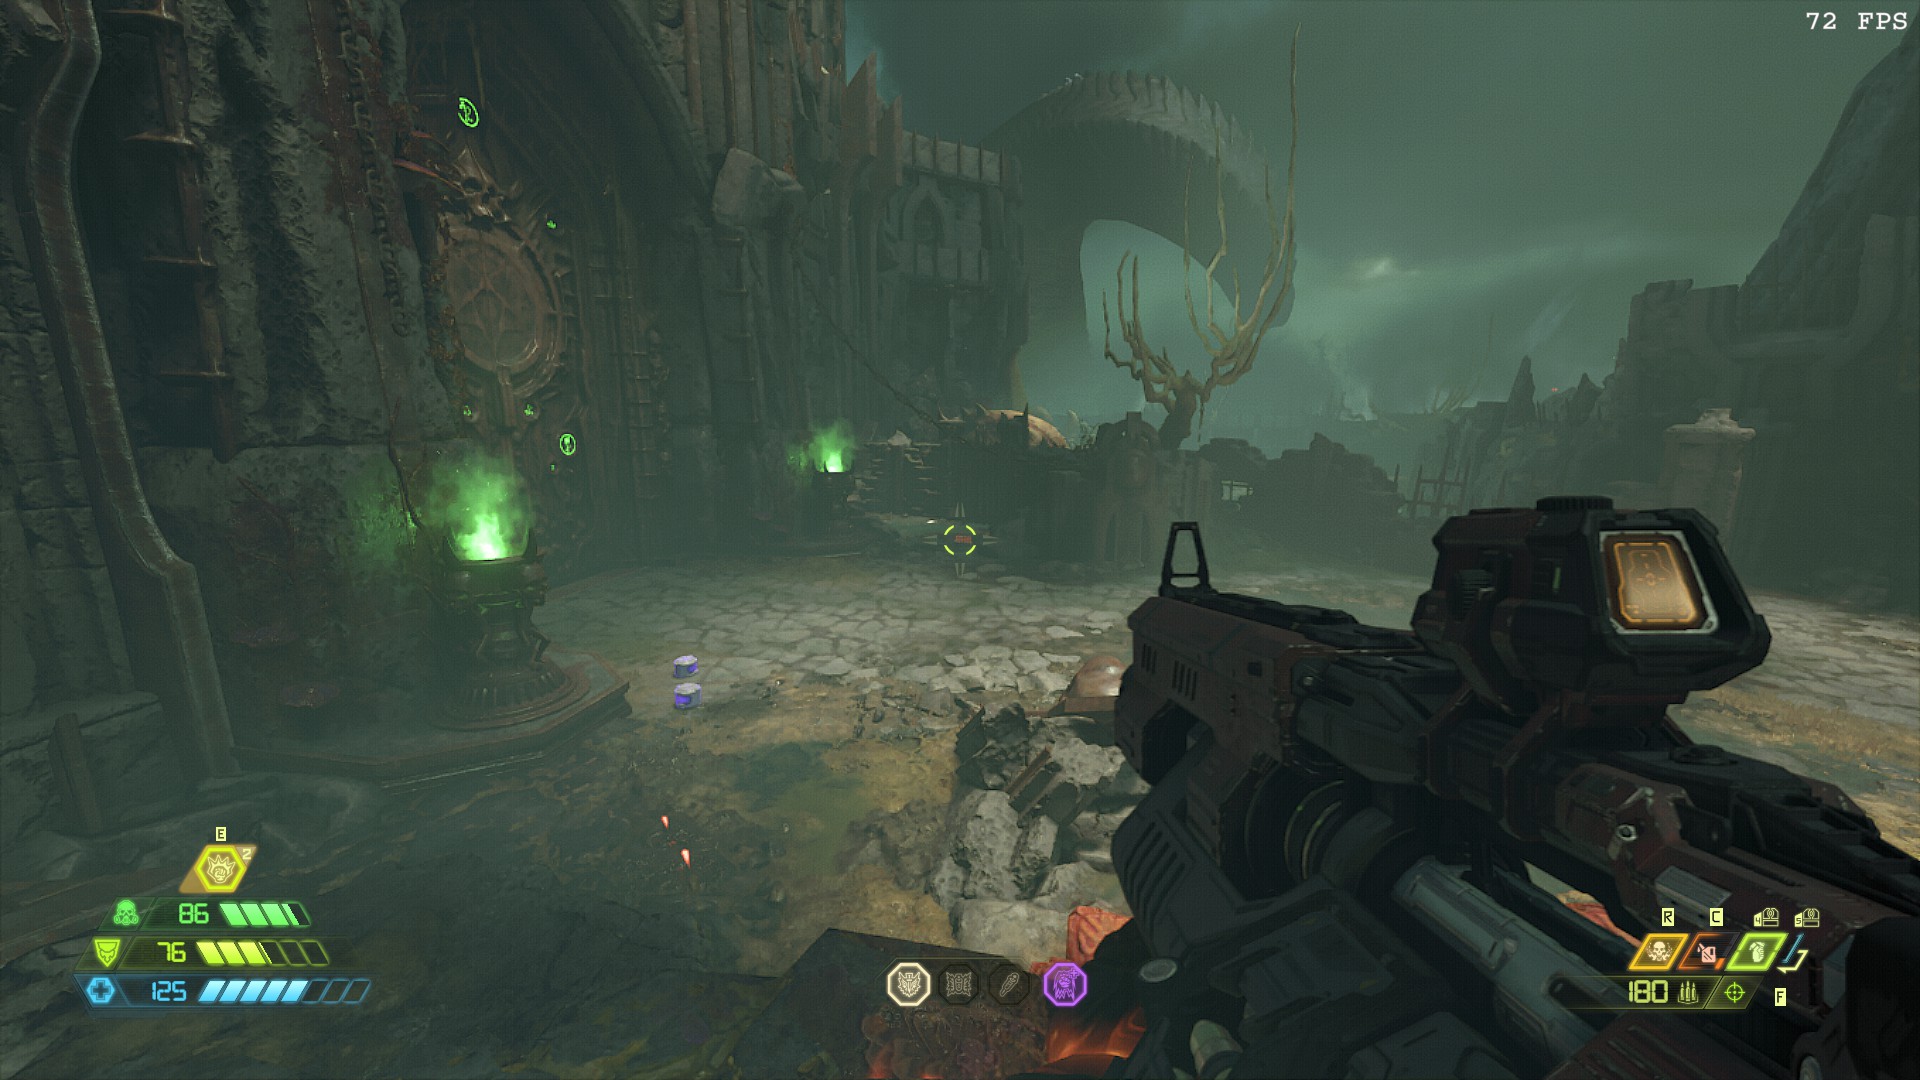
Low preset on an RX 5600 XT @ 1080p, hitting 180 FPS avg in a mid-DLC area. Combat doesn’t tend to dip FPS too much, making these settings actually a little overkill for 1080p144Hz with the 5600 XT.
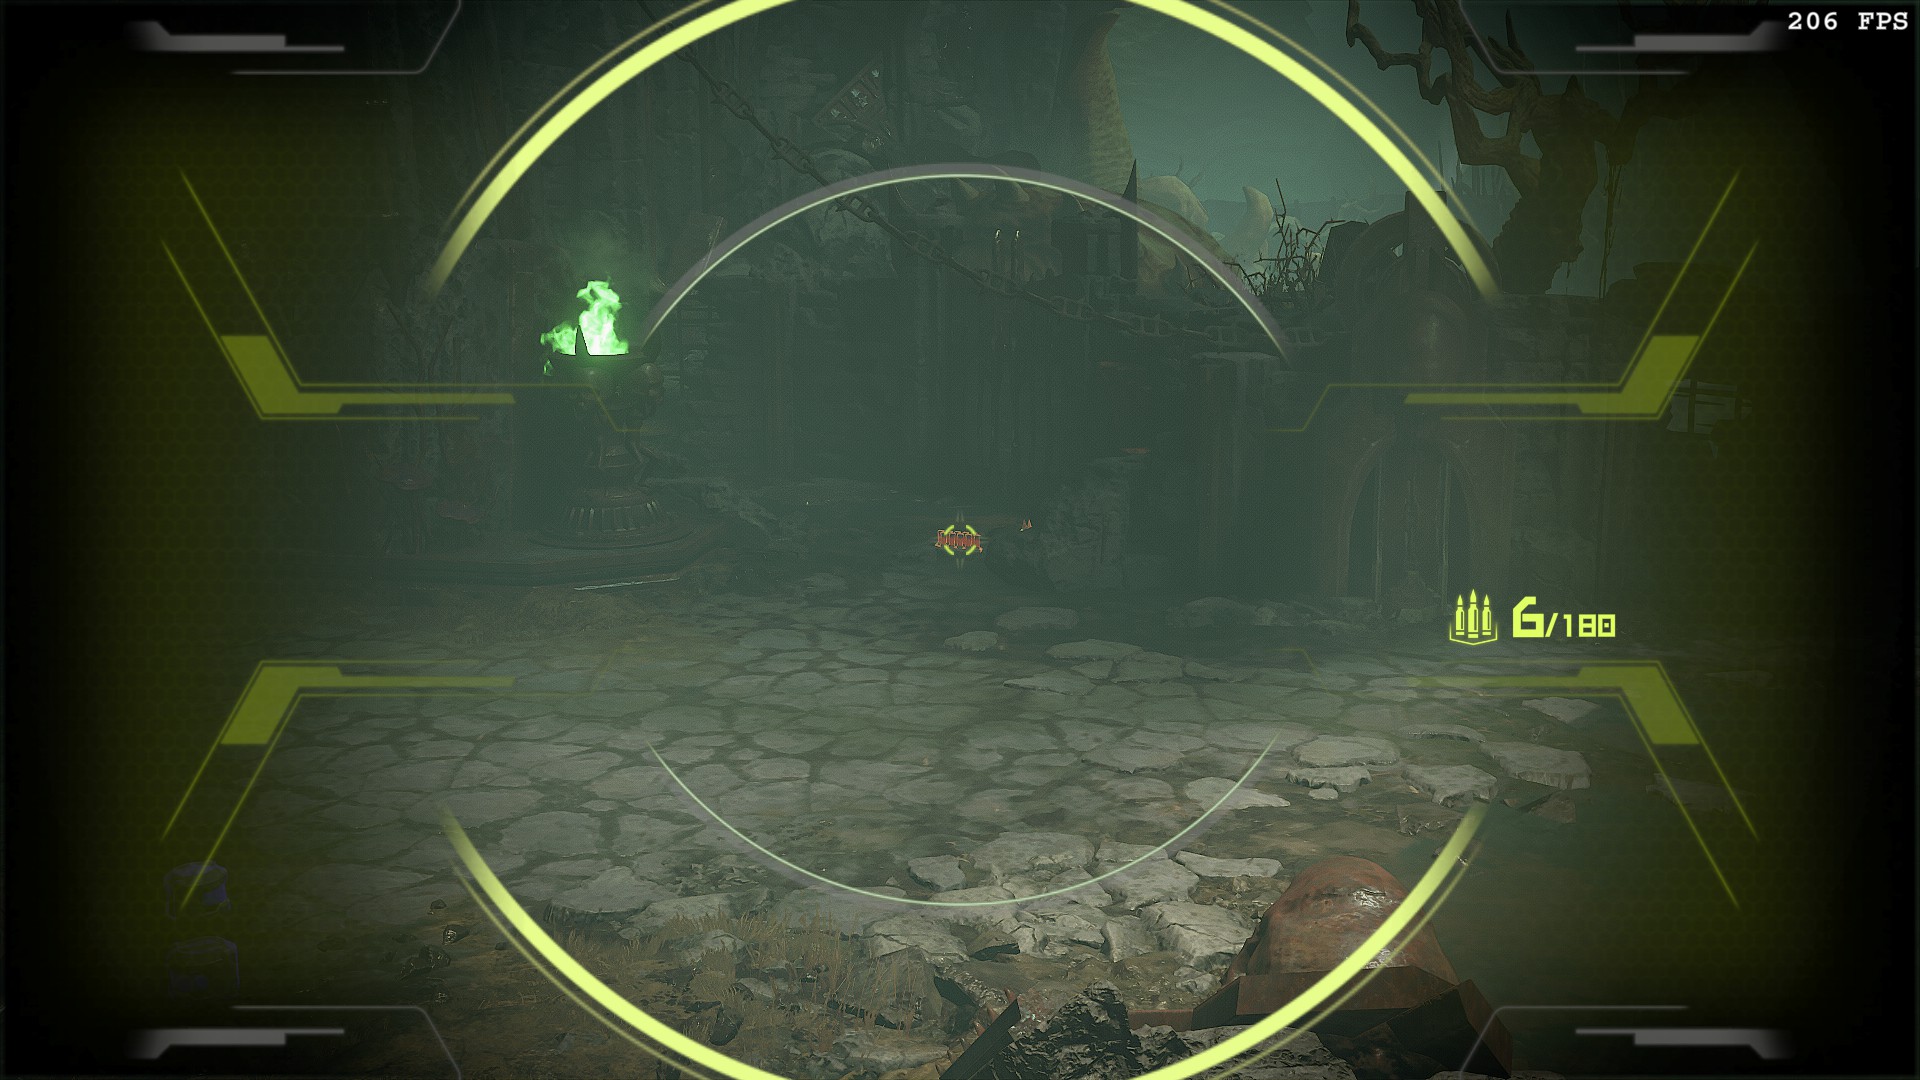
Scope further increases average to ~205 due to narrow FOV/less GPU stress, but this isn’t going to make a major difference in real gameplay and isn’t indicative of the average performance you can expect.
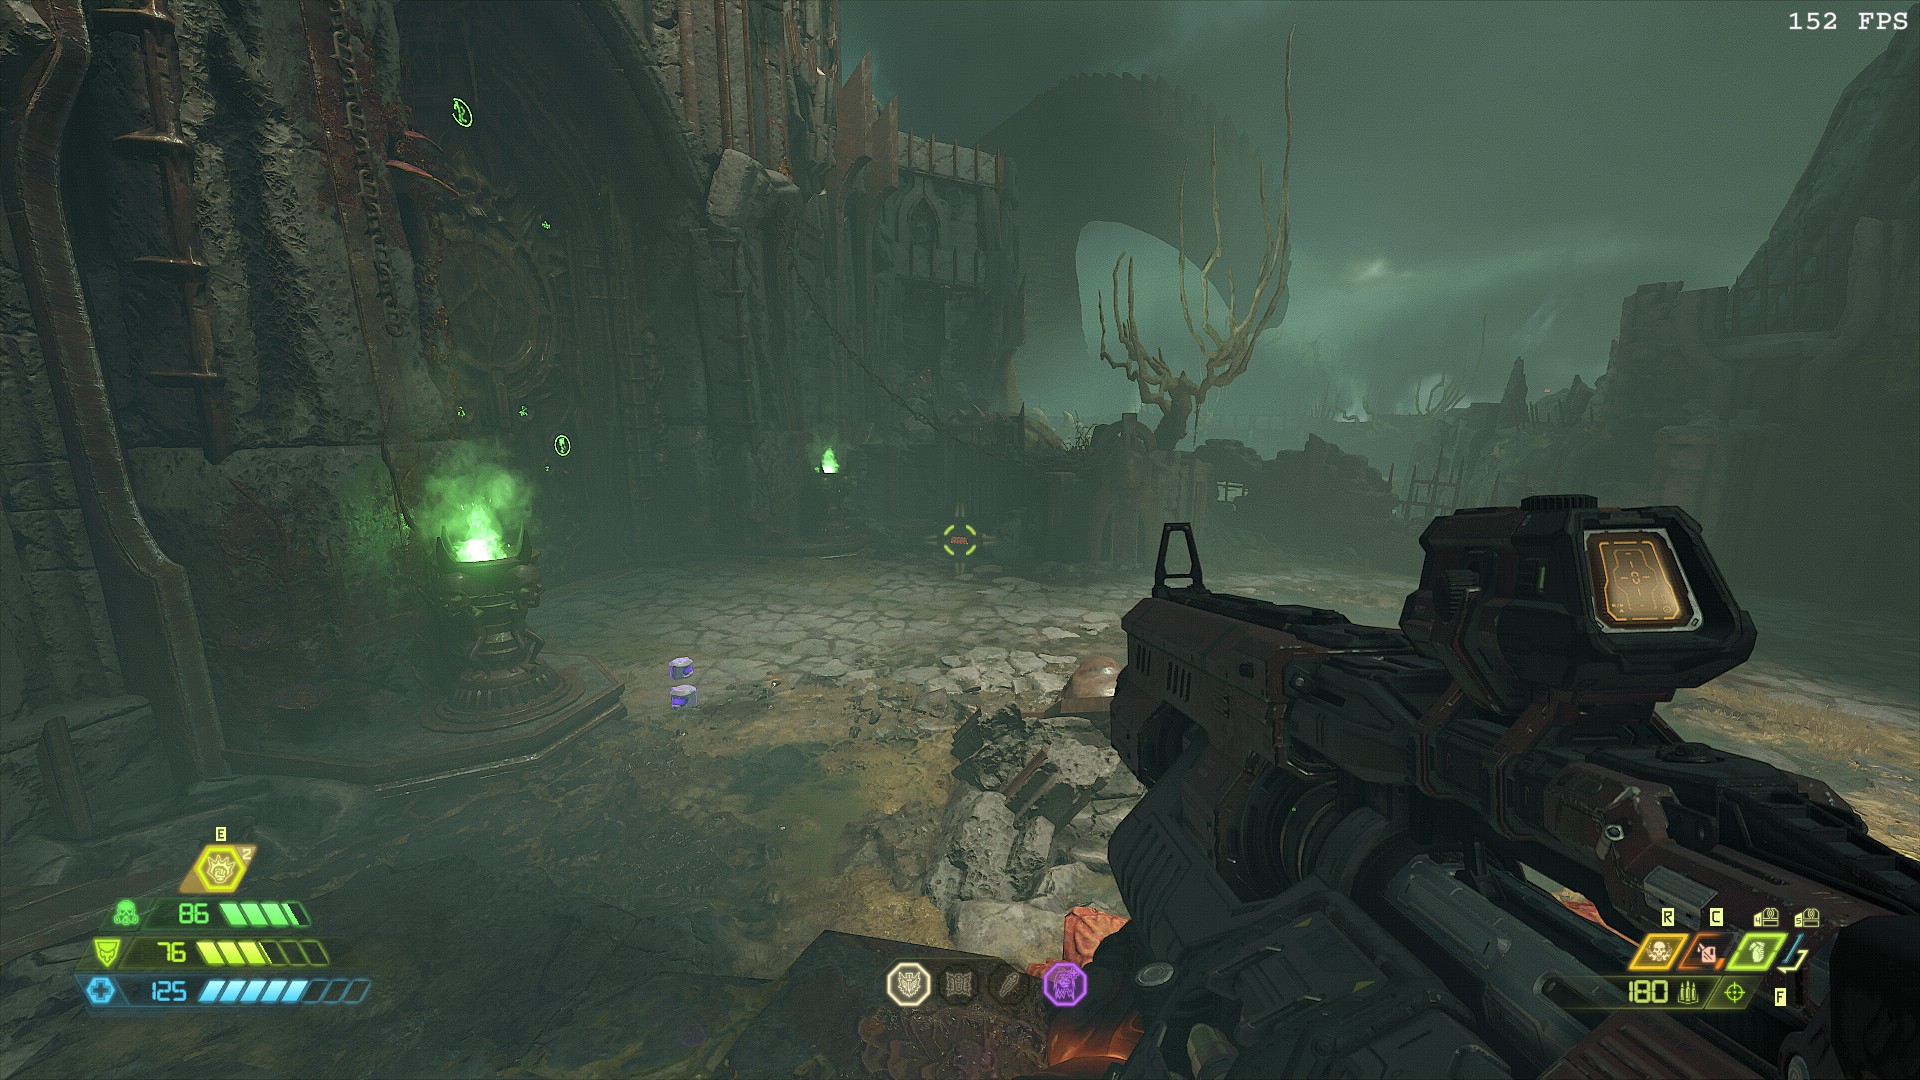
Medium preset in the same area- average FPS has gone from 180 to 150 at 1080p. This is ideal for targeting a near-locked 144 FPS with an RX 5600 XT.
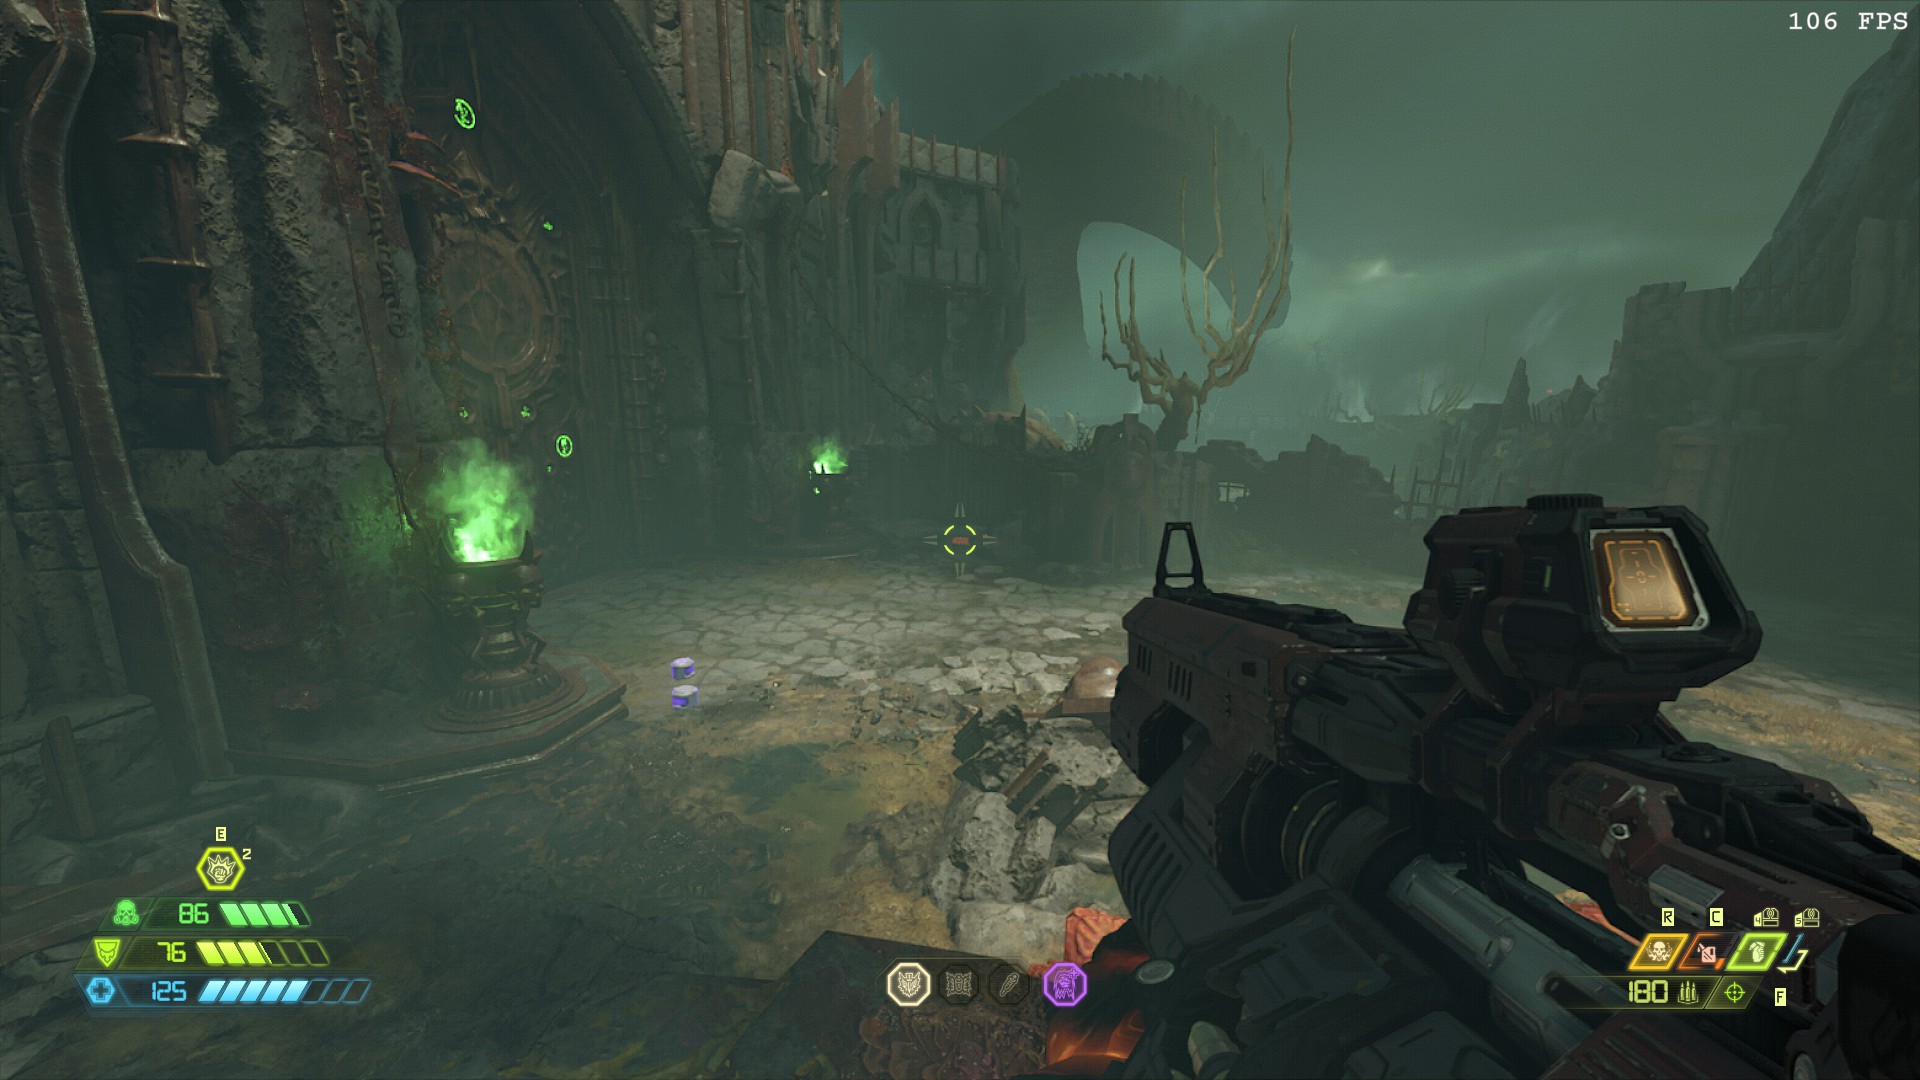
High preset in the same area- average FPS has gone from 150 to 105 at 1080p. Some DRS with a 100/105 FPS minimum will perform quite well on an RX 5600 XT in this scenario.

Ultra preset in the same area- average FPS has gone from 105 to 75 at 1080p. Still playable, but not so much for high-refresh rate experiences.
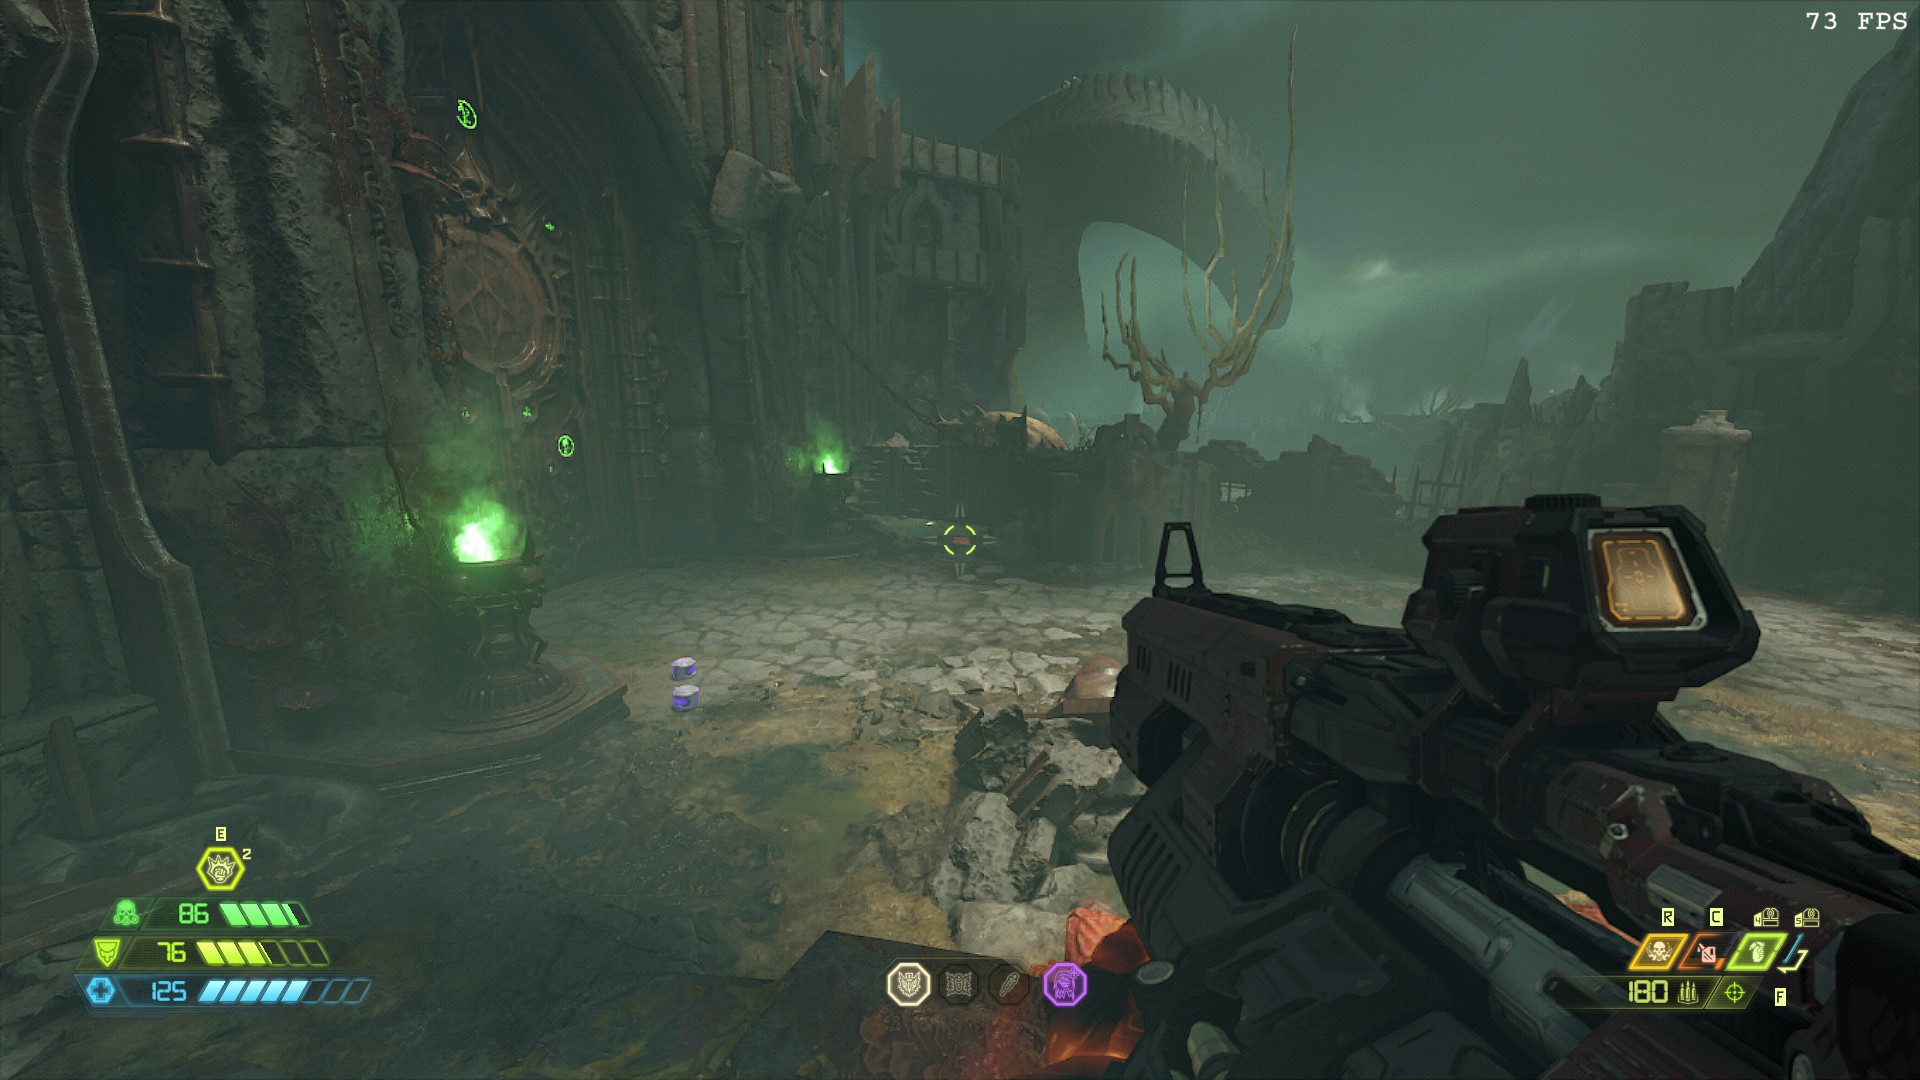
Nightmare preset in the same area- average FPS has gone from 75 to 73 at 1080p. Almost no performance or visual change compared to Ultra.
Ultra Nightmare preset in the same area- average FPS has gone from 73 to 72 at 1080p. Almost no performance or visual change compared to Nightmare.
As anyone that’s experimented with the original Doom Eternal’s graphics settings knows, the difference between the highest and lowest settings are minimal at best. There are only minor performance gains and visual changes from the highest to lowest configuration of most graphics settings in this game, barring a few exceptions.
The biggest visual and performance differences start around the High preset- past that, FPS begins to dip for very little perceivable change in quality.
Before starting with the main settings you should be optimizing, go ahead and choose a Preset for us to work from. We recommend Low or High as a starting point.
Adjust Texture Pool Size To Your Available VRAM
The first setting to change is Texture Pool Size. You’ll see a visible Available VRAM meter at the top of your screen when changing graphics settings- simply adjust this setting until your VRAM is being used, then hit save.

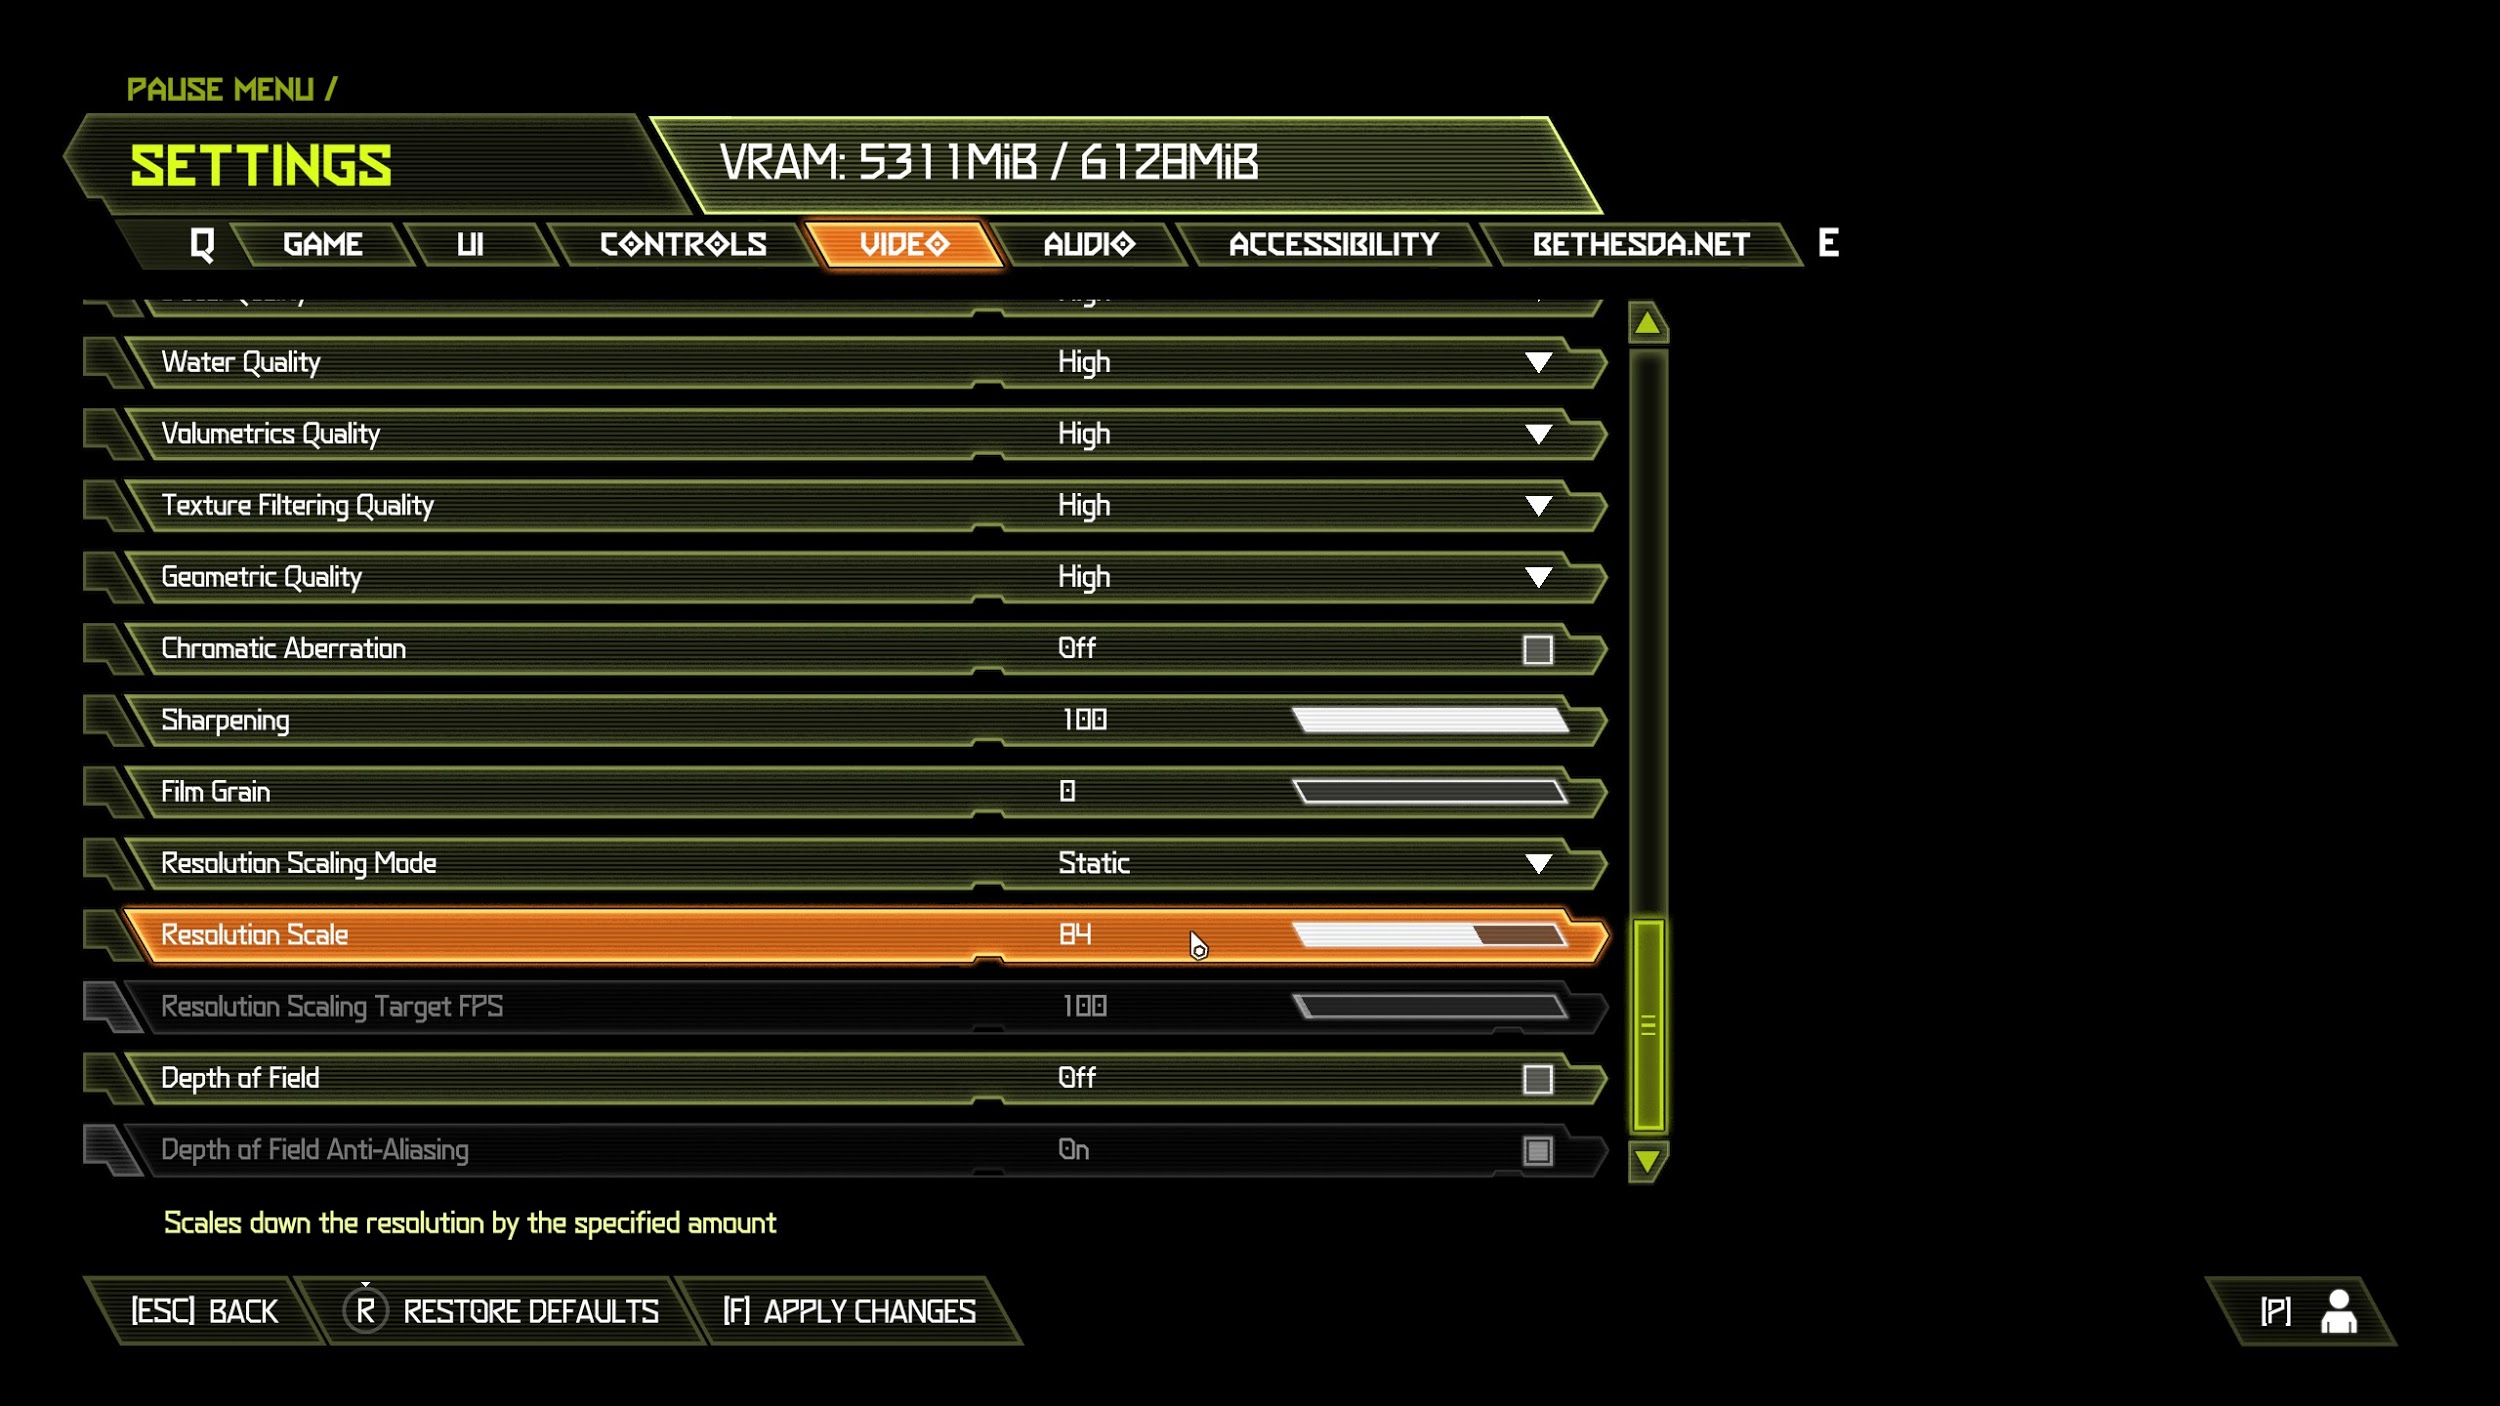
Now, scroll past all the other stuff (disabling whatever you like- ie depth of field and motion blur often aren’t popular) and get down to the Resolution Scaling section.
Most Important Settings: Resolution Scaling & Target FPS
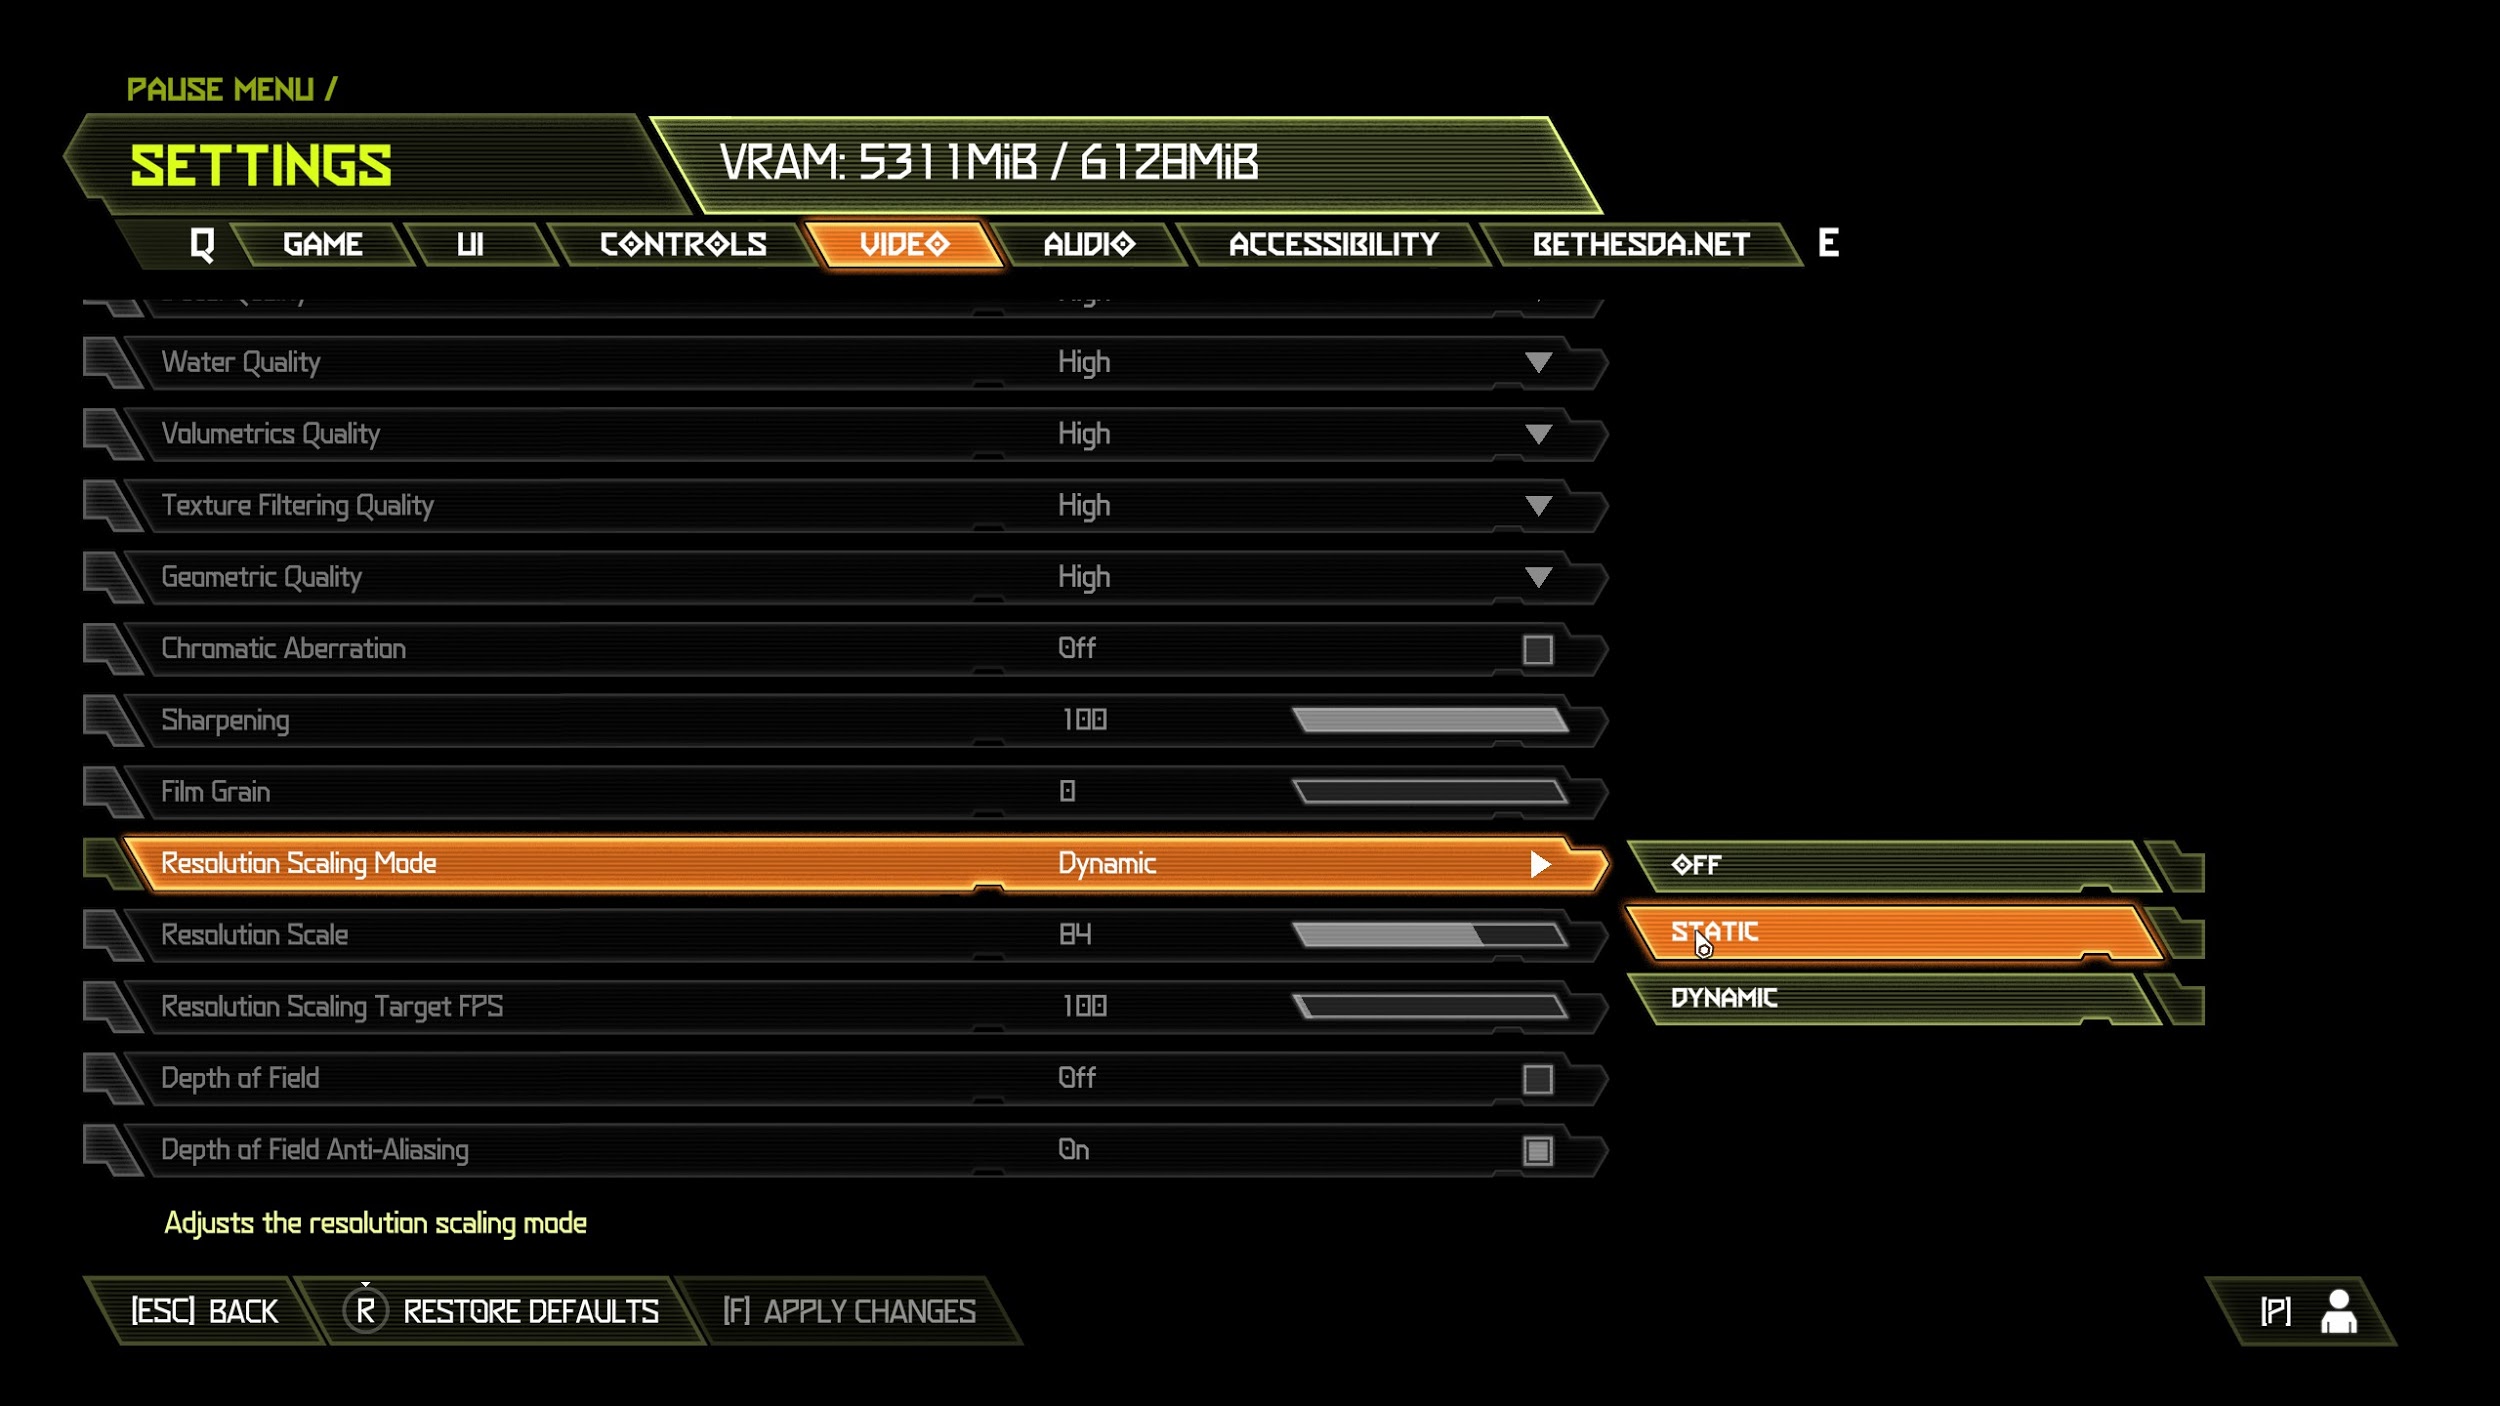
You have two options for resolution scaling in Doom Eternal: dynamic resolution scaling (DRS) that downscales in-game resolution when a certain target framerate would otherwise be lost, and static resolution scaling (SRS), which keeps a fixed percentage resolution scale at all times. Both of these resolution scaling settings are preferable to actually playing at a sub-native resolution, especially since your UI and HUD will remain at native resolution.
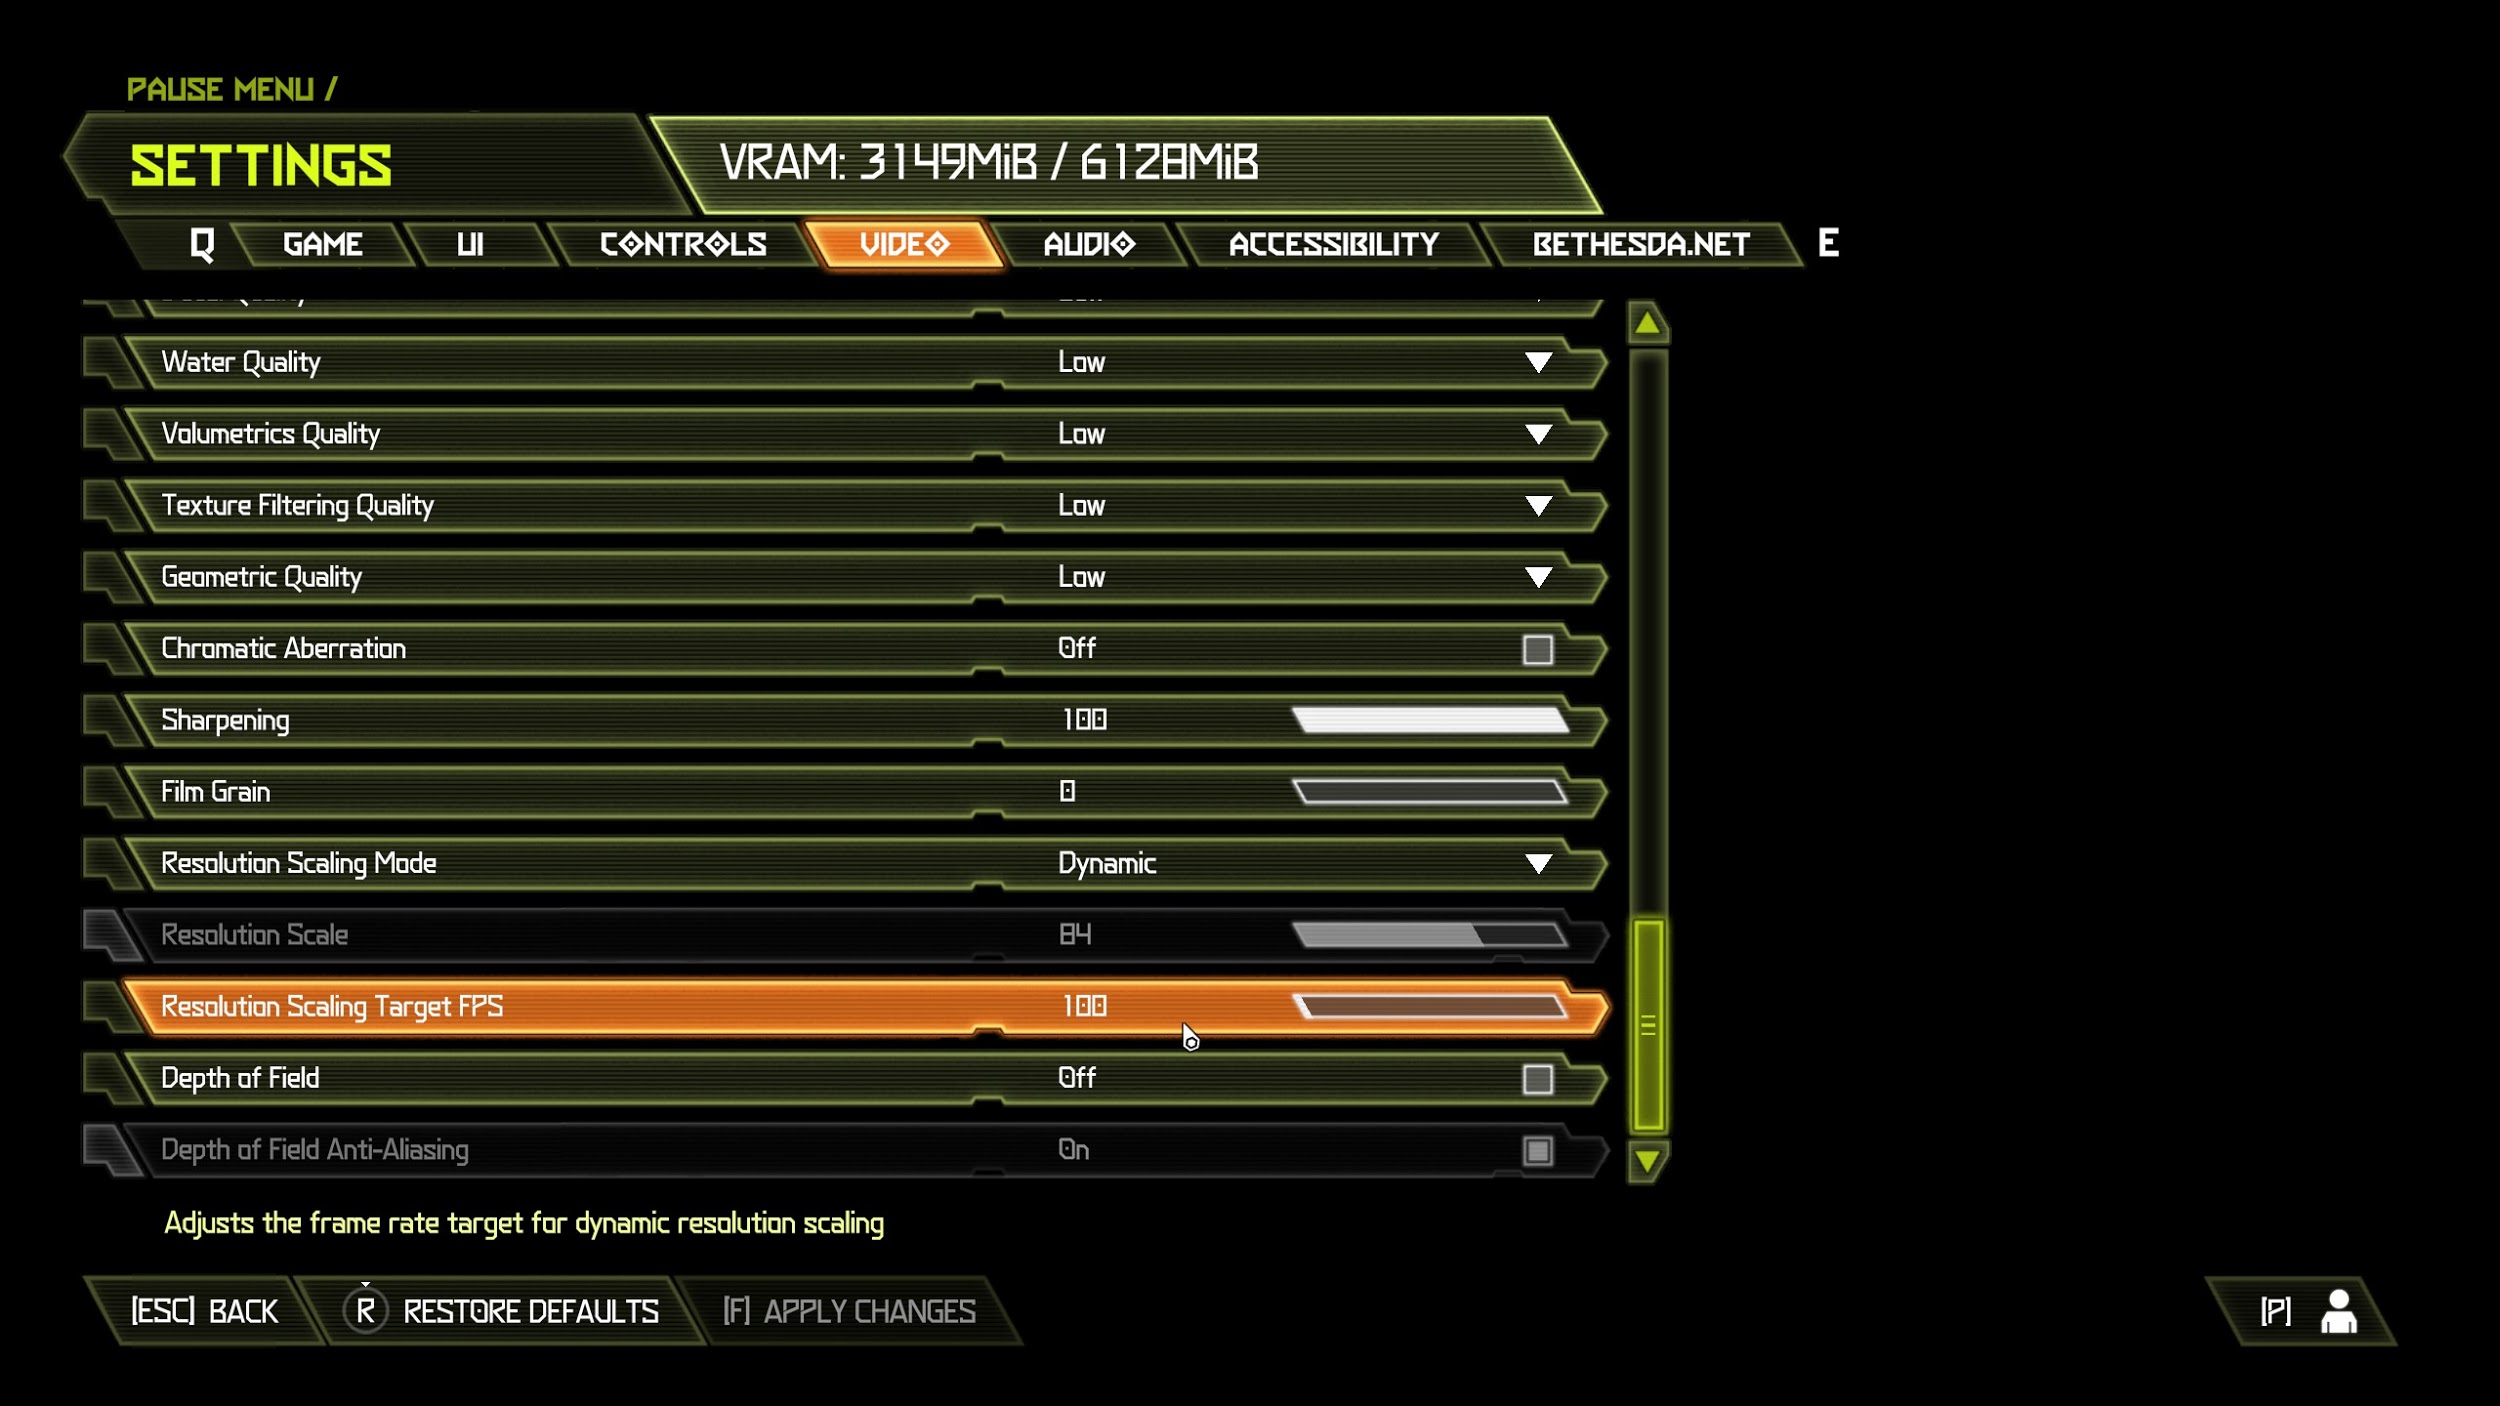
If you’re struggling to meet 60 FPS, we recommend turning all settings to Low and setting DRS to a 60 FPS target framerate.
If you want to target 100, 120, 144, or any other high FPS number and you have capable hardware, we recommend using DRS and setting the target framerate to at least 100/120 or one matching your refresh rate. Adjust presets as low as is necessary to keep this FPS number, if hyper-smoothness is the experience you’re chasing.
If you want to exceed 60 FPS and you have capable hardware, we recommend using SRS but going no lower than 70% resolution scale. On a 24-inch 1080p or 27-inch 1440p monitor, this should still keep your image looking fairly sharp and clean while providing a fair bump to performance.
Other Settings
Everything else essentially comes down to personal preference and hardware performance. We’ve linked a dedicated per-setting graphics optimization guide from Game Debate in Extra Resources below, but it doesn’t tell you anything we haven’t already told you- most Eternal settings simply don’t change much, and keeping them on Low will generally be the best option if you’re aiming for the smoothest possible experience.