
 do in PC Games?")
What does anti-aliasing do for your games, why does it seem to have such a high performance cost, and what’s with all the different versions of the technology running around? In this article, I’m gonna try and break all that down for you, including plenty of real-world examples of anti-aliasing techniques across various games.
Let’s get into it.
Table of Contents
What is Aliasing?
First up, think of “aliasing” as the presence of unwanted jagged edges and breakdown of fine detail at long distances in video games. The most common culprits of aliasing include things like distant staircases, power lines, and especially fencing. Aliasing manifests as a direct result of the source image being too low-resolution to properly reproduce fine details like this, and oftentimes it will be present even when running at full, native resolution, especially on 1080p, 720p, and other common display resolutions.
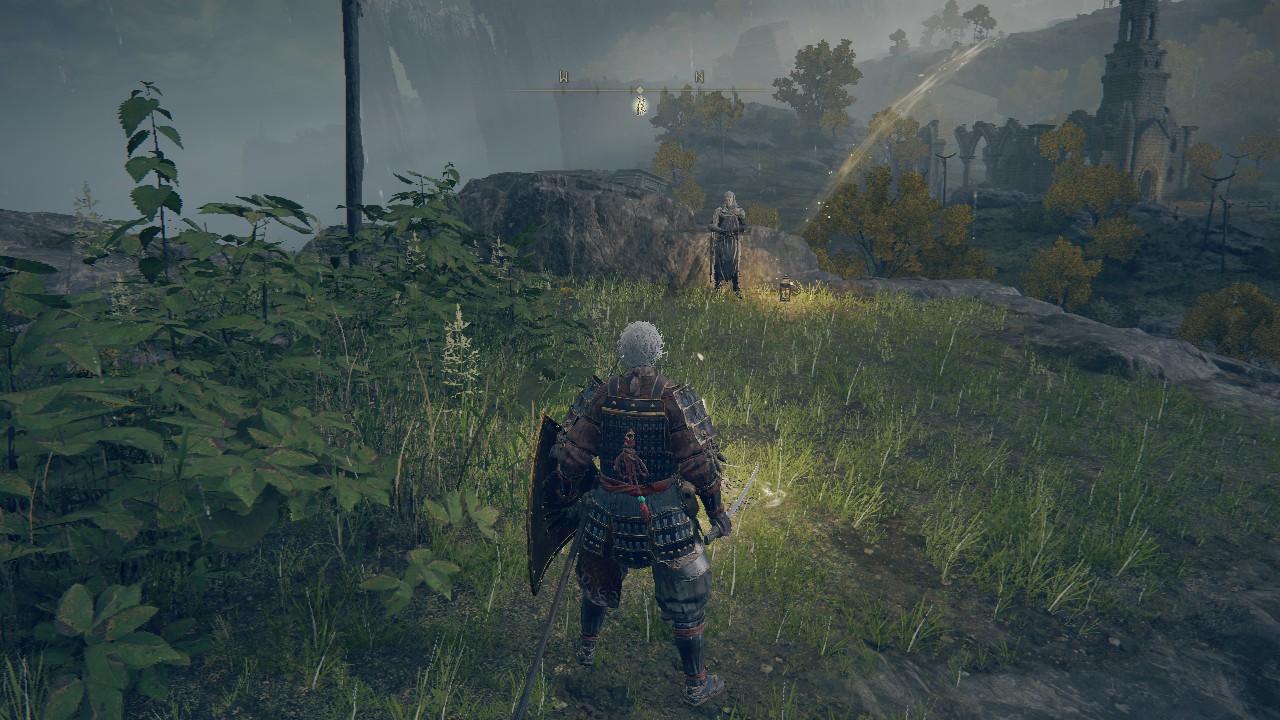
A screenshot of Elden Ring running at 720p without anti-aliasing enabled. Notice the rough, pixelated look of the image, especially where foliage and hair are present.
As games increase in raw fidelity, aliasing can become a lot more noticeable in places where it wasn’t before, including on particularly detailed surfaces and foliage. Older, more polygonal titles aren’t as prone to visible aliasing as a game made with today’s detail density.
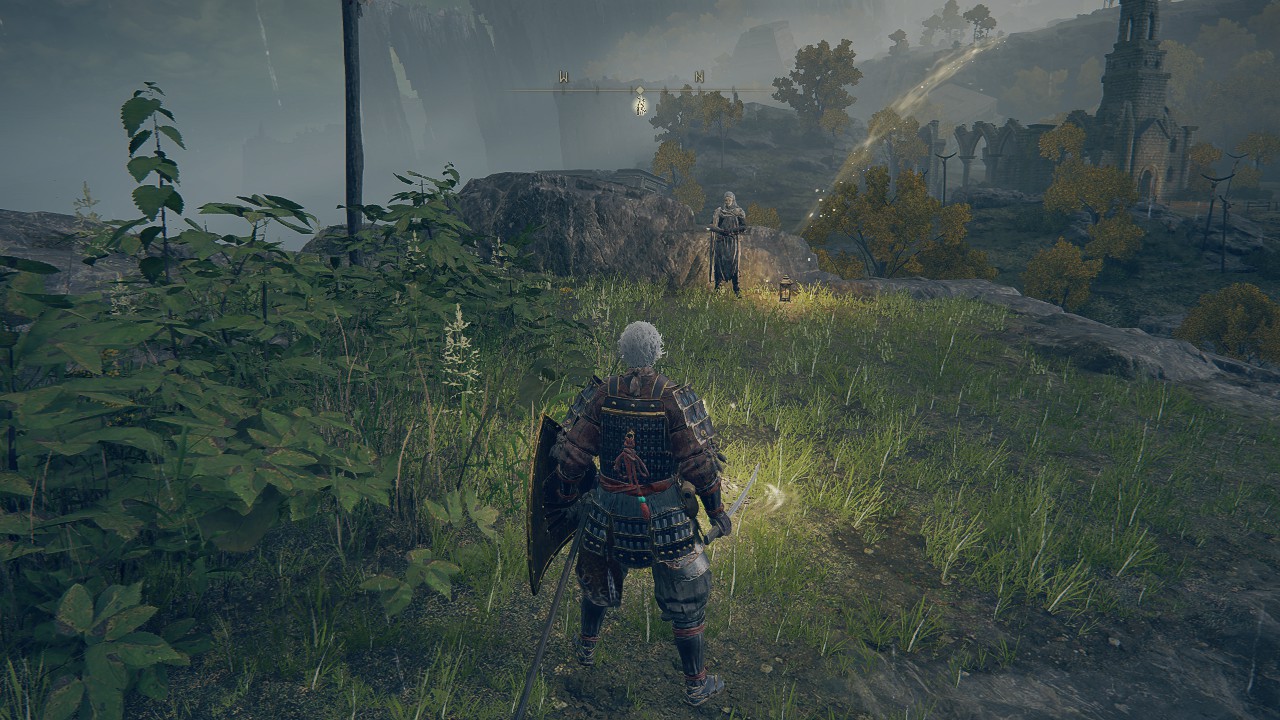
A screenshot of Elden Ring running at 720p with anti-aliasing set to “High”. While some aliasing is still present, the image as a whole is made much cleaner by the addition of AA- especially in motion.
The main reason aliasing happens at all is because ultimately, your final in-game resolution is an assembly of a bunch of squares (pixels) slapped together in order to mimic a true-to-life image as closely as possible. This inherently-geometric manner of rendering results in inherently-geometric artifacts, like visible “stairstepping” on finer details and an appearance of “shimmering” when in motion.
How Anti-Aliasing Works

So, how does anti-aliasing work?
The goal of anti-aliasing is to remove as much noticeable shimmer, especially from defined edges, as possible. The method through which this is achieved varies though.
Sample-based anti-aliasing like MSAA or SSAA works by taking samples from parts or all of the current image, and rendering them at a higher, more accurate resolution before sending them to the display. These functionalities have to be built into the renderer, and aren’t compatible with the deferred rendering-based engines that have become common in many modern games.
Meanwhile, post-processing-based AA like FXAA or TAA work using…well, post-processing. To hyper-simplify it, this means that post-processing-based AA can be more easily implemented as the final step of a rendering process before the image is shown to the end user.
Since these techniques don’t require any part of the image to be rendered at a higher resolution before being scaled to the current display, these techniques also come with a much lower performance cost when compared to sampling-based techniques like MSAA.
How Anti-Aliasing Relates To Resolution
Aliasing is a pretty direct result of low resolution, and the “simplest” way to eliminate it is through the use of supersampling, which means rendering the entire image at a higher resolution than is actually displayed. This means that a lot of fine details that would otherwise be lost or become indecipherable if rendered wholly at the lower resolution can be preserved.
Unfortunately, straight-up supersampling is pretty performance-intensive, and often not a viable solution in today’s era of games with very demanding graphical requirements. The reason why is pretty simple if you do the math: rendering an image at twice the resolution will naturally result in half the performance.
Because of that, a fairly wide variety of anti-aliasing techniques have come to exist on the market today. There are also other image scaling solutions that exist to reduce the reliance on raw pixel count that’s become common in modern gaming machines, which I’ll discuss below.
How Anti-Aliasing Relates To FSR, NIS, and DLSS
It’d be a pretty bold move for me to completely ignore technologies like AMD FSR, Nvidia Image Scaling, and Nvidia’s Deep Learning Super Sampling in this article all about anti-aliasing. All of these technologies function by taking a lower resolution source image and scaling it to a higher final resolution on the display, aiming to imitate or surpass native image quality while costing much less performance overall.
I’ll be focusing mostly on regular anti-aliasing techniques in this article, but if you end up using any of these technologies in your games, adding anti-aliasing is usually a pretty safe way to further improve upon image quality. Check out my article on What Are FSR and DLSS if you want more information on these technologies specifically.
Anti-Aliasing Examples
MSAA: Multi-Sample Anti-Aliasing
So first up, let’s talk about the most well-known form of anti-aliasing: multi-sample anti-aliasing. Like SSAA, MSAA works by taking multiple high-resolution “samples” before presenting a lower-resolution but sharper final image. However, MSAA mostly only does this around noticeable edges, rather than the entire image.
This means that while MSAA comes with a significant performance cost, it is not NEARLY as costly as SSAA, also known as supersampling, is. I’ve embedded a few screenshots showing MSAA in action just below.
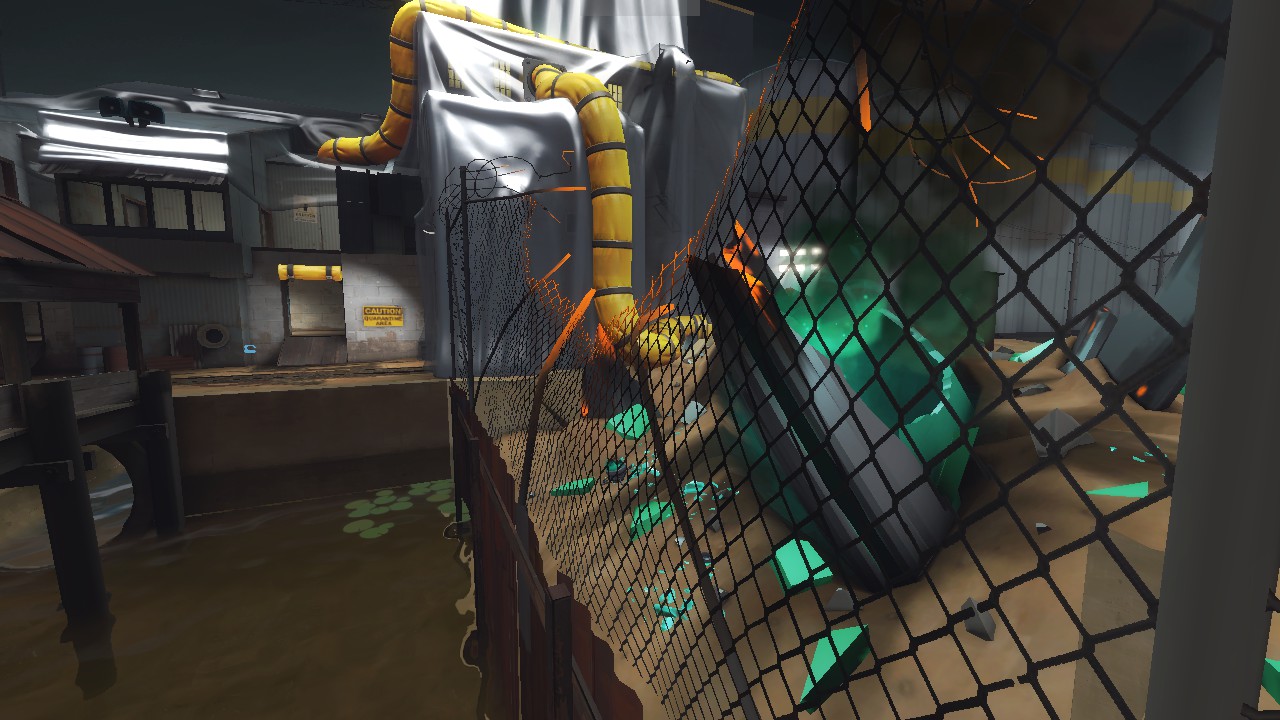
A screenshot of Team Fortress 2 running at 720p without anti-aliasing enabled. Notice how the fencing farther from the camera becomes much harder to discern, especially as it bends and distorts at the point of impact.
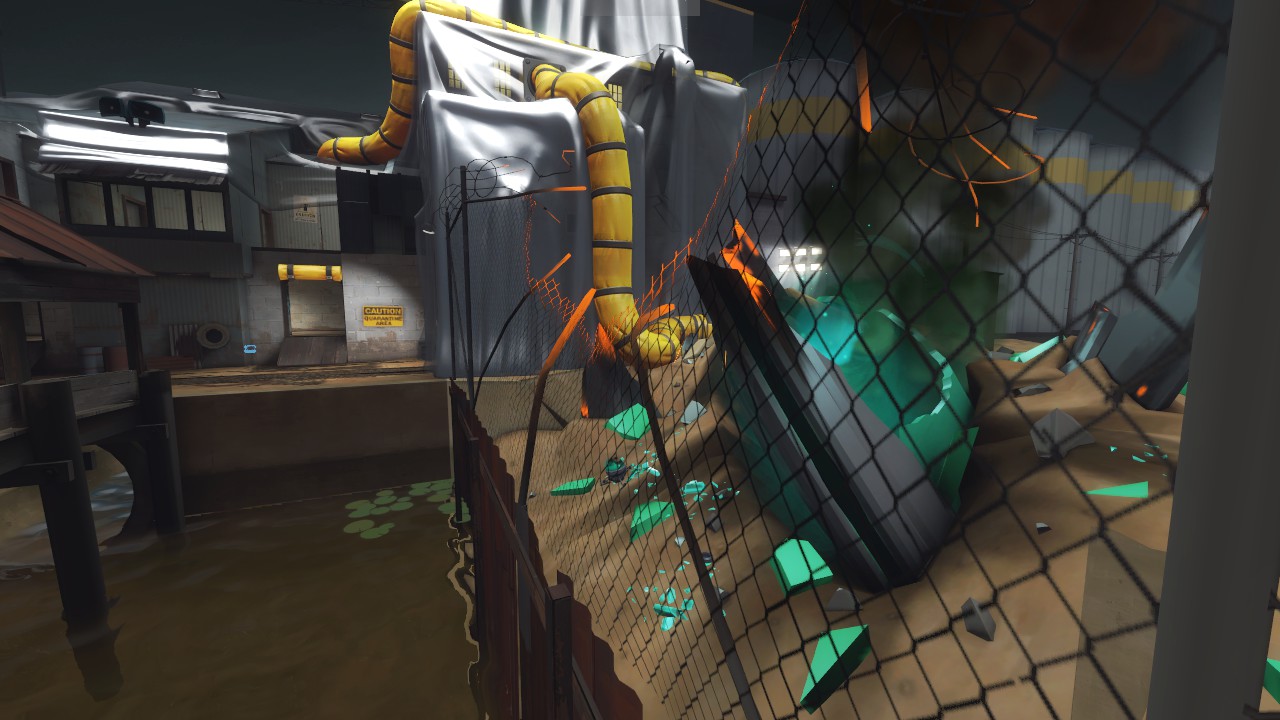
A screenshot of Team Fortress 2 running at 720p with 8x MSAA enabled. Note how all fencing is rendered at roughly the same level of detail, or made somewhat transparent where previously a bunch of scattered pixels were present.
SSAA: Supersampling Anti-Aliasing (aka, Super Resolution, Downsampling)
Like with MSAA, SSAA works by taking multiple higher-resolution samples before outputting a lower-resolution final image. However, SSAA is kind of brute-force method, because it doesn’t specify edges or any specific part of the image from which to do this. Instead, SSAA works by taking the entire image and rendering it at a higher resolution before outputting the final result, rather than trying to focus on “edges” or, really, any idea of efficiency.
If your game doesn’t support an SSAA feature out-of-the-box, it can easily be forced in modern driver software through features like “Super Resolution”, which enables running games at higher resolutions than your display actually supports. Another word for this is “downsampling”, which is just the practice of taking a high-resolution image and reducing its resolution. This does a great- arguably the best- job at preserving detail that was only visible at the higher resolution but does not manifest in any performance improvement compared to rendering exclusively at the higher resolution.
TAA: Temporal Anti-Aliasing
Temporal Anti-Aliasing uses “samples”, but not in the same sense that MSAA and SSAA do. Instead, it’s a post-processing-based form of anti-aliasing, where its “samples” are actually based on previously-rendered frames. TAA functions by analyzing the content of previously-rendered frames and attempting to “smooth” any roughness it detects in them before the final render is presented to the user.
TAA is considered the de facto standard for modern anti-aliasing technologies, since it can be easily implemented into nearly any modern engine (if not already built-in to begin with) and turns around similar image quality to MSAA at a significantly reduced performance cost. However, it does come with its own shortcomings, and is largely known to be blurrier in motion than MSAA or SSAA due to its attempt to “blend” frames together as much as possible.
Besides image quality and performance benefits, TAA also allows for easier implementation of in-game resolution scaling options. In fact, if your game supports in-game resolution scaling, chances are quite high that TAA will also be supported- and should most likely be enabled if you’re playing at a lower resolution scale.
FXAA: Fast Approximate Anti-Aliasing
Like TAA, FXAA is another popular modern version of anti-aliasing that aims to provide MSAA quality without MSAA performance loss. Unfortunately, FXAA is a solely post-processing based form of AA, and isn’t based on accumulated rendered frames like TAA is. This makes FXAA, generally-speaking, the lowest-quality version of anti-aliasing available on the market, but it can still turn around decent results, especially if used to polish up an already high-resolution image.
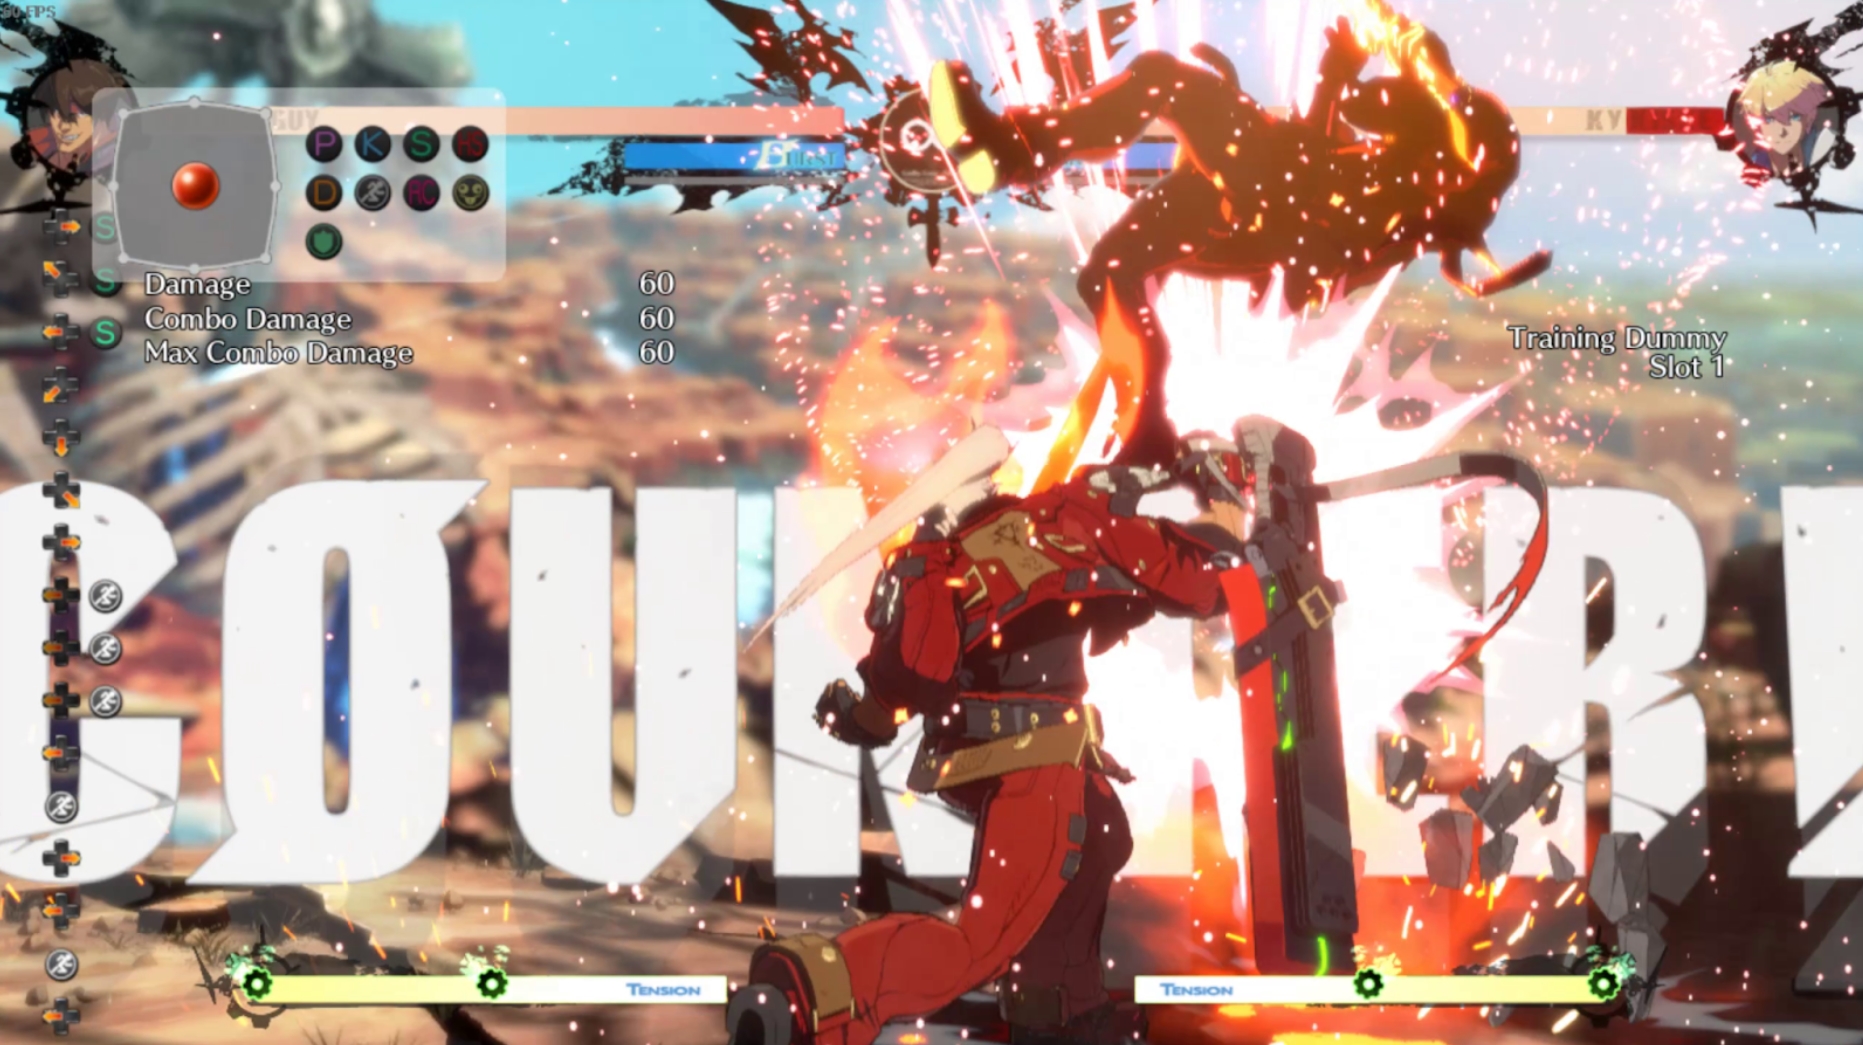
Below, I’ve embedded three screenshots of Guilty Gear: Strive running at 720p resolution and High Anti-Aliasing settings. The only difference between the three images is that I’ve picked FXAA, TAA, and MSAA (in that order) for each, to demonstrate the differences between the two main post-processing based techniques compared to the traditional MSAA.
Guilty Gear: Strive running at 720p, High Anti-Aliasing, using FXAA. While still good, the overall image has some noticeable post processing-induced blur.
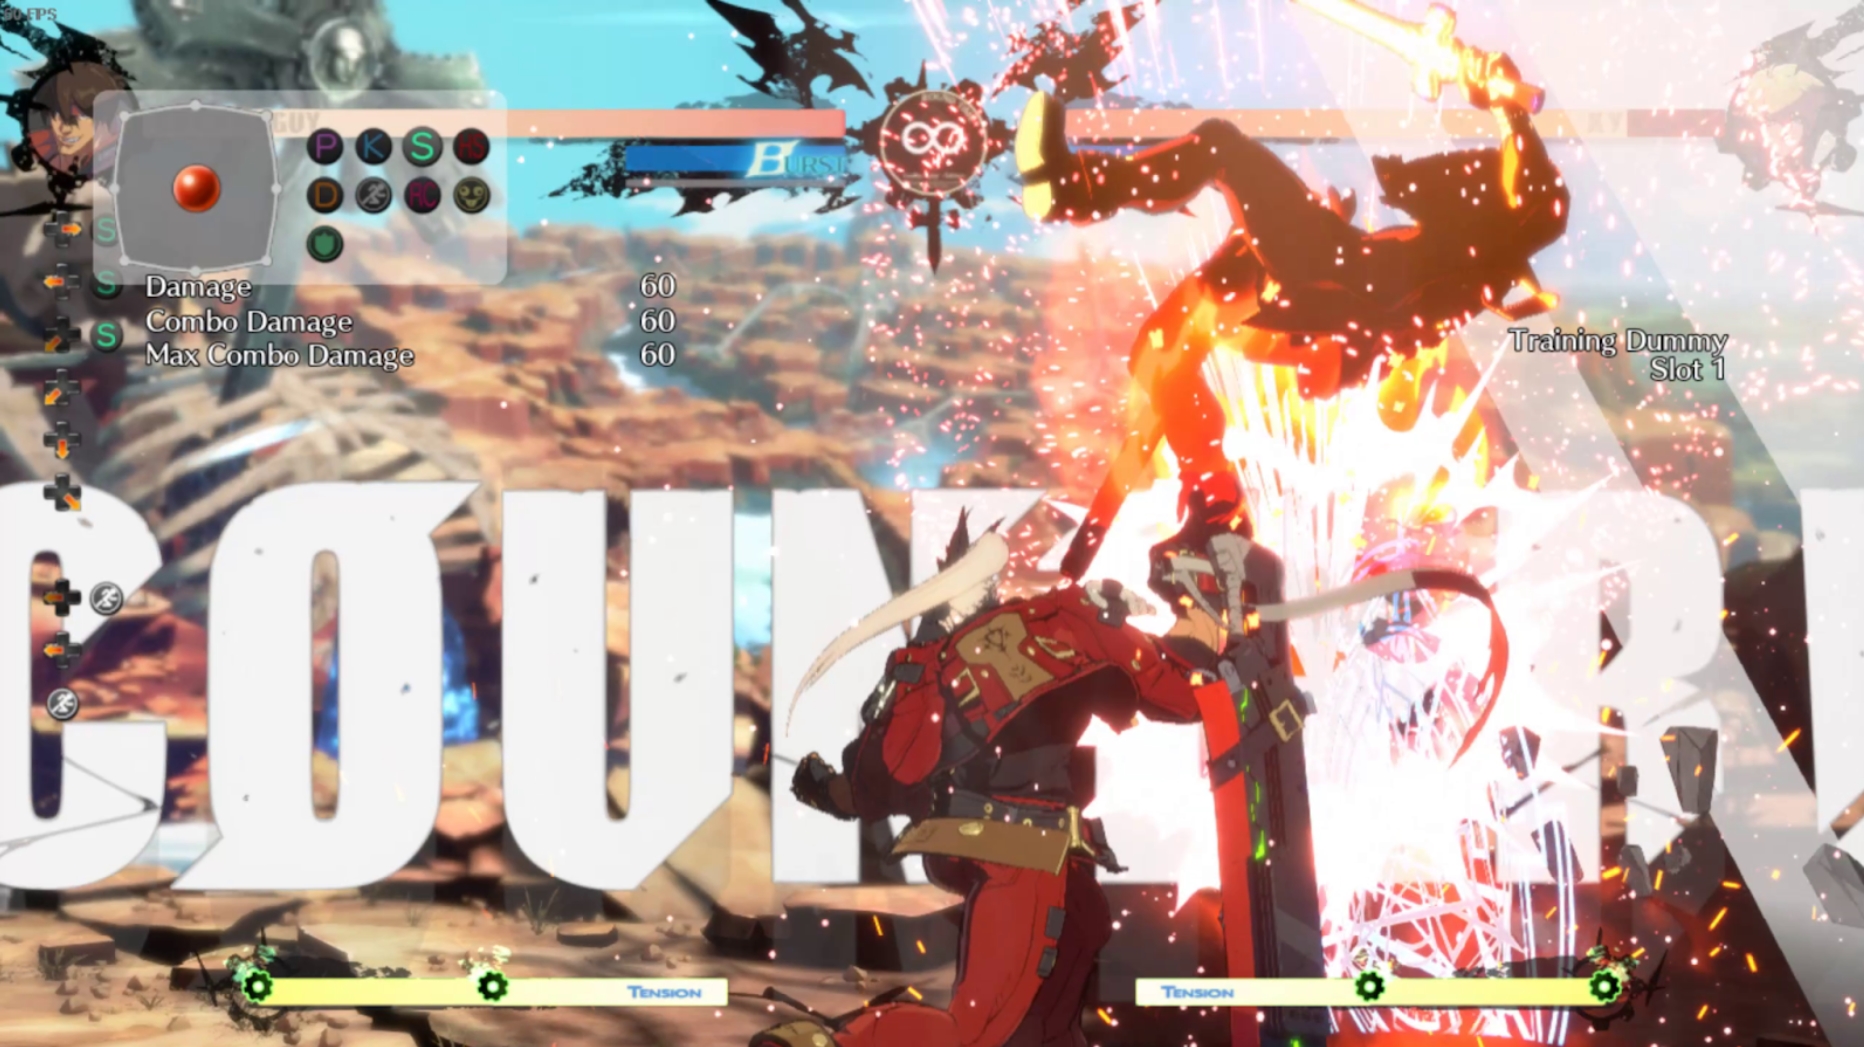
Guilty Gear: Strive running at 720p, High Anti-Aliasing, using Temporal AA. There’s a definite improvement over FXAA here, especially in the details of individual particles. In motion, the image still has some post-processing blur, though.

Guilty Gear: Strive running at 720p. High Anti-Aliasing, using MSAA. The best rendering of individual particles thus far, plus foliage on the ground looking slightly sharper than on TAA or FXAA. No post-processing blur.
SMAA and MLAA: (Subpixel) Morphological Anti-Aliasing
MLAA, and its more advanced SMAA cousin, are both forms of morphological anti-aliasing. These are both forms of anti-aliasing that work through post-processing rather than being sample-based like MSAA or SSAA.

The exact implementation of SMAA can vary depending on the game in question. For example, Batman: Arkham Knight uses a custom SMAA effect that can only be toggled “On” or “Off”. I’ve embedded screenshots with and without the feature enabled at 1440p and high settings below. These screenshots are from a later segment in the game which features a significant amount of excess plant spores dispersed throughout the entire city, making it quite easy to demonstrate the differences with and without AA.
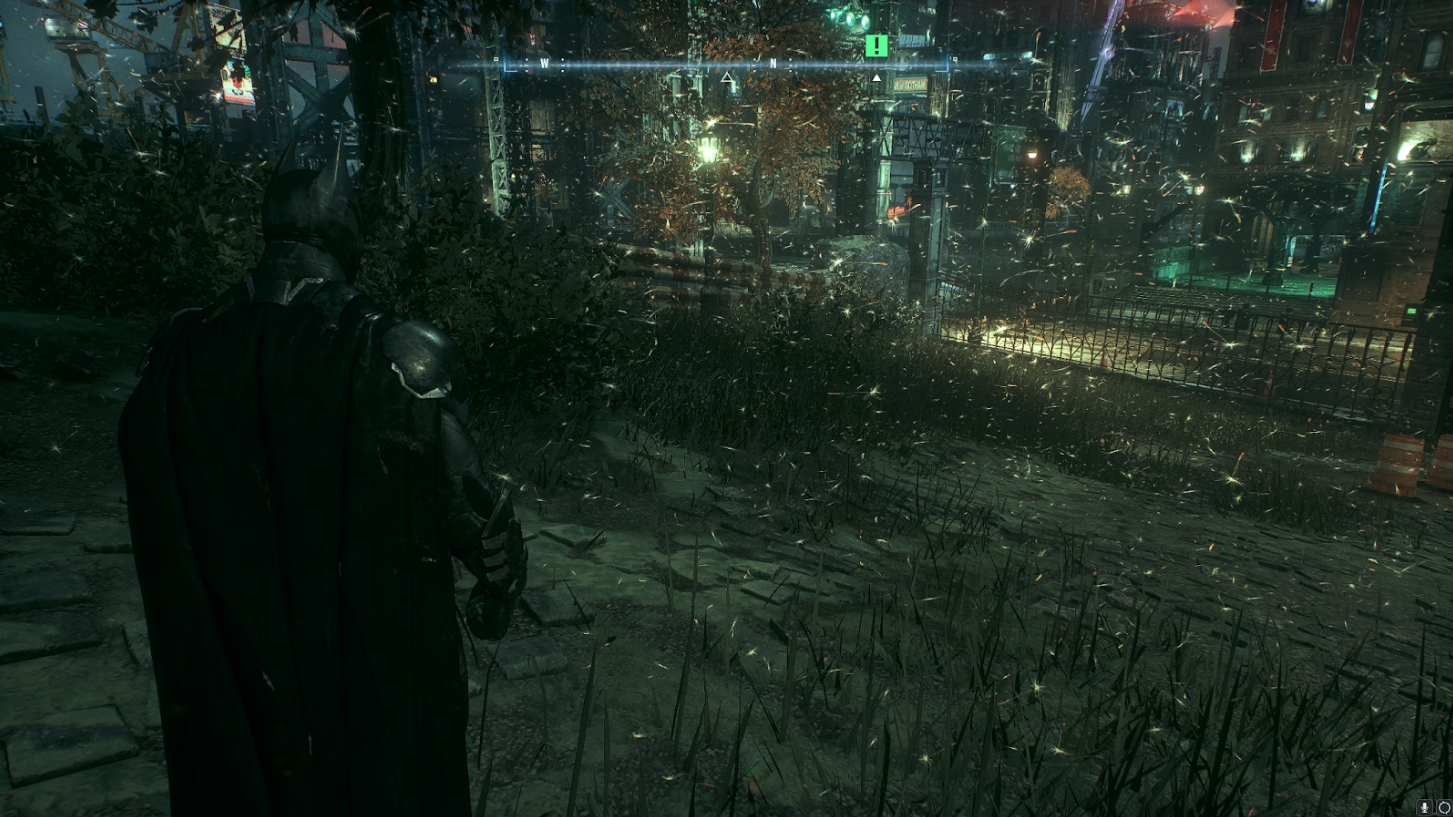
Batman: Arkham Knight without its SMAA feature enabled. Note the sharpness of the overall image, and the clarity with each individual spore is rendered. However, you may also notice more fuzziness in fine details due to the sheer density of non-AA’d detail on the screen.
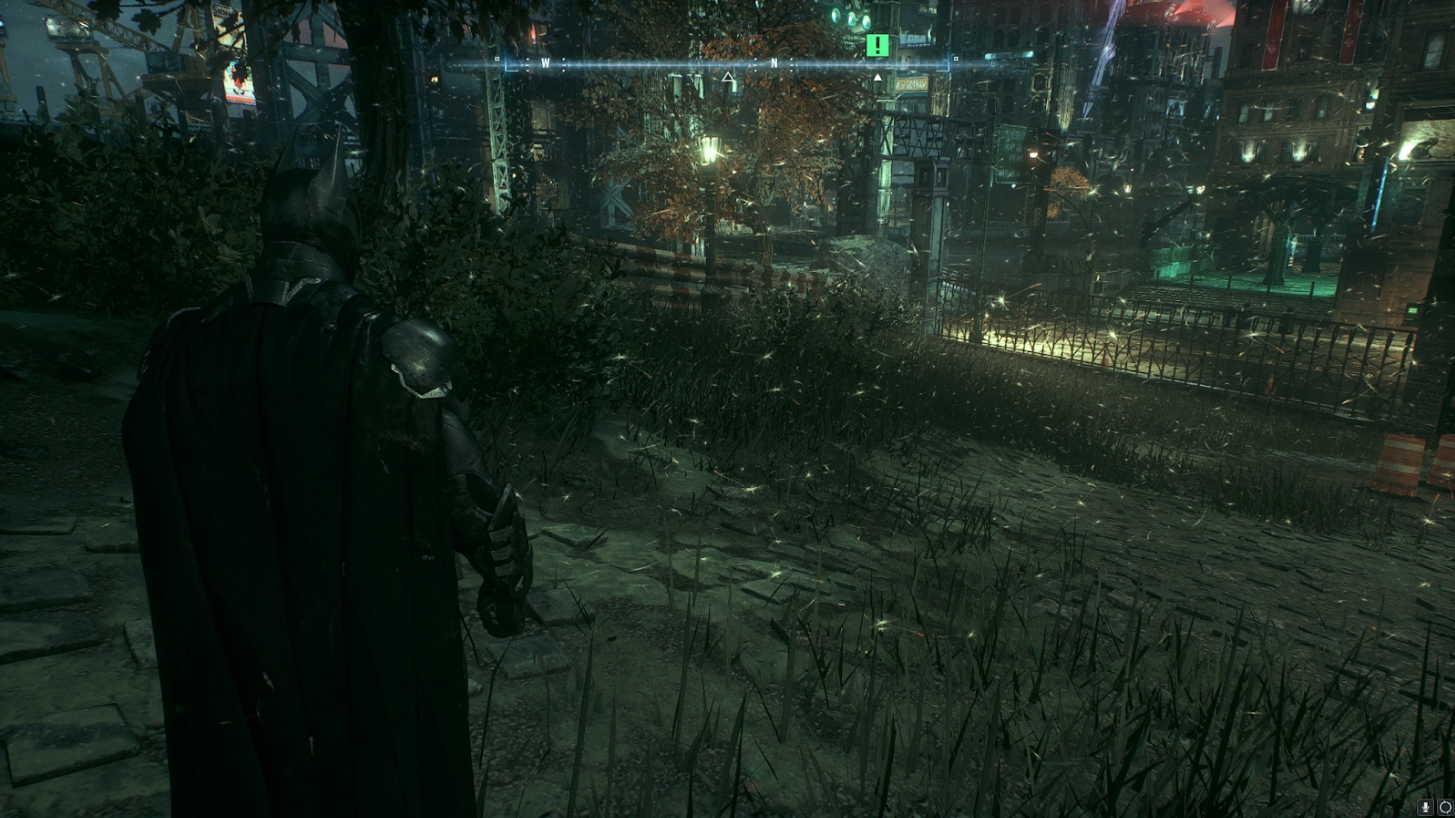
Batman: Arkham Knight with its SMAA effect enabled. Aliasing on the stair steps in the distance and the grass blades on the ground has decreased, but so too has fine detail seen in individual plant spores. Since this is still a post-processing AA technique rather than a sample-based one, some aliasing is still present while overall image fidelity has been somewhat blurred.
Batman: Arkham Knight isn’t exactly the best example of MLAA and SMAA effects out there, but it does demonstrate a shortcoming with post-processing-based techniques like this one. In my own testing and in the wider Internet at large, most players of Arkham Knight prefer to disable this AA effect entirely in favor of clearer and sharper graphics, instead achieving AA through supersampling or running the game at a high enough resolution (like 1440p and higher) that visible aliasing is minimized.
CSAA: Coverage Sampling Anti-Aliasing (Nvidia)
A now-defunct version of MSAA used exclusively by Nvidia graphics cards until the release of the Maxwell architecture (GTX 900 and adjacent GPUs). While scrapped from newer Nvidia cards, it provided similar image quality to MSAA at a significantly reduced performance cost, allowing for basically free boosts to AA where it was properly supported.
I myself fondly remember using CSAA in Team Fortress 2 as an alternative to other AA options, and distinctly remember how well it handled things like fencing, removing most visible aliasing from the image fairly well.
EQAA: Enhanced Quality Anti-Aliasing (AMD)
A mostly-unsupported (these days) version of MSAA used exclusively by AMD cards. Basically, this was AMD’s answer to Nvidia’s CSAA, and turned around similar performance. Like Nvidia’s CSAA, it was most comparable to MSAA of the traditional AA technologies, and could be forced through driver software.
Unfortunately, also like CSAA, nothing really supports it anymore. I’m not sure that it’s been explicitly disabled in current AMD drivers, but by all reports (and my own eyes when I was using an RX 5600 XT instead of my current GTX 1070), the feature is no longer present.
Parting Words
And that’s it, for now! I hope this article helped give you a more thorough understanding of anti-aliasing in its various forms without getting too bogged down in tech talk and technical details.
For most users, I would recommend investing in a 1440p display before cranking up a bunch of expensive AA settings. Playing games at 1440p by itself has reduced a great deal of any visible aliasing I was experiencing playing games at 1080p previously, and where I am inclined to use AA, I’m more comfortable using low AA settings or post-processing based AA like FXAA without a huge worry of performance or visual quality loss.