

So, you just got yourself a Valve Steam Deck, but maybe you’re new to PC gaming or just aren’t quite sure how to make the most out of this little device. That’s what I’m here for.
Let me preface with this: I have yet to find a Steam title game that is playable on Steam Deck that I can’t force to run at a stable framerate with the correct settings tweaks. This is in line with most statements made by Valve and by press prior to the Steam Deck’s release, but it doesn’t necessarily tell the full story.
This is still a PC, not a Nintendo Switch, and it isn’t operating with such an excess of power that you can set modern games to maximum or default configurations and still expect to get stable performance. Most default configurations will generally work on the Steam Deck, but may not be optimal for steady 30 FPS or 60 FPS gaming.
However, I’ve still yet to find a game that runs on Steam Deck that I can’t fix that issue with. I’ve confirmed the ability to achieve stable Steam Deck performance across a fairly wide variety of games since I’ve received it, including Elden Ring, Psychonauts 2 , Devil May Cry 5, Sonic Generations, and even the marked-unsupported Guilty Gear Strive, which still worked!
Even games that launch with poor Windows PC optimization, like Elden Ring. can be forced to run at a stable 30 FPS on the Steam Deck handheld thanks to Valve’s Proton and hardware-level optimization patches. You can even use the Steam Deck 40 Hz mode to lock a smooth 40 FPS in many titles, including Elden Ring, with the correct tweaks! You’ll still need to know how to make those tweaks yourself, though- and that’s what this article is here for.
Table of Contents
Why The Steam Deck Can Sometimes Struggle With Consistent FPS
First, let’s take a moment to talk about why the Steam Deck may struggle with consistent FPS. The specific reasons why can vary by game. Sometimes it’s game or Valve Proton-level compatibility issues you can only alleviate, not completely fix. Most times, it’s simply a case of your game settings or Steam Deck settings not being quite right to lock a stable 30 or 60 FPS.
Fortunately, Steam Deck isn’t just a PC in a nifty handheld form factor. It’s also a PC with very in-depth but easily-accessible customization options. You can enable system-wide FPSs caps, tweak GPU clocks, and even lower system power draw without even closing your game. Without even pausing your game.
So while the Steam Deck isn’t necessarily as plug-and-play as a console might be for performance, since it’s still a PC, you also have tons of easily-accessible options to you at any given time to tweak battery life and game performance. This is alongside the usual settings optimizations that you would have with any PC game.
So, let’s dive a little deeper- and the perfect place to start diagnosing your own performance in a Steam Deck game is to take a closer look at the Deck’s Performance Overlay, and enable the Frame-Time Graph.
Update For Steam Deck OLED (11/23) and Refresh Rate Changing
Recently, the Steam Deck had a major refresh announced called the Steam Deck OLED, which bumps down the original mid-range, IPS, 256 GB NVMe model to the entry-level $399, brings 512 GB NVMe to the new mid-range OLED model at $549, and a whopping 1 TB NVMe to the new high-end OLED model at $649.
In relevance to the rest of this article, the tips below should still apply minus some minor visual changes to the Steam Deck interface for the OLED Deck (and presumably, eventually the other Decks). The OLED Decks also boast an increased 90 Hz screen refresh rate, but in terms of gaming performance they’re near-identical. You’ll be following the same steps for setting a custom FPS cap, but on the newer OLED Deck, this FPS cap is tied directly to the Refresh Rate slider.
On older models of the Deck and revisions of Steam OS made following this article, a refresh rate slider was added in addition to the FPS cap in order to allow users to target more varied FPS caps without incurring severe penalties. If your FPS cap and refresh rate slider are separate, just try and make sure that they’re either identical or that your desired FPS cap evenly divides into your refresh rate if it’s smaller. (ie, 30 FPS = 60 Hz, 40 FPS = 40 Hz, and so on.)
Understanding the Steam Deck Performance Overlay and Frame-Time
So to start, let me show you a screenshot of my Steam Deck running Psychonauts 2 with a mix of low and medium settings, at 800p, with totally uncapped FPS.
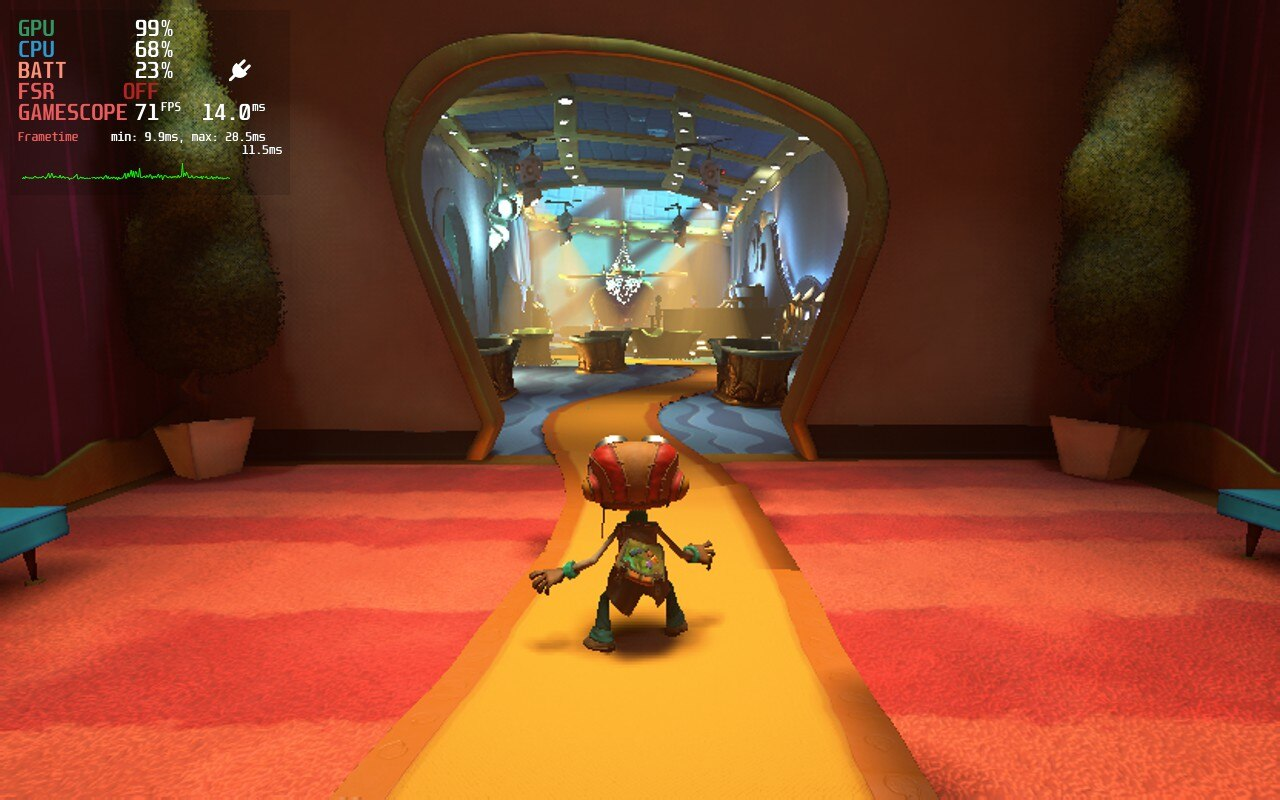
See the green, squiggly line in the top-left corner? That’s the frame-time graph, and you can think of it as a real-time reading of your in-game performance. Frame-time measures the amount of time it takes for a game to display the next frame, and is brought up frequently in discussions of frames per second. While FPS is certainly important, it’s also only an average: frame-time graphs instead give an exact reading over time and are measured in ms.
Ideally, your frame-time graph in any game on any platform should be as close to a flat line as possible. Lots of dips upward and downward will manifest as things just feeling inconsistent- even if you don’t consciously know or understand why, these big variations in frame-time will also impact your input latency, especially noticeable with extended smooth or precise inputs.
As you can see, the Steam Deck is doing a pretty good job here by pushing 71 FPS- over its own refresh rate, even! This would normally result in screen tearing on a Windows PC, but Valve seems to force some degree of triple buffering on an OS level even with uncapped FPS in OS, so I didn’t notice any. What I did notice was those dips in the curve and input inconsistency, though.
So, how do we fix that? Maybe we should cap it to 60 FPS?
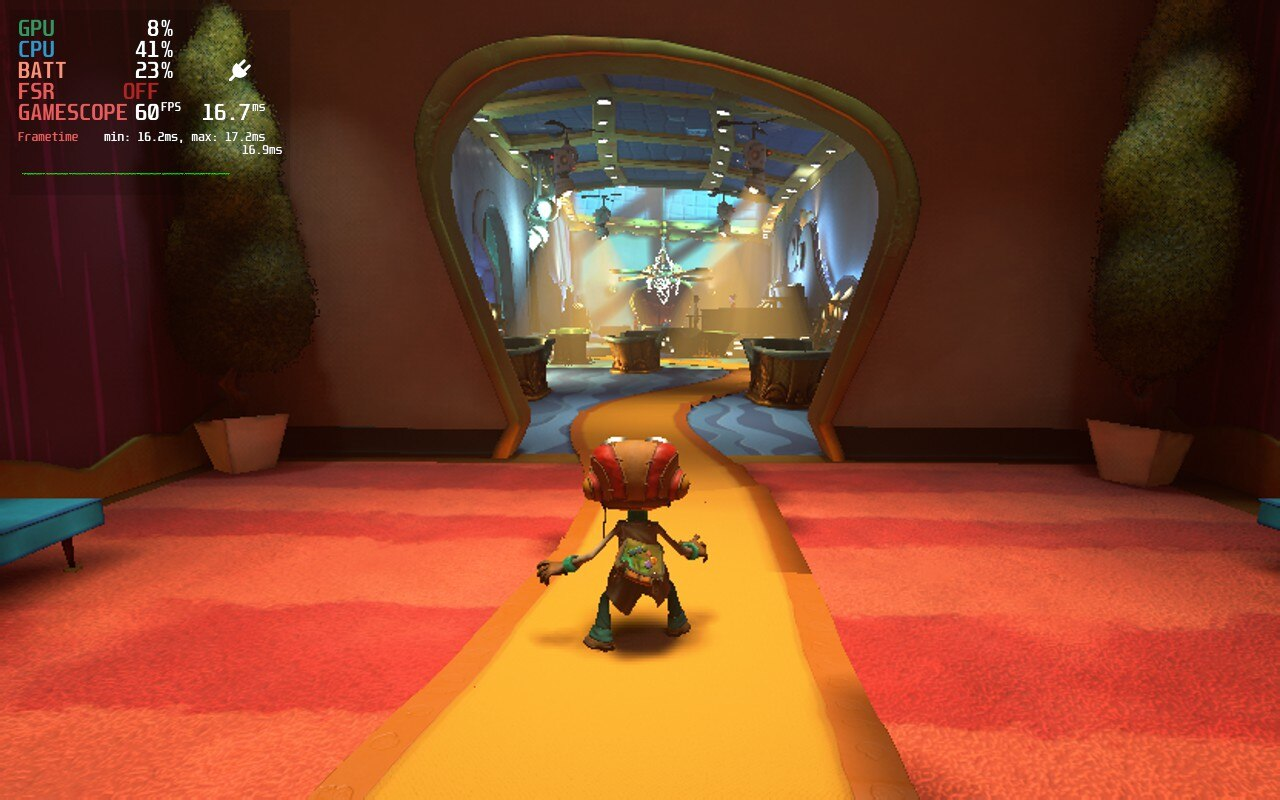
Bingo. Look at that beautiful, flat line! With consistent frame pacing in addition to a good framerate, you can get some extremely good results. You can also actually give the GPU some reprieve- there are points I’ve noticed where my rated GPU usage dips dramatically for an instant or two despite still being in a scene. This only happens with a capped framerate because this is the only way for your GPU to actually get ahead of schedule in any meaningful way, rather than pushing out all the frames the moment they are rendered.
This is the ideal result you’re looking for in any of your games. Even if you can’t push 60 FPS in certain titles and have to settle for 30 or 40 FPS, knowing what a stable frame-time graph looks like and how to ensure it will greatly improve your Steam Deck gaming experience.
Now that you know what you want, let’s teach you how to use tools available to you to make it happen.
How To Use The Steam Deck FPS Limiter
As somewhat demonstrated above, the most important tool you have at your disposal as a Steam Deck power user is the built-in FPS limiter. The first thing to do is press the right-hand options button just under your right touchpad, the one that looks like three dots.
This will open your right-hand overlay, and if this is your first time, most likely your Notifications.
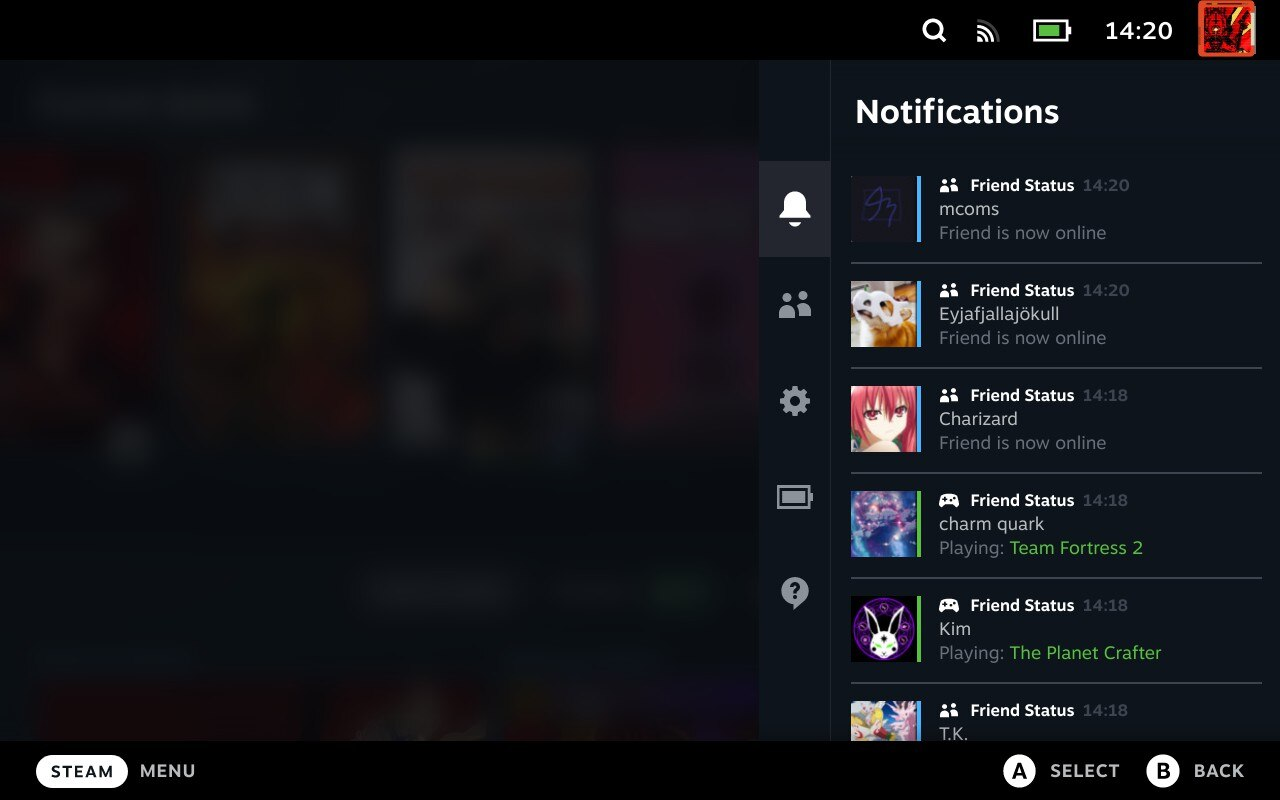
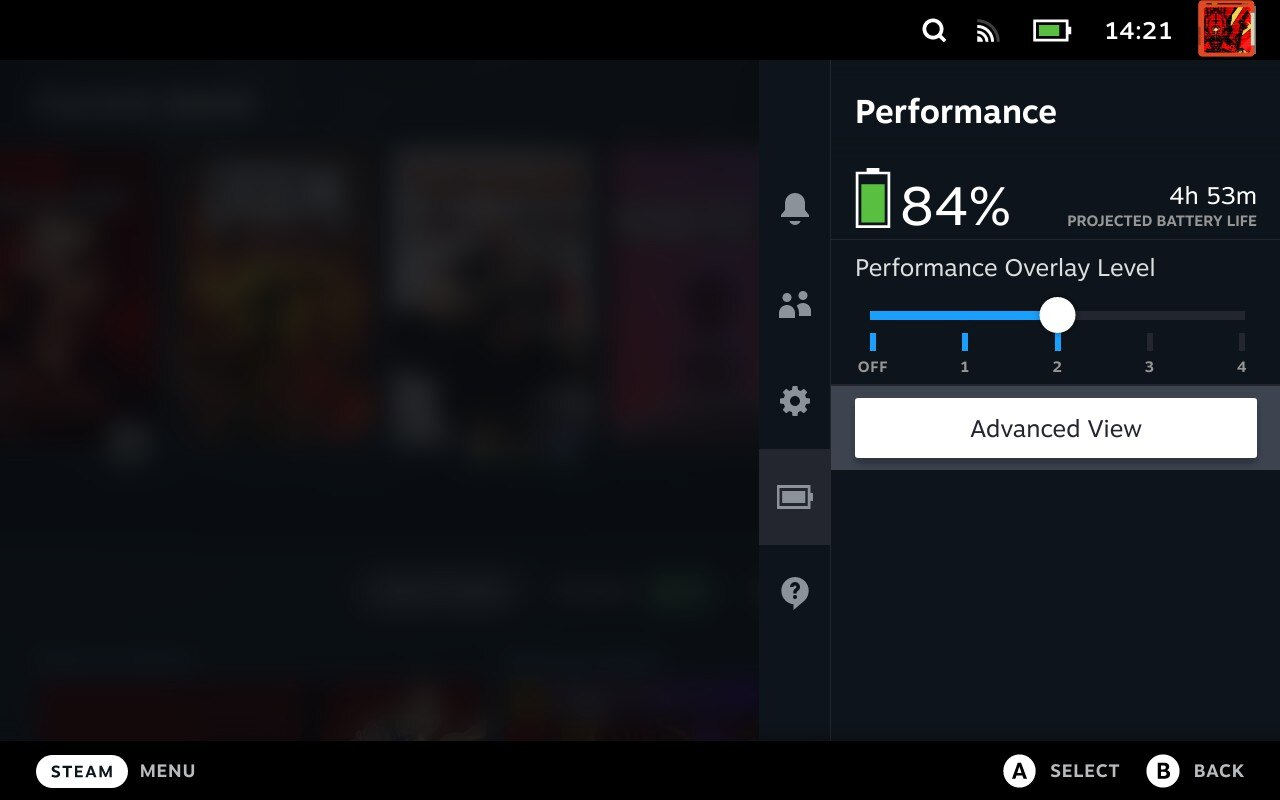
Select the Battery icon with your stick, D-Pad or touchscreen to open up the Performance overlay from this menu. This is where you can enable various levels of performance monitoring: 1 being a plain FPS count, 2 adding in the frame-time graph pictured above, 3 adding VRAM and RAM monitoring, and 4 adding per-core CPU usage monitoring…albeit at the cost of taking up half the screen.
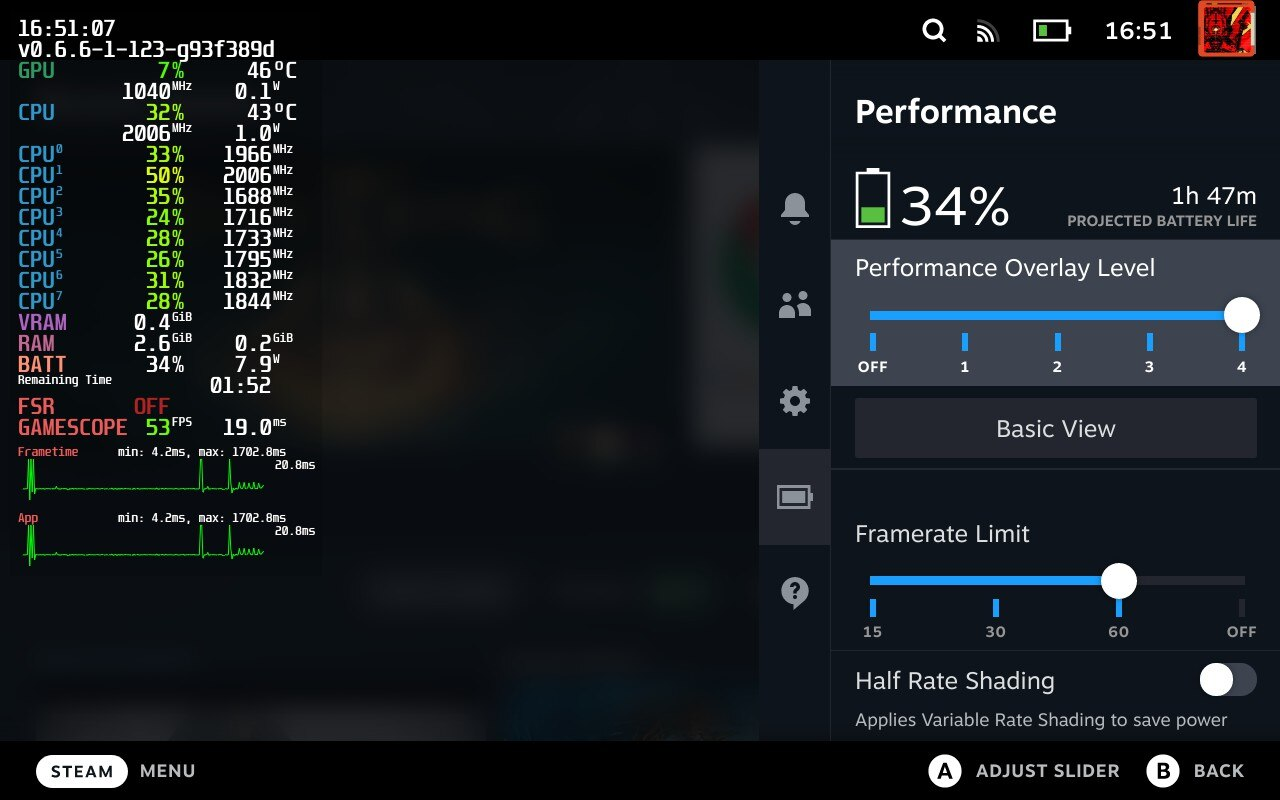
The Level 4 Performance Overlay, taking up way too much screen-space for actual gaming.
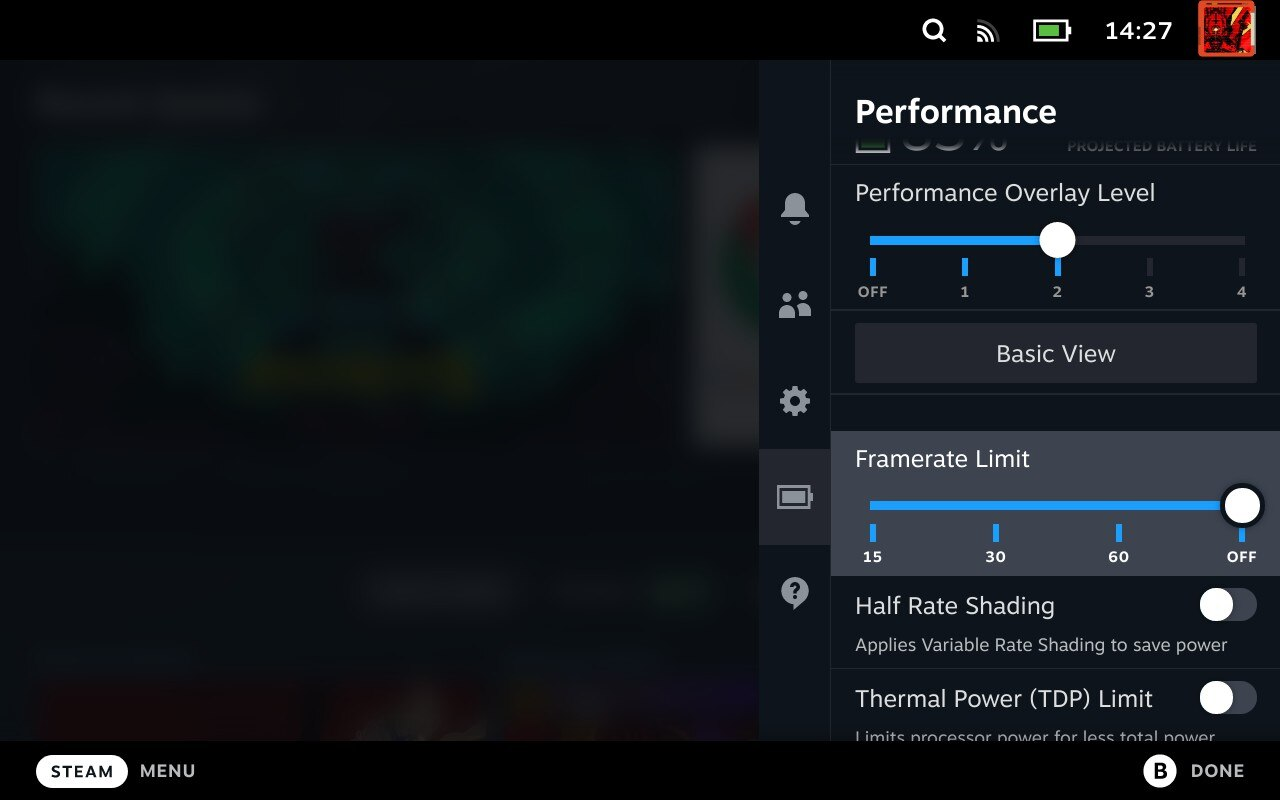
Now, select the button that says Advanced View. This will open up the menu for all of your deeper controls and tweaks, including the FPS limiter and the other tools we’ll be discussing in this article. Most importantly, you’ll see an option here for saving per-game profiles, which I definitely recommend enabling for current and future optimizations.
Under Framerate Limit, you will identify four options (at time of writing, anyway): 15 FPS, 30 FPS, 60 FPS, and Off. These can obviously be set to your preference, but let’s talk about scenarios where you may be convinced to use one or another.
- 15 FPS – For turn-based RPGs, strategy games, and visual novels. Also, non-gaming things like word processing. Basically things that barely need framerate to function at all. Immediately raise it to 30 or 60 if you notice slowdown. If you can enable this with your game of choice, expect dramatically increased battery life!
- 30 FPS – For games that don’t support or can’t quite reach 60 FPS, or for saving battery life! While 30 FPS is hardly the ideal in-game framerate, a strong stable 30 FPS like the implementation enabled by the Steam Deck FPS cap will still feel responsive, especially on a handheld screen.
- 40 FPS – A middle-ground between the increased fluidity and responsiveness of 60 FPS and the power-saving of 30 FPS, only available in 40 Hz mode. While 10 FPS may not sound like that big of an increase, it’s still a marked improvement over 30 FPS when 30 FPS is your only other option for a certain game…as long as it keeps consistency, which thus far the Steam Deck doesn’t seem to have issue with. This preset should work well with my Elden Ring configuration.
- 60 FPS – For the smoothest, most responsive possible gaming experience on the Steam Deck handheld, and games that have logic requiring it (often 2D games and Fighting Games in general).
- Uncapped FPS – On the Steam Deck itself, there truthfully isn’t much reason to use this setting besides helping establish performance floor and ceiling when choosing your desired in-game settings and Deck optimizations. You’ll just have worse frame-time consistency than 60 FPS and lose battery faster. If your Steam Deck is docked to a display that supports a refresh rate higher than 60 Hz, though, this can still be a great option!
- 40 FPS (Current Beta Option) – A middle-ground between the increased fluidity and responsiveness of 60 FPS and the power-saving of 30 FPS. While 10 FPS may not sound like that big of an increase, it’s still a marked improvement over 30 FPS when 30 FPS is your only other option for a certain game…as long as it keeps consistency, which thus far the Steam Deck doesn’t seem to have issue with. This preset should work well with my Elden Ring configuration.
In the future when you open this overlay, it should default to whichever sub-section (Notifications, Friends, Quick Settings, Performance, Help) you were last using. This will be useful for the rest of this article, as the FPS Limiter and all the other Deck-level Performance tweaks we’ll be making will be done through this same Performance submenu.
How To Use The Steam Deck GPU Clock and TDP Limiter
So, the Steam Deck is already pretty well-built for high-FPS PC gaming, but with the tweaks that you’re able to make at a hardware level, you can actually make it even better.
The best thing I found was that if I was dealing with unexpected or severe dips in a game that was otherwise running stably at my desired high framerate, the best fix was to simply slightly undervolt the system and underclock the GPU.
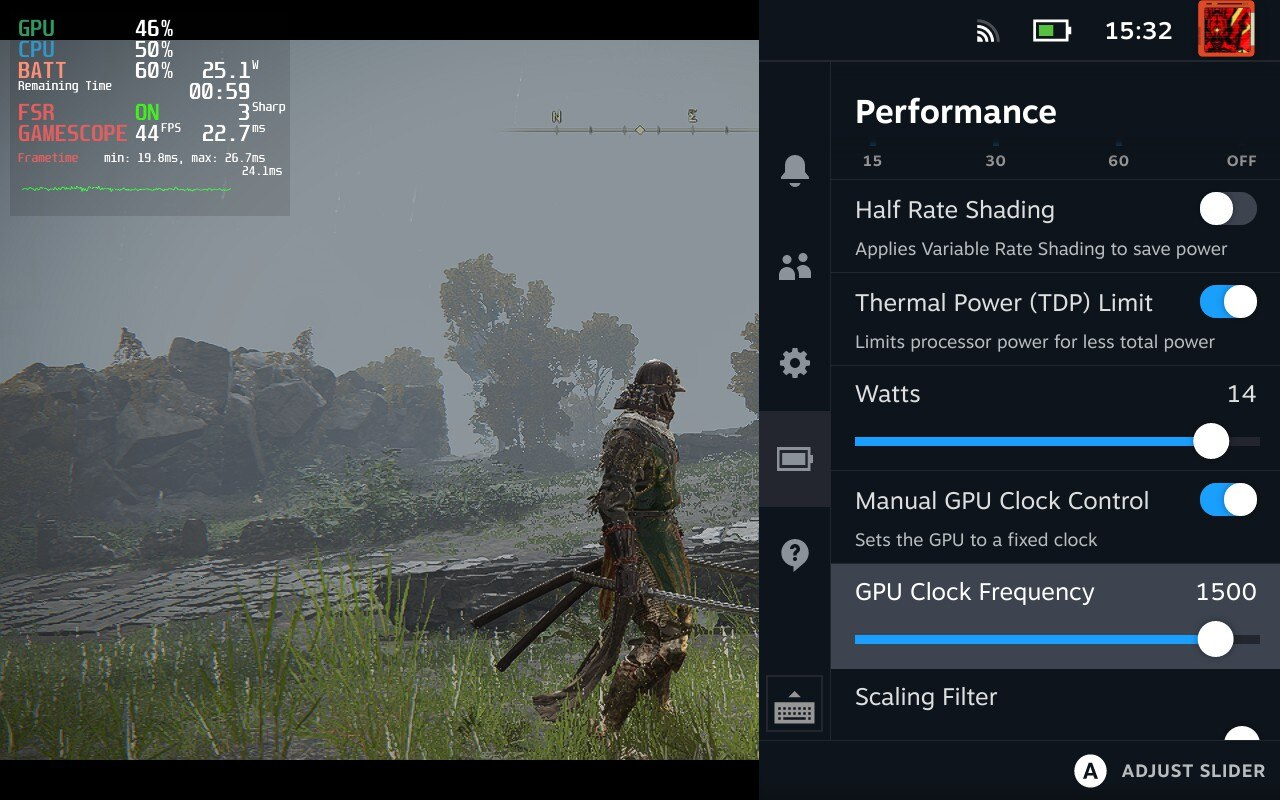
So setting TDP to 14 Watts and GPU Clock Frequency to 1500 accomplishes two goals. While it definitely doesn’t increase your battery life, it stabilizes both GPU load and power consumption on the higher end. In regular gameplay, the Steam Deck pretty much has to allocate these things in real-time, and some titles will simply introduce high-FPS-cost elements and throw them away before the GPU clock has time to catch up.
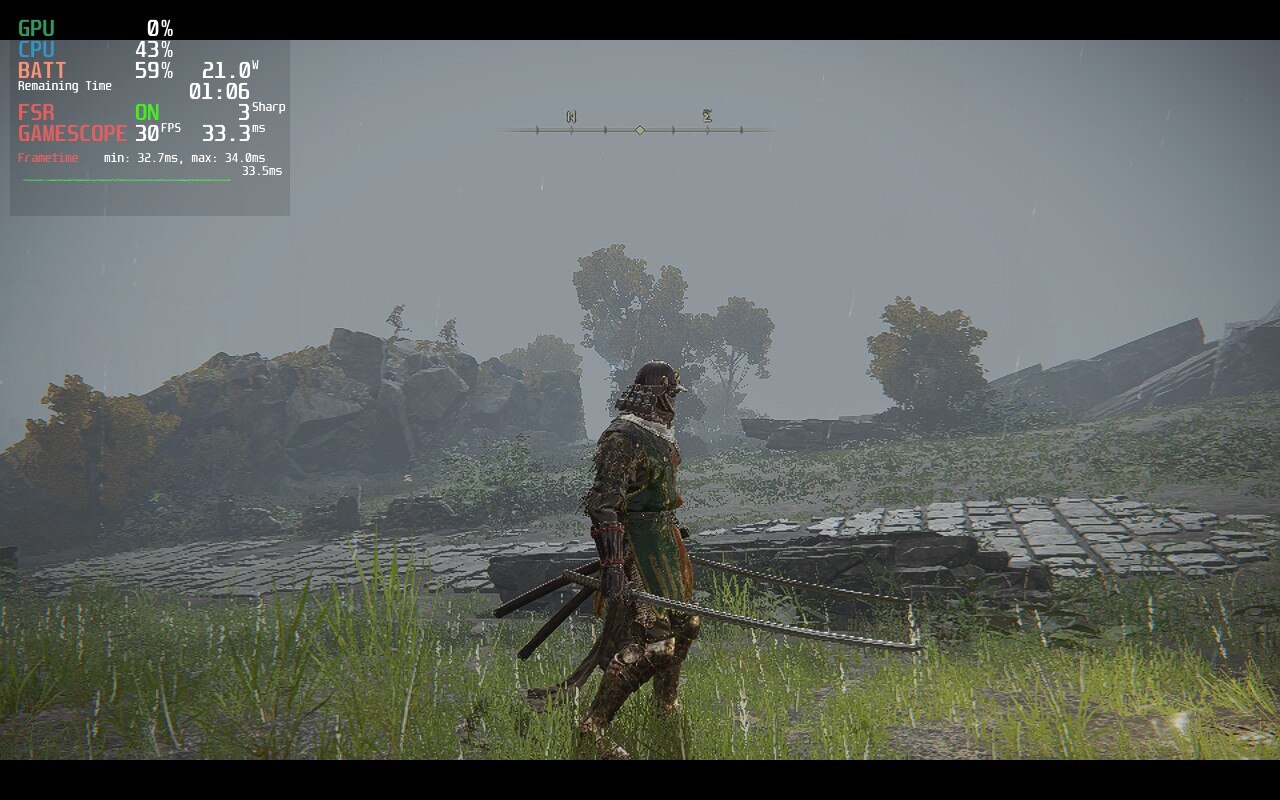
In my own extended testing across various games, I’ve found that 14W and 1500 MHz are the ideal combination to make the most of CPU and GPU power without overly taxing them and risking inopportune slowdown at the worst of moments. The performance I was able to get doing this was so good that even without the 40 FPS cap enabled, I could get pretty stable mid-40s FPS in Elden Ring, still without major dips. I ultimately still ended up going for a 30 FPS cap, though, for that sweet sweet frame-time consistency:
My white whale as far as Steam Deck optimization goes so far is actually a Verified title- Sonic Generations. With default settings, I faced some pretty horrendous hard drops from 60 to 30 and below on that game- enough that I even questioned the Verified status.
Even after enabling 540p FSR (more on that in a bit), adjusting all settings to their lowest, and applying the tweaks I have…there are still points where the game engine simply does too much too quickly and drops to the 40 FPS range for a second or two. However, these points are roughly in line with where the game experiences lag on PC and console to begin with, and the Steam Deck handles Generations leagues better than its original PS3/360 home consoles after making the appropriate tweaks to power settings.
Additionally, I don’t really consider the Generations issue to be a Steam Deck issue so much as a Sonic Generations engine issue of some kind, as I’ve run the game at max settings and 60 FPS with less tweaking on much less powerful hardware than a Steam Deck before. However, it’s still pretty fixable, especially if you just read how to fix it from me!
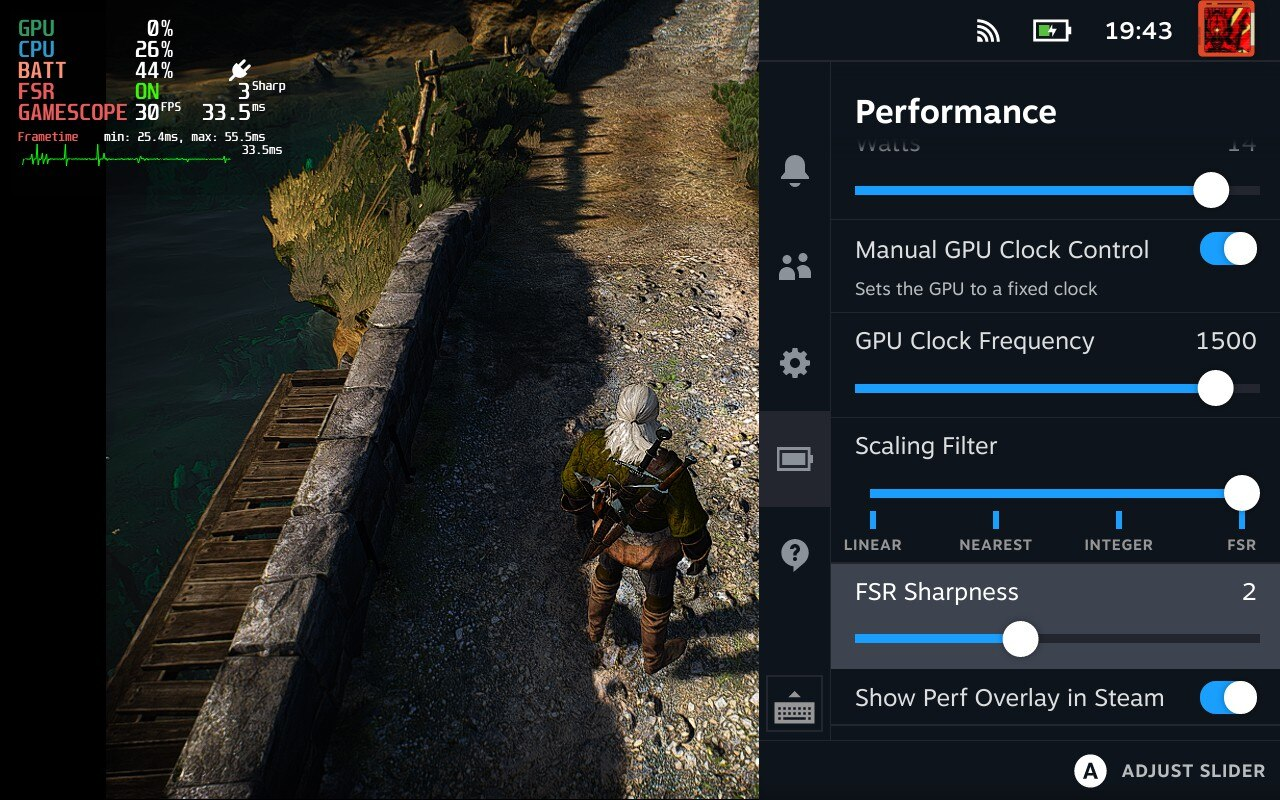
Enabling and Using Steam Deck FSR and other Scaling Methods
If you continue scrolling down the Performance overlay sub-menu, you’ll eventually find yourself faced with a slider for “Scaling Filter”, culminating in FSR, and a slider just underneath for FSR sharpness. I recently discussed FSR in pretty exhaustive detail, so you can head there if you want a more in-depth explanation, but for now the main thing to know about FSR is that it gets you more performance.
Since this is OS-level FSR, you enable it by setting your resolution to something lower than the Steam Deck’s native 800p or 720p resolution, like 540p or 648p. From there, FSR scales it to the handheld’s screen pretty well, but also adds a sharpening filter that you can adjust to your preference.
Beyond FSR, your next-best scaling filter setting is going to Integer scaling, especially for any 2D sprite-based games you might be playing. Integer scaling basically forces perfect scaling to the screen’s native resolution, and adds black bars instead of stretching or extrapolating where there isn’t room for another 2x increase in pixel count.
Linear and Nearest (Neighbor) can do a decent job too, but ultimately don’t offer any value that integer or FSR scaling don’t do better. I don’t recommend using these Scaling Filters, but feel free to leave a comment if you like them for some reason.
Follow-Up Questions
What is Half Rate Shading? Should I enable it to improve Steam Deck FPS?
You may have noticed the “Half Rate Shading” setting get skimmed over in the Performance Overlay. It’s self-described as a tool with which to cut down on power consumption, but does it also impact in-game performance?
Well, first it’s important to understand what Half Rate Shading actually is, and before we can do that, we have to talk about Variable Rate Shading.
With the latest modern games built around the feature, Variable Rate Shading can be applied intelligently depending on screen region and assets in order to improve gaming performance. It basically allows for lighting and shading performance cost to be controlled on a very granular level.
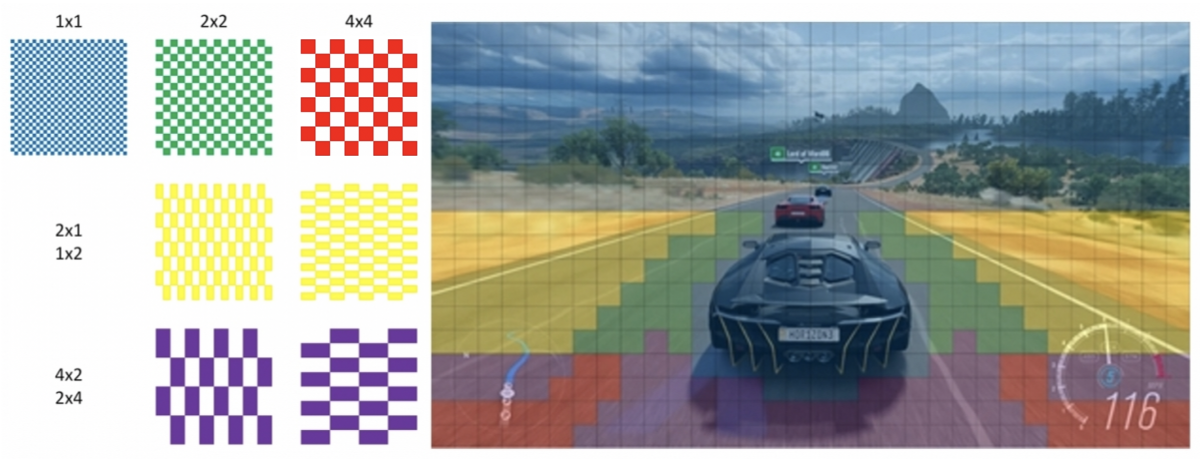
While Half Rate Shading is technically built on the same technology, it’s kind of brute-forced onto games in the same way that FSR is on Steam Deck. That means the entire screen operates with VRS on the same reduction of quality, not nearly as carefully tweaked as an actual in-engine implementation would be.
Unfortunately, I can’t say I noticed any performance improvements from enabling Half Rate Shading- and where they were present, the only way I could identify them was monitoring the frametime graph for a ~1-2ms decrease in frame-times with the feature enabled in Elden Ring.
Pretty much, don’t anticipate getting a bunch of extra performance out of enabling this feature. It’s meant to save on your battery life, and that’s about it. Fortunately, if you can enable it and it doesn’t make your game look too messed up, it will still help reduce your power draw!
The differences can be tougher to see on the handheld screen, but still noticeable if you know what to look for. For example, see my comparison shots of Elden Ring with and without Half Rate Shading enabled below:
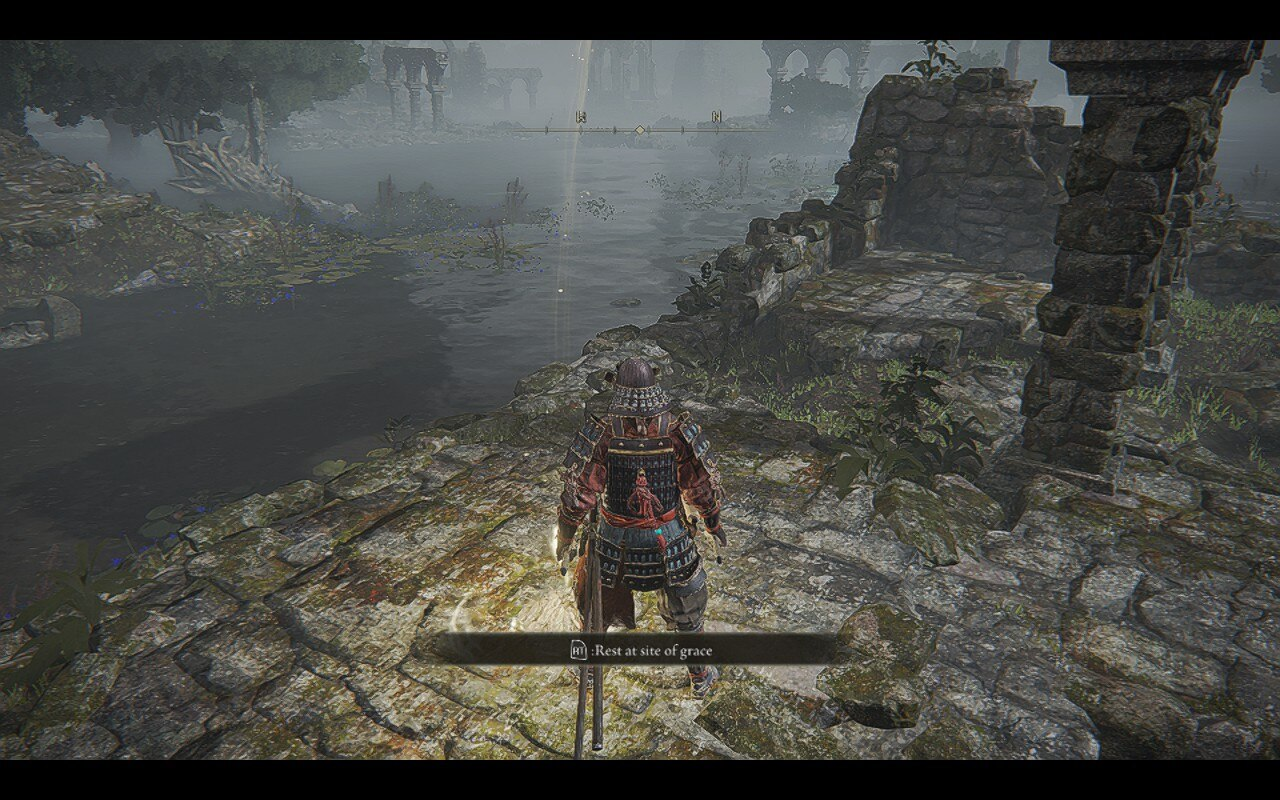
Elden Ring running on Steam Deck without Half Rate Shading enabled. Notice the fine detail present on the terrain in the scene, and the distance at which fog is rendered.

Elden Ring running on Steam Deck with Half Rate Shading enabled. Notice the blending of textures and the loss of fine detail on terrain, as well as (seemingly) increased render fog in the distance.
What in-game settings should I be wary of, gaming on a Steam Deck?
The big one will be anti-aliasing. Anti-aliasing at a high setting on such a small screen will serve to decimate your gaming performance, even though you’re running at a low resolution. If you feel the need to enable AA, do so at low settings first, since the high pixel density of the Steam Deck display should already be doing lots of work making things look sharp and clear.
Other settings to look out for include Global Illumination, Reflections, and Shadows.
If you’re running a more cutting-edge title like Elden Ring, don’t be surprised if you have to set a lot of things to Low or Medium settings. Fortunately I’ve found that Elden Ring runs fairly well at mixed low and medium settings on the Steam Deck- even some higher settings if I don’t mind flirting with that 30 FPS cap a little.
Meanwhile in Psychonauts 2, while I am stuck with almost all low settings to maintain my desired 60 FPS, I was able to turn up Ambient Occlusion to Medium to improve the lighting and shading of the entire game without a big performance dip. Finding high-visual, low-performance impact graphics settings can help go a long way toward improving your Deck gaming experience.
Definitely start with low settings and work your way up on the Steam Deck when it comes time to optimize, especially for a locked 30 or 60 FPS goal. And immediately disable or lower known heavy-hitters like the ones listed above.
Can I still apply these tips to non-Verified for Steam Deck games?
Yeah, of course! Of course it will depend on if these games can be forced to run on Steam Deck or not, but I’ve personally experienced good results with both No More Heroes and Guilty Gear Strive. These are both games that are officially marked Unsupported, but still run fine.
What about saving battery?
Well, an FPS cap will definitely help cut down on excess CPU and GPU usage that would drain your battery life. My settings will still keep them on the higher end of utilization, though, especially your GPU. If you’re worried about your battery life but still want to achieve high FPS, you’ll need to do some extended testing of your own to find the rough wattage consumed by your game in intense scenarios.
Fortunately, the Performance Overlay will read out the information you need to make these tweaks to you.
GPU not being fully utilized? You can probably afford to turn down the GPU clock some more. For 2D games and older/less intensive 3D games, I would recommend a starting clock of around 500 MHz.
CPU barely being utilized? You can try to adjust the TDP in steps of 3 until you experience issues- and if you’re able to lower it without experiencing issues, you can add full hours to your on-the-go gaming time. I wouldn’t suggest putting it any lower than 5 Watts unless you’re web browsing or playing a 2D game, though.
Parting Words
Whew!
Worked up a sweat writing this one, but I hope it serves its purposes for the Steam Deck owners out there looking to optimize their favorite games for this little handheld.
Feel free to comment below and let us know: what games are you playing on Deck, and what tweaks have you made for them to look or run better?