

How good is Steam Deck’s battery life, and how can you improve it as a Steam Deck owner? Today, I’ll be answering both of these questions to the best of my ability, speaking as both a Deck owner and experienced PC hardware writer. Let’s get into it!
Table of Contents
How good is Steam Deck’s battery life, in general?
11/28 Update: The release of the OLED Steam Deck changes things! While non-OLED models are unchanged, OLED Steam Deck models boast a bigger battery in addition to improvements to the screen and memory bandwidth. You can expect anywhere from 30%-50% more battery life out of the Steam Deck OLED according to both Valve and external testing.
The tips given in the rest of this article should still apply for those looking to improve battery life on their Deck OLED, with the minor interface change combining Refresh Rate and FPS Limit into a single slider rather than two separate sliders.
So, how is the Steam Deck’s battery life in general?
Basically, expect a battery life of around 2-5 Hours, depending on what games you’re playing, before making optimizations. Additionally, it takes about 100 minutes to charge the Deck to 80% battery with the included charger, and another 80 minutes after that for the last 20% of battery charge.
For intensive 3D titles like Elden Ring, expect closer to that 2 hour mark. But for 2D games, it shouldn’t be too tough for Steam Deck to push up to 5 hours on a full charge. For the first few weeks I owned a Steam Deck, this was roughly the experience I grew to expect from the device. It’s more or less in line with the original 2019 model of the Nintendo Switch, before revisions came out to improve battery life and block certain hardware exploits.
But can it be improved? Absolutely! You’ll run into some limits when it comes to optimizing games that are having trouble running on your Steam Deck to begin with (ie, pushing 40-60 FPS in intensive games like Elden Ring), but you can definitely boost your Steam Deck’s battery life from a mere two hours or less of active use.
I’ve managed to push my Deck’s battery life as far as 7 Hours, but only in 2D games and web browsing. Still, that’s pretty good for a hefty portable gaming machine like this one, especially considering how much more comfortable it is to hold than the Switch and how much more powerful it is in general. For more intensive games like Elden Ring, I can push it up to about 2.5-3 hours with 30 or 40 FPS cap. Older or better-performing 3D titles can even be pushed to 4+ hours!
Even so, with a Switch or another portable console, you have the benefit of developers doing everything they can to optimize for performance and battery life well before you ever open the game. With Steam Deck, which is a handheld console but also a straight-up Linux PC running Windows games through a translation layer, you’ll have to be a bit more hands-on when it comes time to start optimizing your games for performance and battery life. This level of control comes with some responsibility!
Fortunately, I should be able to help you find good Steam Deck battery settings for most games in this article. Let’s get into it!
What Steam Deck settings have the biggest impact on battery life?
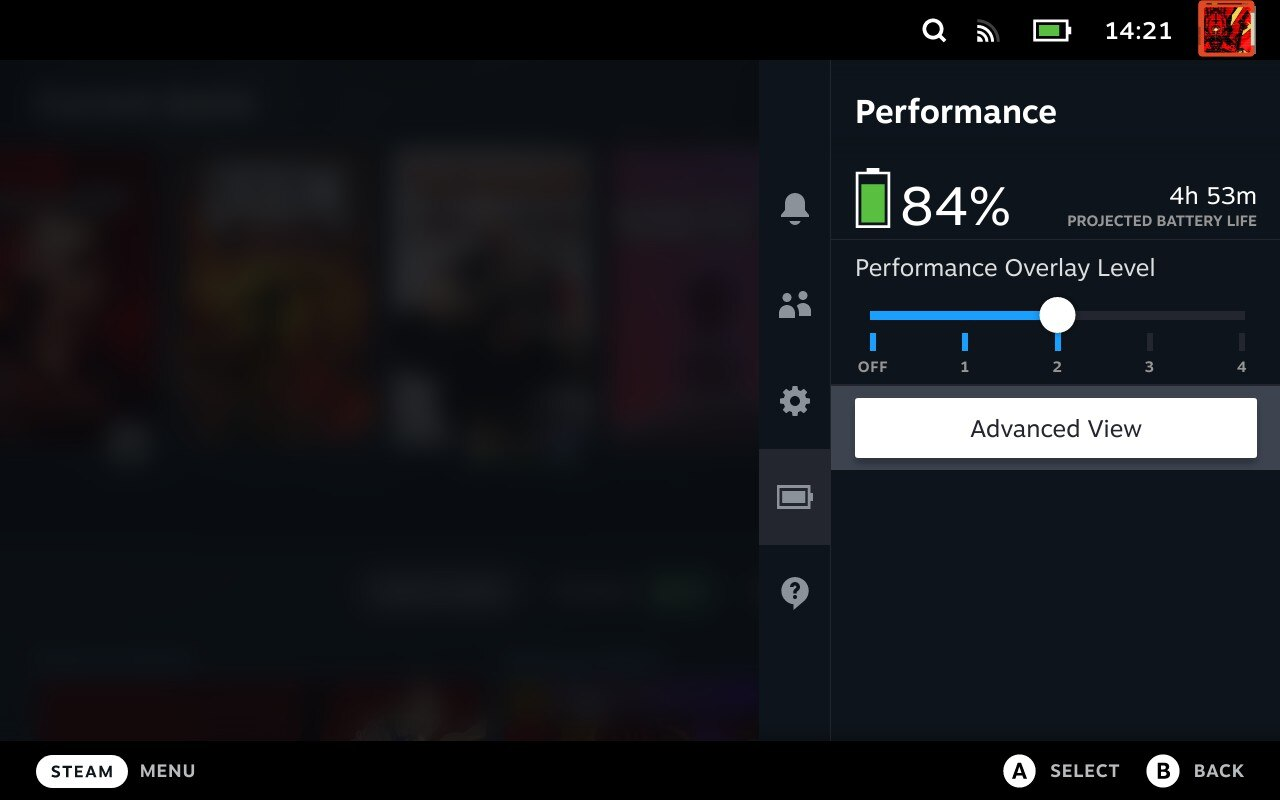
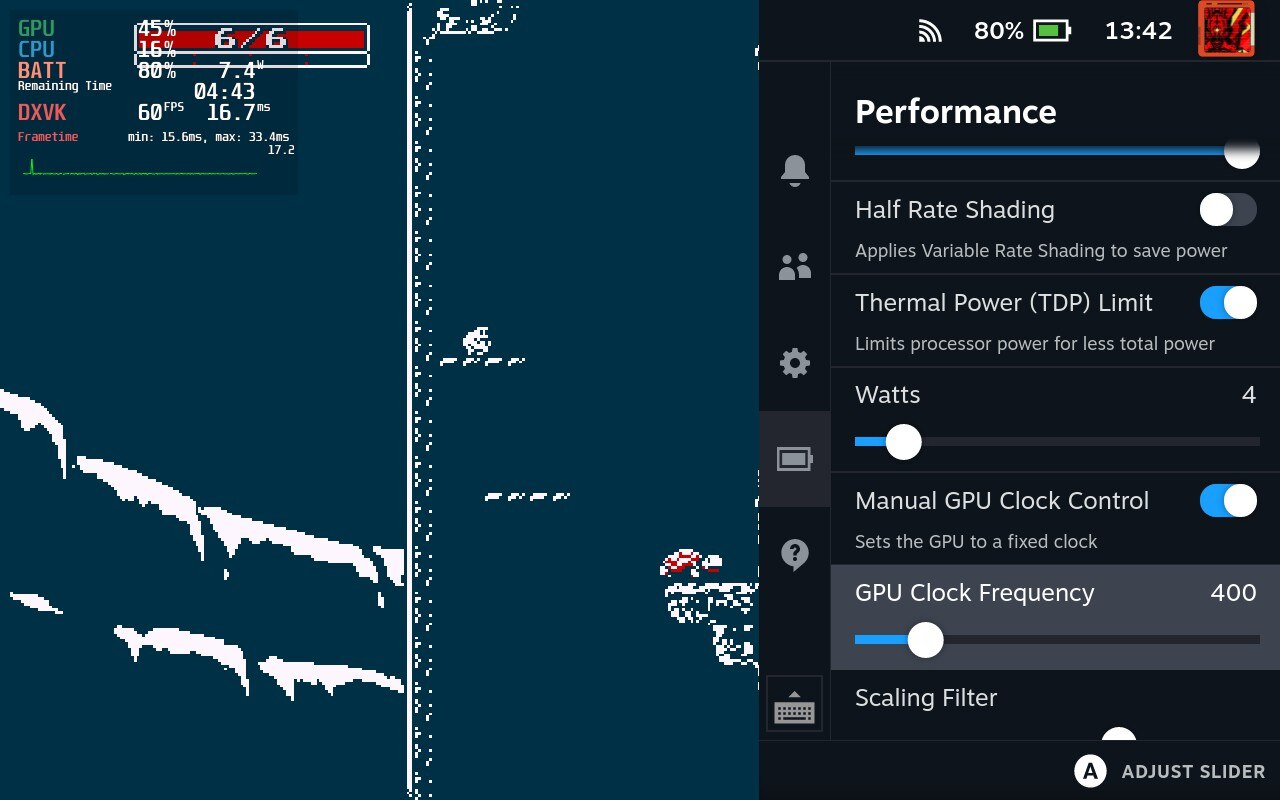
By “Steam Deck settings”, I’m referring to Steam Deck Quick Settings that are all available by pressing the triple-dot button on the right side of the Steam Deck. These are primarily in the Performance settings menu, which has an icon that looks like a battery. You’ll want to select “Advanced View” in order to enable the options I’ll be discussing below.
For now, I’ll just be explaining the high-impact options and what they mean. I’ll include a more detailed tweaking tutorial and power profile recommendations later on in the article!
TDP Limit
Let’s start with the first and most high-impact setting: your TDP Limit!
The TDP Limit will control the amount of power that goes to the CPU inside of your Steam Deck, and can be set from a mere 3 Watts to 15 Watts.For your reference, the combined maximum power draw of everything in the Steam Deck is about ~25 Watts, so this is the setting where you can squeeze out the most improvements in battery life.
From what I’m able to tell, the CPU inside the Steam Deck is actually more than suitable enough for 60 FPS in most titles. Where it’s bottlenecked is by the RDNA2 GPU inside the Deck, as well as the TDP Limit itself preventing the Deck’s CPU from reaching its theoretical full potential. While it is packing AMD Zen 2 cores, the same as in Ryzen 3000 series CPUs and the current-gen consoles, these cores are also operating with a much lower power limit due to the limited TDP of the handheld.
Fortunately, you can still get smooth gaming experiences with the Steam Deck’s onboard hardware. My list of tested Steam Deck verified games can attest to that!
But if you want to have smooth gaming experiences while also saving battery, you’ll have to experiment to find the lowest TDP Limit that works properly with your game of choice. More on this process later in the article.
Manual GPU Clock Control
Another high-impact setting will be Manual GPU Clock Control. This is…pretty much exactly what it sounds like, and can be adjusted from a minimum of 300 MHz all the way up to 1500 MHz.
GPU clock speed in this context is pretty much just the speed that your GPU will be running at, and you’re using a GPU that is specced for running current-generation games at 720p and 30-60 FPS. This is great and all, but it also means you have plenty of flex room for adjusting GPU clock downward for less graphically-intensive games, including 2D titles and 3D games from past generations of gaming.
Screen Brightness
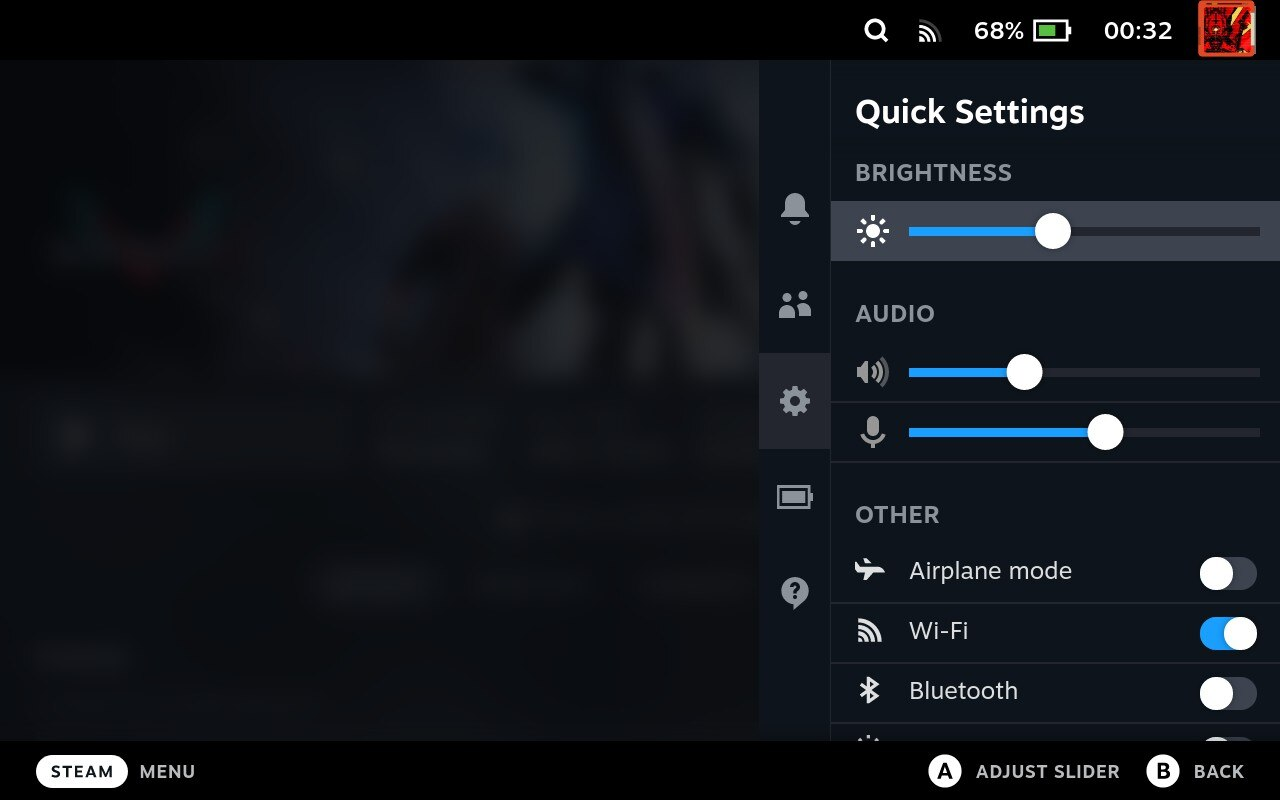
Accessible from Steam’s Quick Settings Menu, brightness will also have a strong impact on your Steam Deck’s battery life.
The reason is pretty simple: your screen is already one of the most high-power components on your Steam Deck, and increasing its brightness is pretty much directly increasing the power that you push to it. So, decreasing your brightness wherever possible without hurting your eyes or in-game visibility is a fairly sound way to improve your Steam Deck battery life, even if other settings will give a bigger overall boost.
The rest of our high-impact settings are back in the Performance Menu, though, so let’s head back there.
Refresh Rate and Framerate Limit
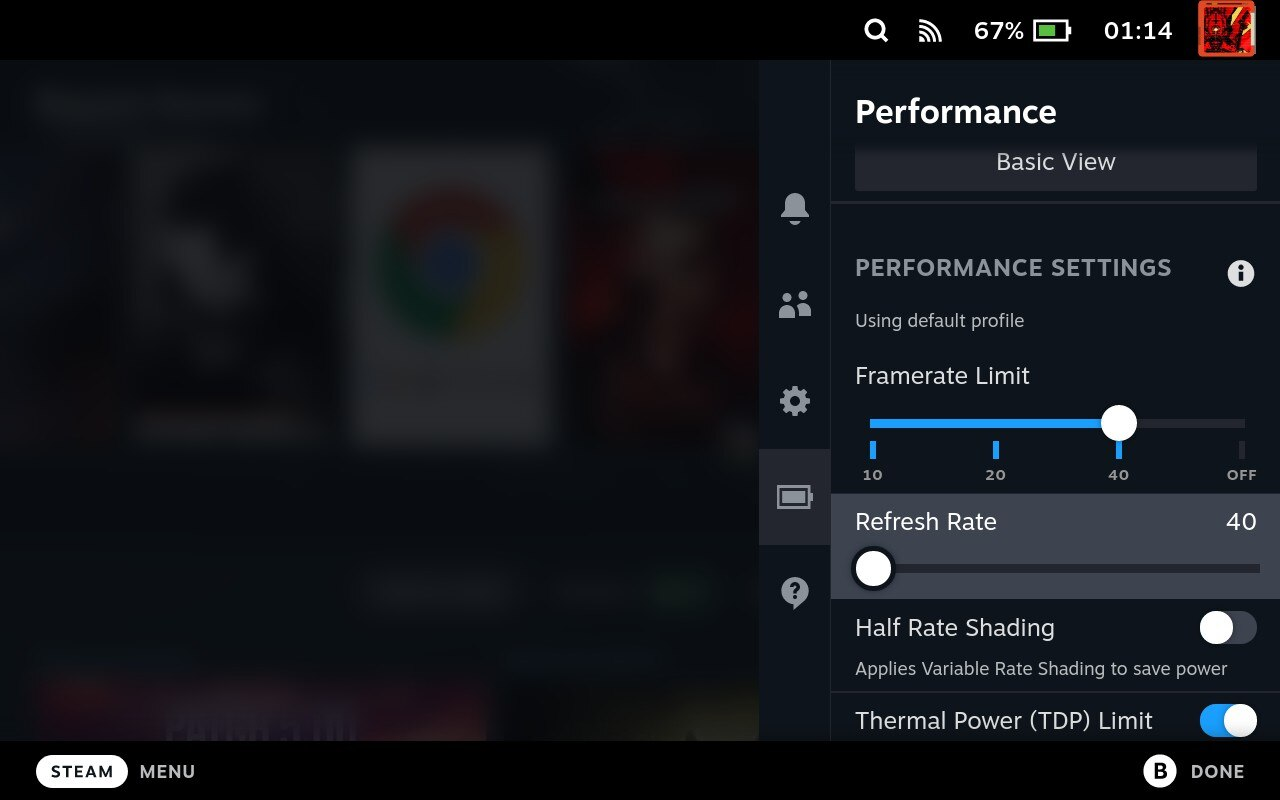
The last of your high-impact settings are Refresh Rate and Framerate Limit. If you happen to set Framerate Limit to Off, you can pretty much forget about improved battery life on your Steam Deck, and you may also see some screen tearing. However, you’ll also get to enjoy the least possible input lag, which is still pretty nice in its own way. Probably not what you want to do if you’ve made your way to this article, though.
The reason why this is a high impact setting should be pretty clear. Taking a game and running it at 30 FPS may be half the performance and fluidity of 60 FPS, but it’s also half the battery life. For this reason, 30 FPS is a fairly common goal for games on portable devices, especially those being ported from more powerful consoles and PCs.
If you take a close look at the screenshot above, you may notice that my Refresh Rate is dialed down to 40 Hz, and my Framerate Limit’s notches have changed from the default 15-30-60-Off to 10-20-40-Off. This change is done automatically when you adjust your Refresh Rate setting, and is recommended if you’re going to be playing games at 40 FPS.
If you’re planning to play games at 40 FPS instead of 30 or 60 FPS, changing to this setting will make 40 FPS look much smoother than if you were running at 60 Hz. It’s good to do this with high-end games where 60 FPS isn’t required to run at full speed, but you still want improved fluidity over 30 FPS!
Half-Rate Shading
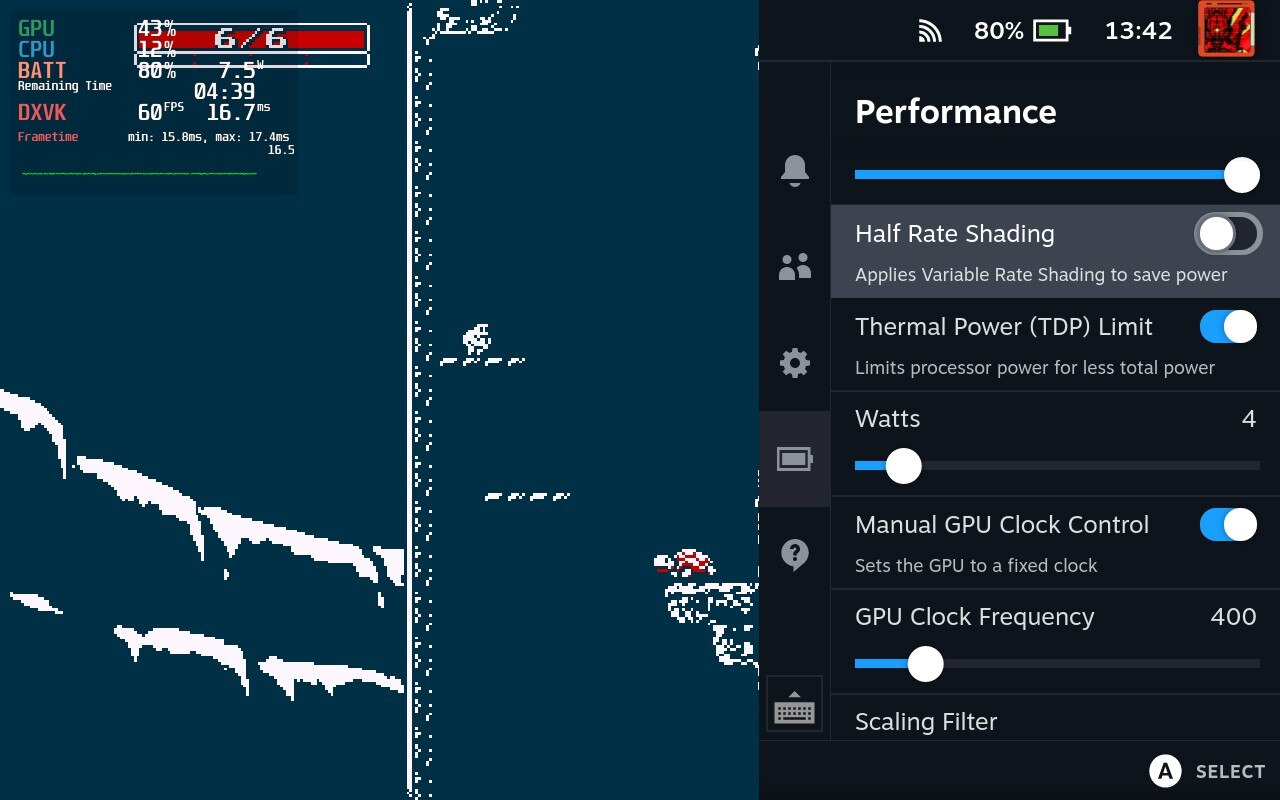
The Half Rate Shading slider, but in a 2D game. Don’t enable it in these!
Half-Rate Shading is a curious little setting that doesn’t seem to have a particularly high impact, at least where performance is concerned, but does come with a noticeable visual impact. However, it’s really only relevant in 3D games.
Here’s what it Half-Rate Shading looks like in Elden Ring, on and off:
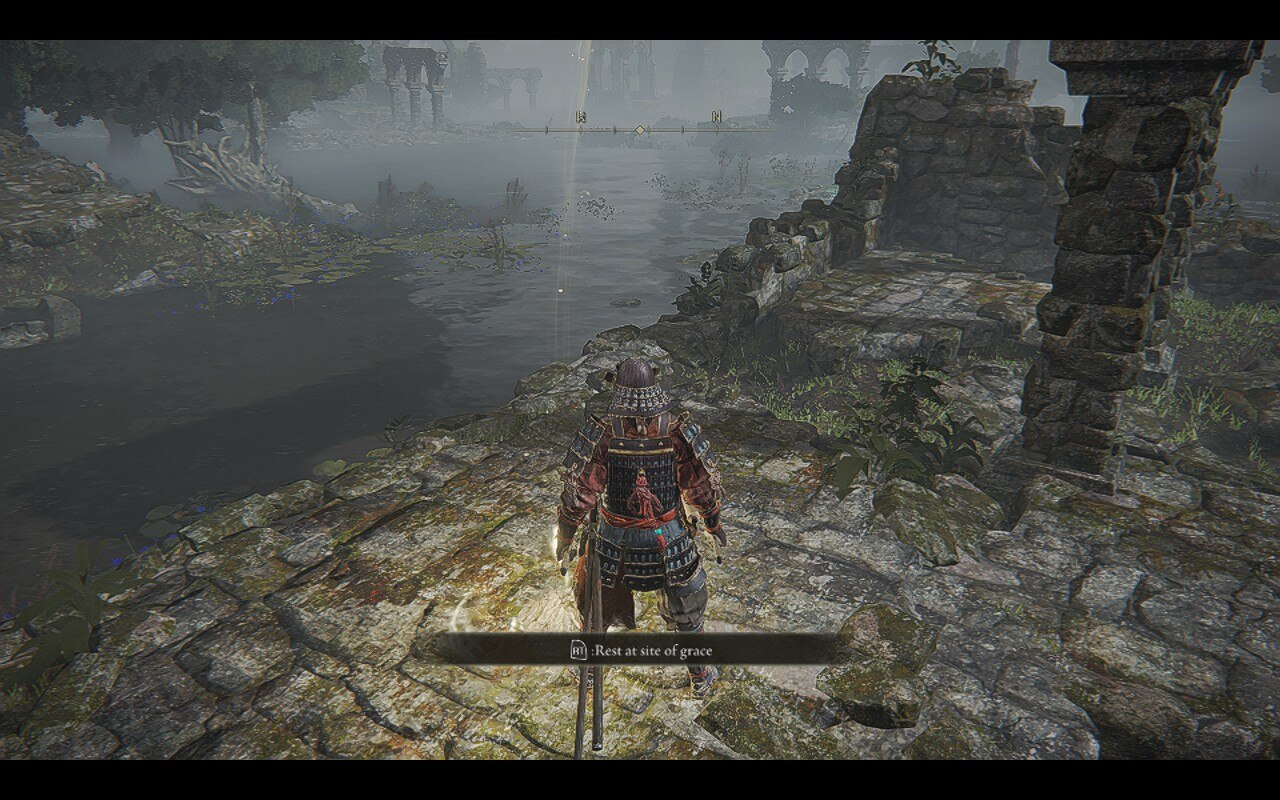
Half-Rate Shading Disabled: Observe the fine details in the stone at my player character’s feet.
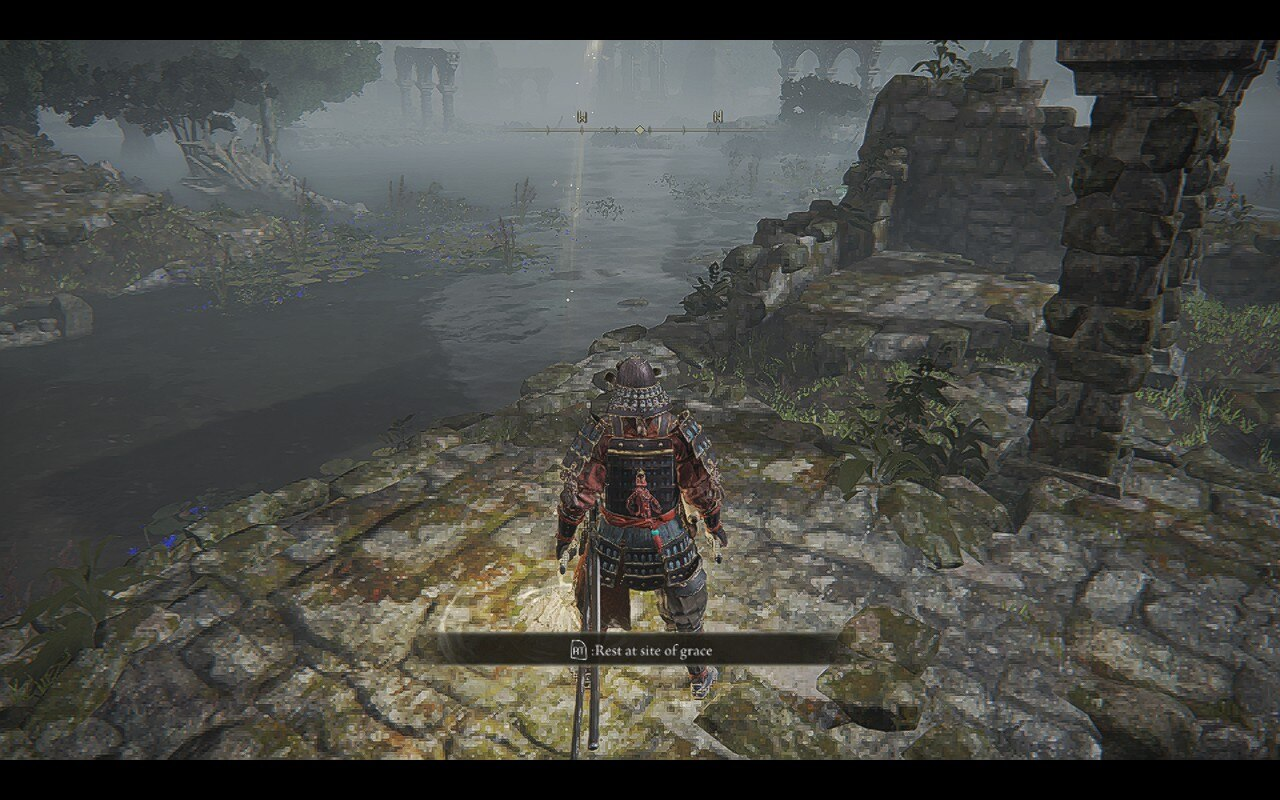
Half-Rate Shading Enabled: Observe the noticeably-increased pixelation in the fine details. Most things still look the same, but where a difference is apparent, it’s pretty severe.
Half-Rate Shading is based on Variable Rate Shading, which is basically a technique where certain parts of the screen are rendered at lower resolutions to improve on performance. Unfortunately, Half-Rate Shading doesn’t seem to improve in-game FPS very much, and applies this VRS effect to the entire screen through brute force rather than picking-and-choosing what parts of the screen and scene are being used.
This results in an overall drop in visual quality, but one that isn’t usually very noticeable on a handheld, and one that is slated to improve your battery life. It’s a bit of a double-edged sword!
I’d recommend trying this one on a per-game basis, and to keep it turned off if it happens to screw up your in-game UI or important texture details. If turning it on doesn’t do too much harm to your visuals, keep it to improve your battery life.
How To Improve Steam Deck Battery Life
With an established understanding of the high-impact settings you’ll want to change, let’s get straight into how to actually improve Steam Deck battery life.
Step 1: Always Use Per-Game Profiles, and Enable the Performance Overlay
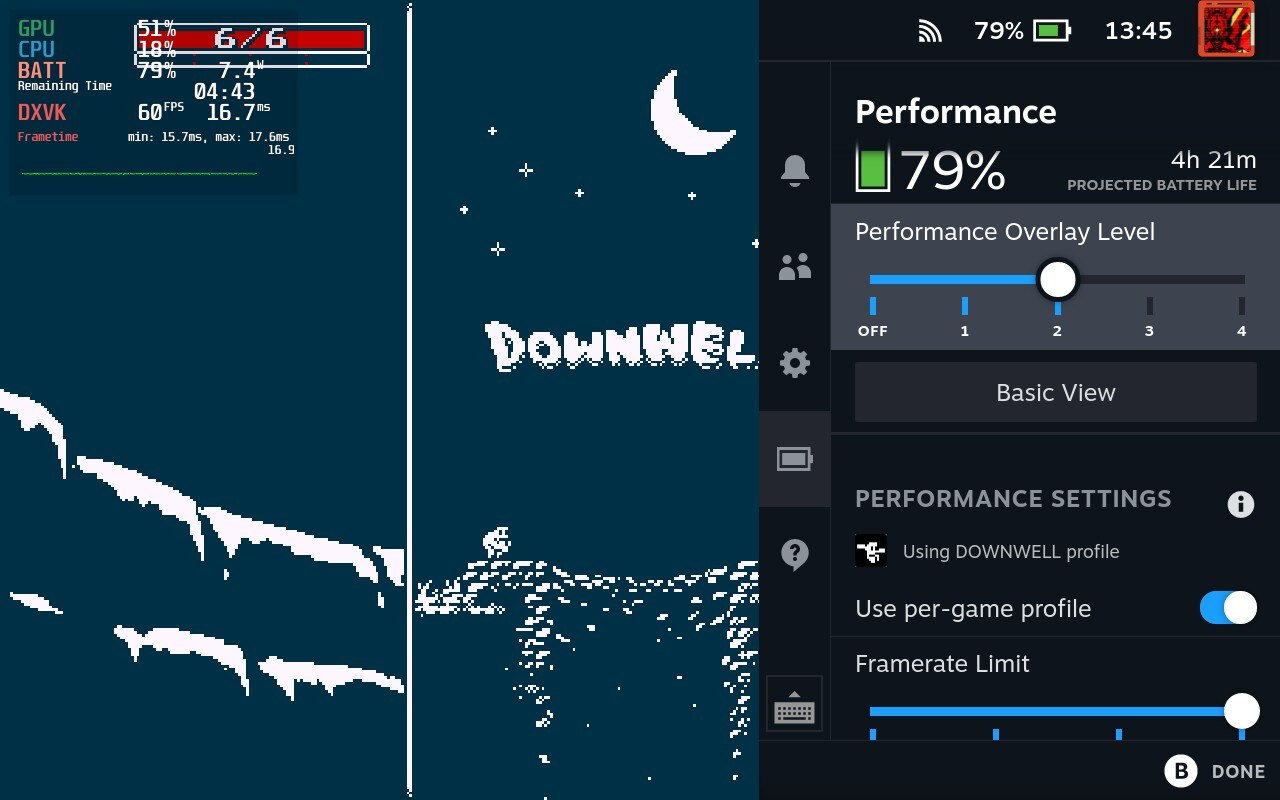
First, start by launching your game and opening your Quick Access Performance menu. Then, set your Performance Overlay Level to 2, and enable the “Use per-game profile” slider at the bottom. You don’t want to change any of these settings system-wide for all of your games, as that will result in unplayable performance on high-end titles and wasted system resources on low-end titles.
Step 2: Identify The Lowest Acceptable Frame/Refresh Rate For Your Game
For this part, you’ll actually need to play your game for a little bit.
If you’re playing a fighting game like Street Fighter or Guilty Gear Strive, you can also just skip this part entirely and go ahead and set that 60 FPS cap. Certain games, like fighting games and many console ports, are built with a hard 60 FPS cap tied to their game logic, with FPS above or below that cap increasing or decreasing the actual speed of the game. You don’t want a 30 FPS cap in games like that!
But in games that allow variable frame rates, which includes most 3D games released natively on PC, you should be able to safely set a 30 or 40 FPS limit to improve your battery life without stressing too much about it.
In the case of the 2D game I’m testing for this guide, Downwell, 60 FPS is actually required for full speed. So I’m gonna keep it there!
Step 3: Use FSR, if Available (3D Games Only, 2D Games Use Integer Scaling)
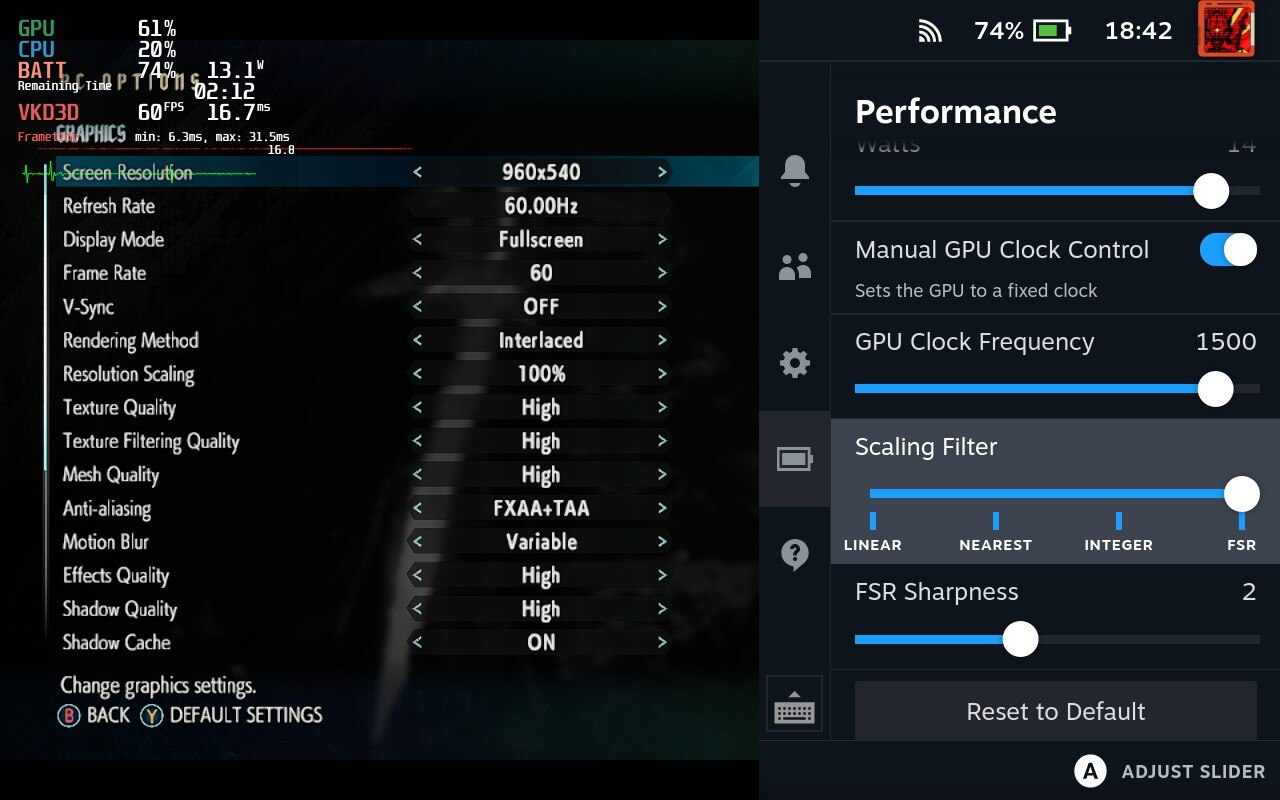
At the bottom of your Performance menu, you’ll find an option to select Scaling Filter for your particular game. Basically, this determines how games that are running at a lower resolution than the Steam Deck’s native 800p or 720p will scale up to your display.
For 2D games, you’ll want to set this to Integer Scaling. Integer Scaling ensures that no pixels are blurred or stretched, only perfectly multiplied times four until they don’t fit on the screen anymore. This will give you the cleanest possible reproduction of 2D sprites on a modern display, and is highly recommended for any 2D game.
For 3D games, you can still use the other Scaling options, but you’ll want to go to FSR. FSR is AMD’s FidelityFX Super Resolution technology, which enables specific games to run at a lower internal resolution and scales them to a much higher one while still keeping surprisingly convincing image quality. I’ve written in more detail about FSR and competing technologies (like DLSS) here, if you’re interested.
The Steam Deck’s version of FSR isn’t tailored per-game (though if a game supports FSR properly, you can still enable it in-game for better results!), but instead forced through the OS with 3D games running at resolutions below 720p. I recommend using a 960 x 540 (540p) resolution alongside FSR in whatever games you have that support it! It looks superb on the handheld screen, will improve your overall performance, and yes, will improve your battery life compared to native 720p or 800p.
Note: FSR may be selected, but will not actually be active unless your resolution is below 720p.
Step 4: Enable Half Rate Shading if Available, and Keep Enabled If It Still Looks Good (3D Games Only)
If available and not outright harmful to your game’s presentation, Half Rate Shading is a great way to improve your battery life. For Downwell and other 2D games, I can skip over this setting entirely without worry.
Step 5: Lower CPU TDP Until You Experience Lag
Remember when we enabled the Performance Overlay earlier? Adjusting your TDP and GPU Clock here is why we did that.
Using the Level 2 Performance Overlay, you’ll be given a frame-time graph represented by a green line.
Your goal is to make that frame-time line look as smooth and flat as possible, even during active gameplay. This will ensure that your game is not losing valuable fluidity and potentially slowing down as a result of overzealous power savings settings.
I’ll give some ballpark recommendations later in the article, but generally-speaking this is a setting that should be fairly easy to adjust downward in the majority of games. It doesn’t take much horsepower from a modern CPU to run most games at up to 60 FPS, even a power-constrained design like the Deck’s CPU.
For 2D Games, you’ll have the highest amount of leniency, sometimes able to bring TDP Limit as low as the minimum 3 Watts.
For 3D Games, it’ll depend more on the scale and complexity of your game. Modern 3D games will likely need 10 or more Watts to perform well, whereas older titles may be able to operate on as low as 5 Watts without issue.
Step 6: Tweak GPU Clock Until Your Frame-Times Become Stable
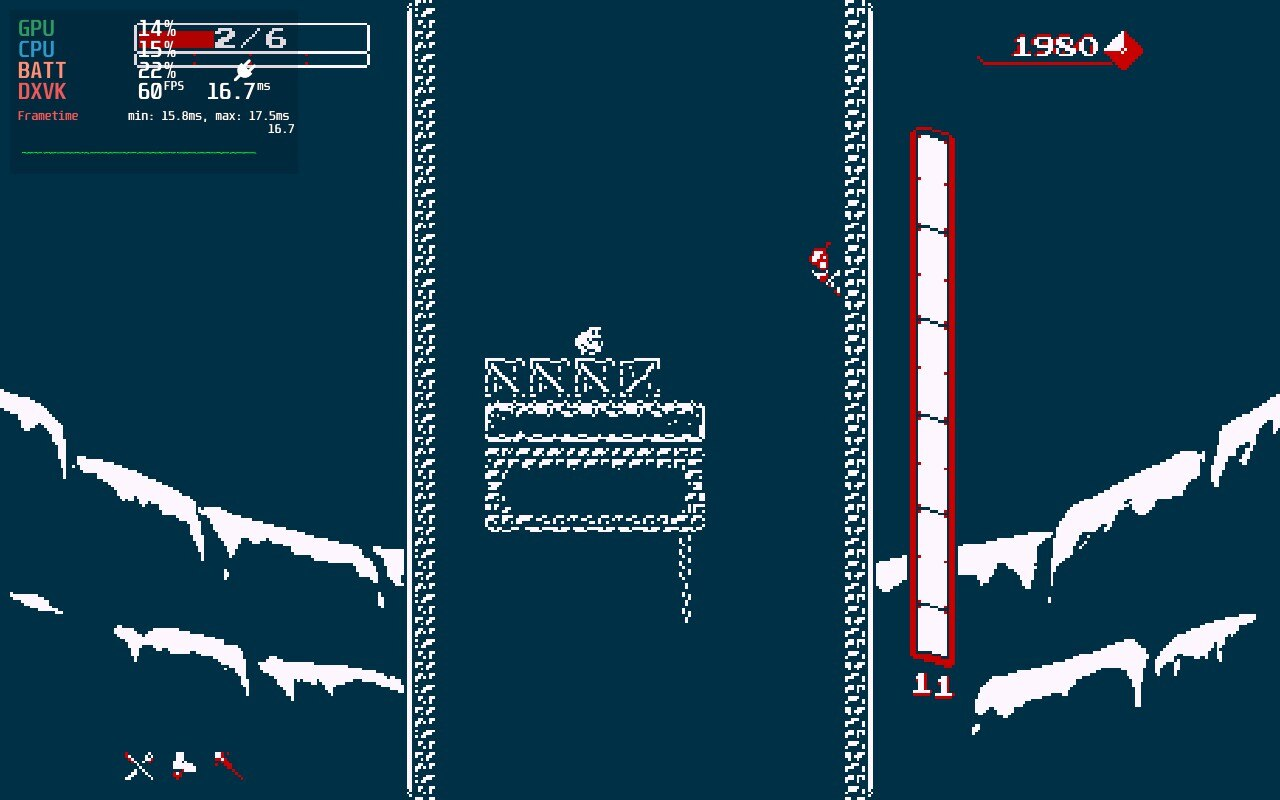
This is the same concept as above, but we’ll be playing with your GPU clock settings instead. For 2D games, start low and tick up until you can achieve a smooth 60 FPS in active gameplay without noticeable hitches in frame-time. In Downwell, just 400 MHz GPU clock is enough to run the game at a near-perfect 60 FPS.
For 3D games, start around the 1000 MHz mark and go up or down in 200 MHz increments depending on how your in-game performance is handling it.
Once you’ve found as low as you can go without experiencing performance problems, give yourself +100 MHz flex room and leave the setting there!
Before You Go: A Few Steam Deck Power Profile Recommendations
Note: Even if you enable 60 FPS, you can still get power savings from other options— just be sure to never turn Framerate Limit Off entirely without an in-game FPS cap or V-Sync to compensate.
Steam Deck Power Saving Settings For Default Profile (SteamOS) and Web Browsing
- Framerate Limit: 60 FPS
- Half-Rate Shading: Disabled (doesn’t do anything)
- TDP Limit: 5 Watts
- Manual GPU Clock Control: Disabled
- Scaling Filter: Doesn’t Matter
Steam Deck Power Saving Settings For 2D Games
- Framerate Limit: 30 FPS
- Half-Rate Shading: Disabled (doesn’t do anything)
- TDP Limit: 3-5 Watts
- Manual GPU Clock Control: Enabled, 400-500 MHz
- Scaling Filter: Integer Scaling
Steam Deck Power Saving Settings For PS3-Era 3D Games
- Framerate Limit: 40 FPS
- Half-Rate Shading: Enabled
- TDP Limit: 5 Watts
- Manual GPU Clock Control: 500-800 MHz
- Scaling Filter: FSR (if available)
Steam Deck Power Saving Settings For Modern 3D Games
- Framerate Limit: 40 FPS
- Half-Rate Shading: Enabled
- TDP Limit: 5-7 Watts
- Manual GPU Clock Control: 800-1000 MHz
- Scaling Filter: FSR (if available)
Parting Words
And that’s all, at least for now! I hope that this article helped teach you how to improve your Steam Deck’s battery life, or at least gave you a rough idea of what to expect from a Steam Deck in terms of battery life if you didn’t have one already. If you liked this article, consider sharing it on Facebook or Twitter for others who may find it useful!
Until then or until next time, have a good one! And remember to use 540p FSR where you can, really. It’s basically free performance and battery life wrapped in one sweet, sweet package.