

So you just got a Steam Deck. Now what? Especially if you’re a console gamer, new to PC gaming, or new to the peculiarities of Steam Deck’s Linux-based Steam OS, this is the article for you. I’ll walk you through everything you need to know in the order you need to know it in this definitive guide, so stick around for first-time setup and long-term use tips!
Table of Contents
What You Need For a Good Steam Deck Handheld Experience
- Steam Deck
- Included Carrying Case
- SD Card (Recommended For Cheaper Models)
- Protective Case (Recommended If Not Using A Steam Deck Dock)
Fortunately, the Steam Deck as-is already makes for a pretty great handheld gaming experience, and can even be used for some desktop and web browsing tasks surprisingly comfortably with dual-touchpad typing.
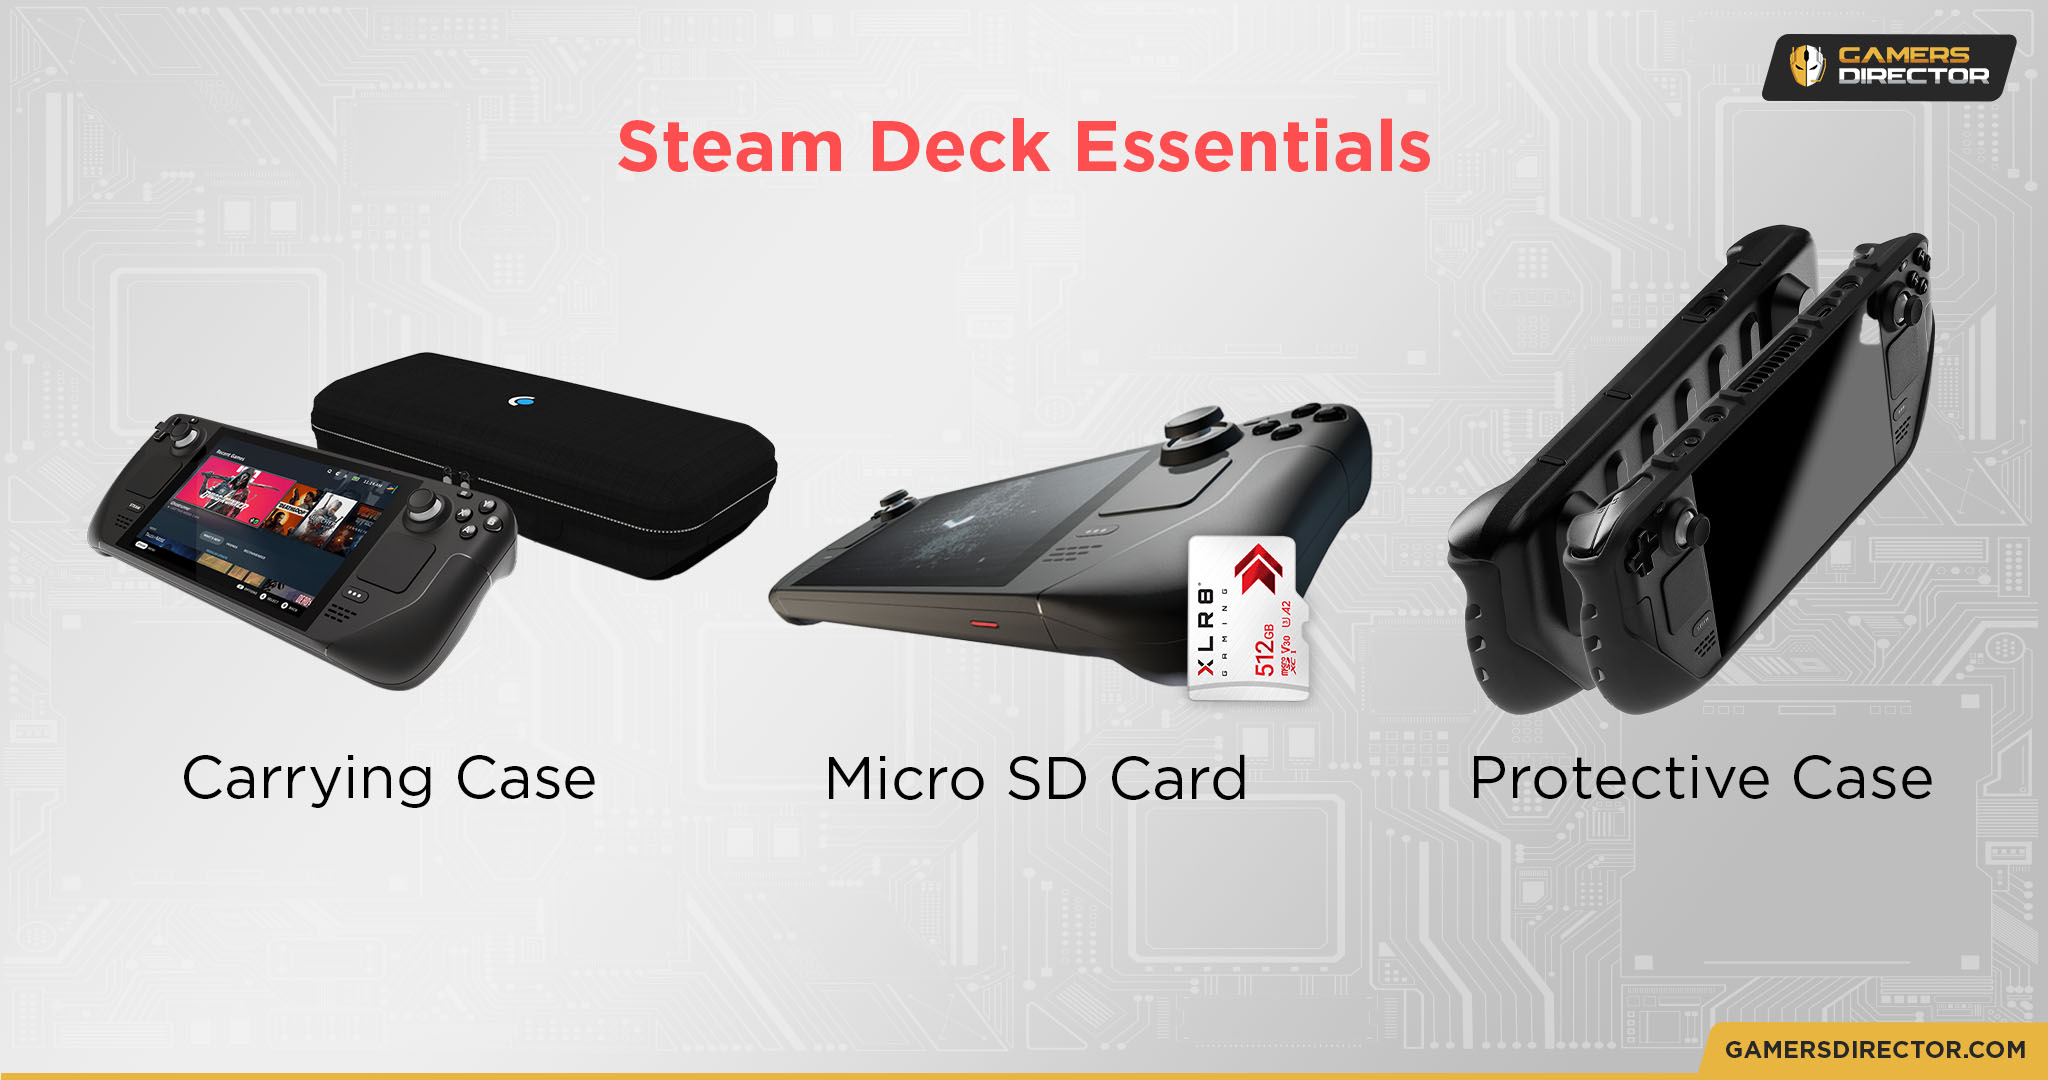 The main downsides of the Steam Deck as a handheld crop up in the form of limited storage space and no protective case except the included carrying case out-of-the-box.
Especially with the non-OLED Steam Deck models, you can find yourself running out of storage for games surprisingly quickly, so I definitely recommend an additional SD card to those users, or anyone who wants to have a sizable Steam Deck game library.
The protective case is fairly optional, especially if you take good care of the device and keep it in the included protective carrying case when not in use, but having an extra shell, screen protector, or both to protect your investment can provide a lot of peace of mind.
What You Need For a Good Steam Deck PC Experience
- Steam Deck
- Docking Station
- Compatible Peripherals
- Monitor (Optional But Recommended)
- SD Card (Optional But Recommended, Unless Using NVMe Expansion)
- NVMe Drive (Optional; Recommended With Compatible Docking Stations)
While the Steam Deck’s included Linux Desktop Mode is fairly good and even in Gaming Mode, touchpad/touchscreen typing in Chrome works well…you’ll probably want to buy a few extras if you’re intending to use the Steam Deck as a full-fledged PC.
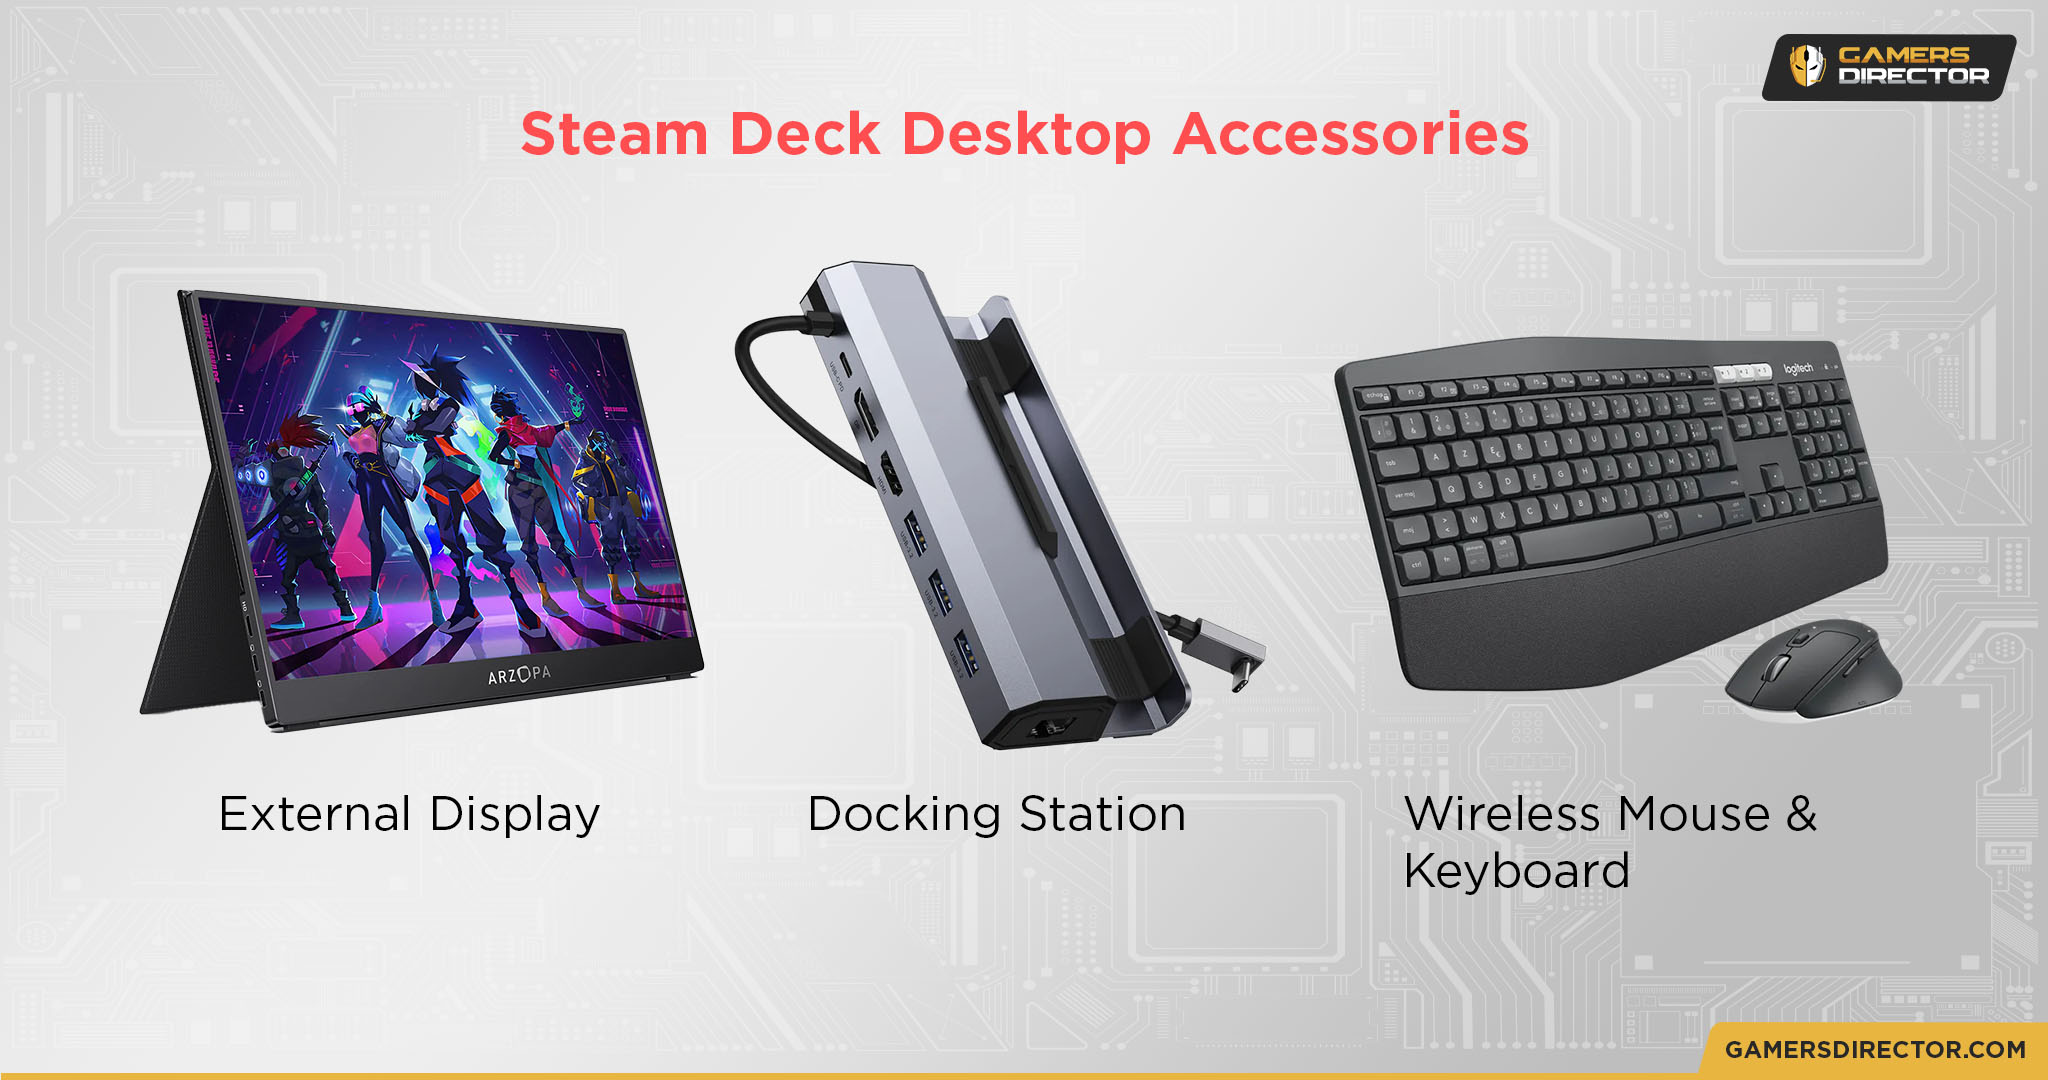 Make no mistake: you absolutely can use the Steam Deck as a full-fledged PC, and even force it to run Windows if you want to, though you’ll lose out on some of the better features of Steam OS tuned for the handheld if you do this. But you’ll really want to buy some extra peripherals, starting with a Docking Station appropriate for your needs, as well as USB peripherals.
In terms of a monitor, that will depend on your needs. For quick on-the-go computing, the 7 inch screen of the Steam Deck and a quick keyboard and mouse plug in can be surprisingly competent, and much more powerful than any netbook you’ve ever used.
But for real PC work, I’d recommend hooking up a docked Steam Deck to a proper monitor, or at least a Portable Gaming Monitor.
Finally, let’s talk storage. SD cards are the main way to expand storage on the Steam Deck if you don’t want to chance manually replacing the internal NVMe SSD yourself, but you can also use NVMe drives at much faster-than-SD speeds with an M.2-compatible Docking Station! However, since the Docking Stations bandwidth is going to be limited by the Steam Deck’s USB 3.1 Type-C port (5 Gigabits per second), don’t expect NVMe Gen 4-tier speeds here.
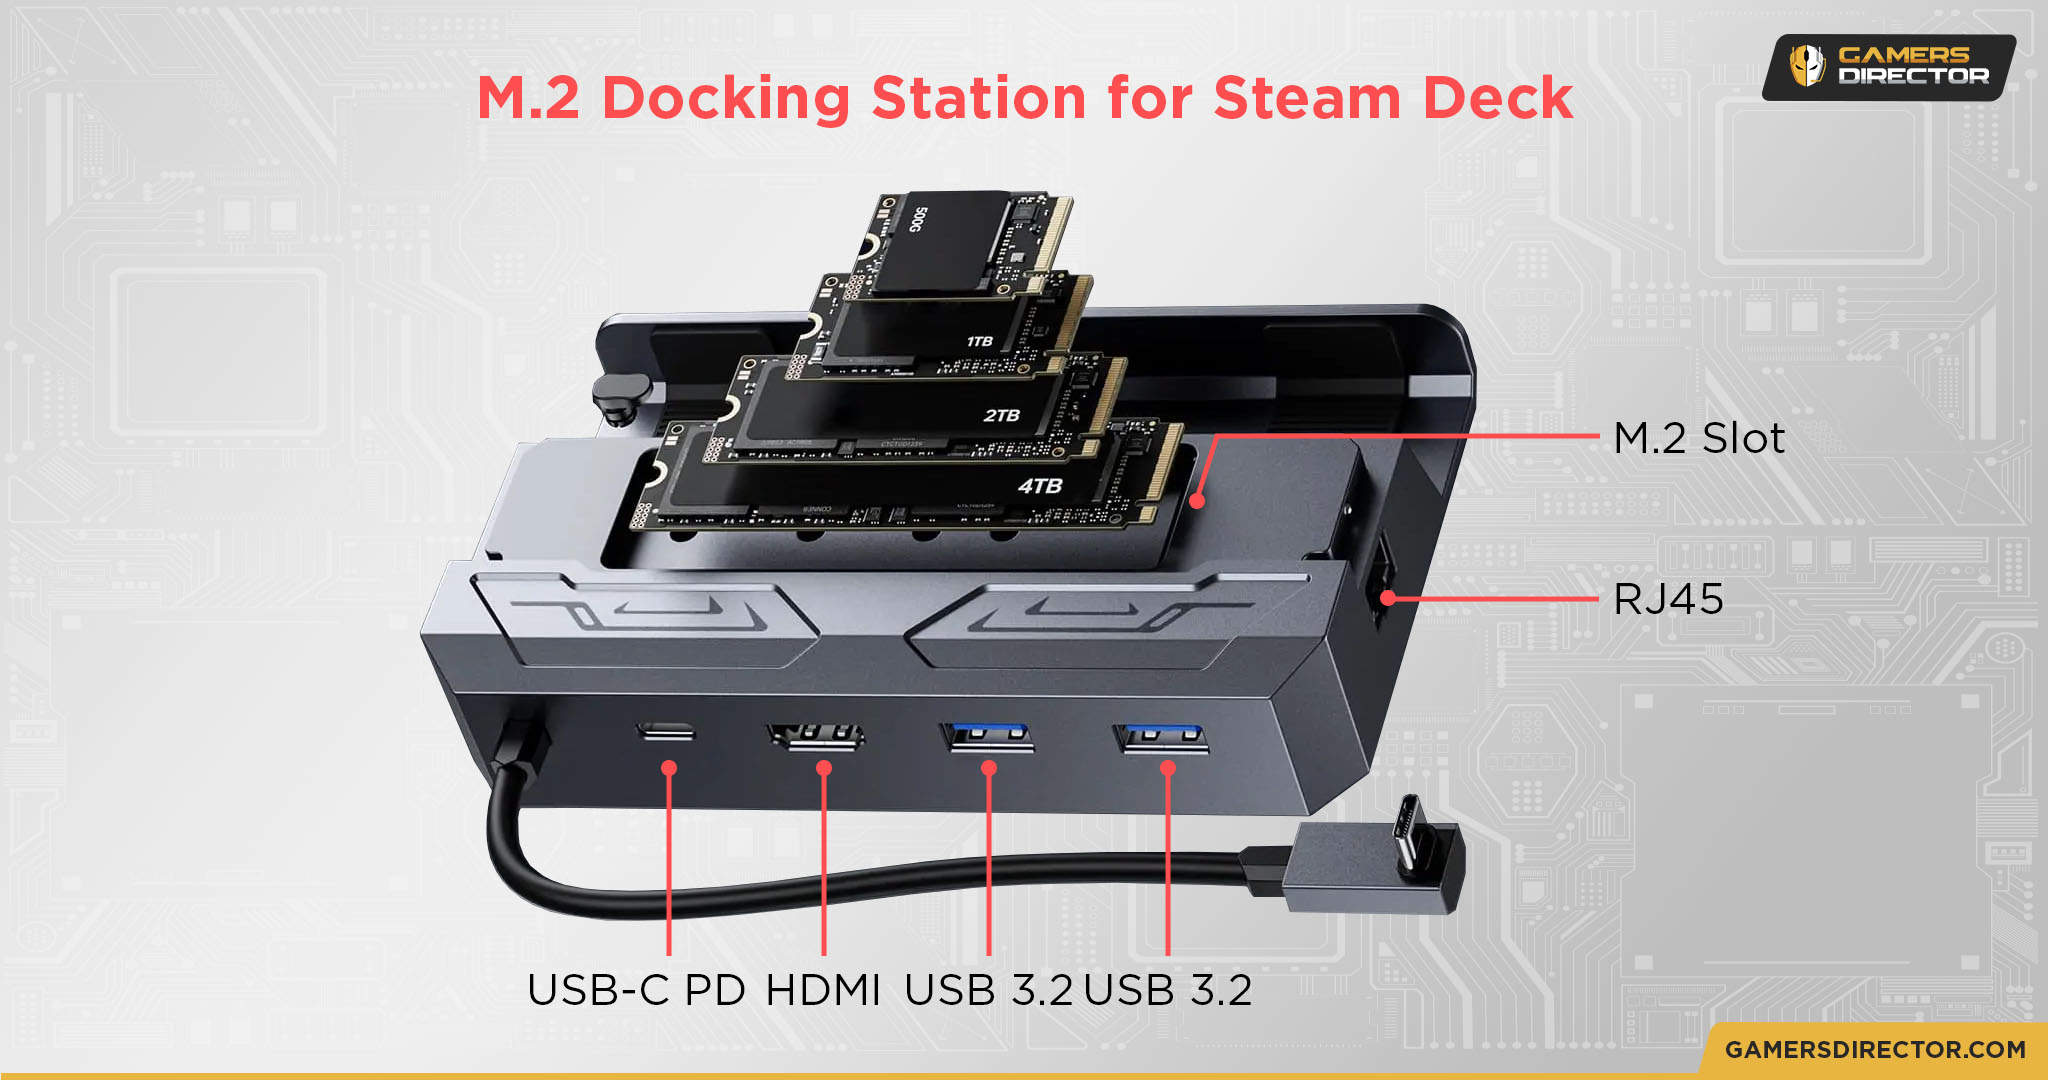 According to Valve, even an SD card should still load games mostly as fast as the internal NVMe, but depending on the game you’re playing or what desktop tasks you’re doing, I can still easily see scenarios where expanding with NVMe will be the clear better choice.
Getting Into Steam Deck: First-Time Setup Explained
Fortunately, most of Steam Deck’s setup is pretty easy to follow, especially if you’ve set up other modern consoles or smart devices. However, I’ll be sure to outline the process here for clarity, and give a few pointers that should help if you’re a first timer with the Steam Deck!
Unfortunately, I can’t take screenshots of the initial setup process, but it’s fairly straightforward, even in text-only format. I’ll be using many more screenshots from my Steam Deck as we proceed throughout the rest of this article.
Configuring The Device
Initial configuration will unfold pretty much how you expect it to.
Once you launch your Steam Deck, you’ll be given a list of languages to choose from. Pick yours (I’m assuming English for this guide, since this article is in English), and then you’ll start getting deeper into the setup process.
After Language, you’ll need to set your Timezone and then connect to a local Wireless network. Alternatively, if your Deck is already Docked and using an Ethernet connection, you can also continue setup with a Wired Connection.
Once you complete Network Setup, Steam will begin installing the latest Steam Deck updates to your device. This can take some time, but be patient while it runs.
Linking Steam Account & Starting The Tutorial
Once your device is updated, you’ll be prompted to link your Steam Account by signing in with either your regular account information or a QR Code with the Steam Mobile App.
Once you’ve signed in, Steam Deck will walk you through a nifty little built-in tutorial for all the main functions of the device. This includes how the left-hand Steam button works (which also doubles as your hold-for-shortcuts button), how the right-hand Quick Access button works, and a quick pointer at your power/volume buttons and SD Card slot.
Other functions will be shown in time. For example, if you open the included Chrome browser, you’ll be given a tutorial on how the On-Screen Keyboard works and how it can be invoked at will. (Steam Button + X, if you’re curious.) But for now, let’s proceed to the two things you should definitely be doing: formatting your SD Card, if you have it, and enabling Per-Game Performance Profiles.
Formatting SD Card (Optional But Recommended)
If you didn’t get an SD card with your Steam Deck or don’t have one yet, feel free to skip through this part.
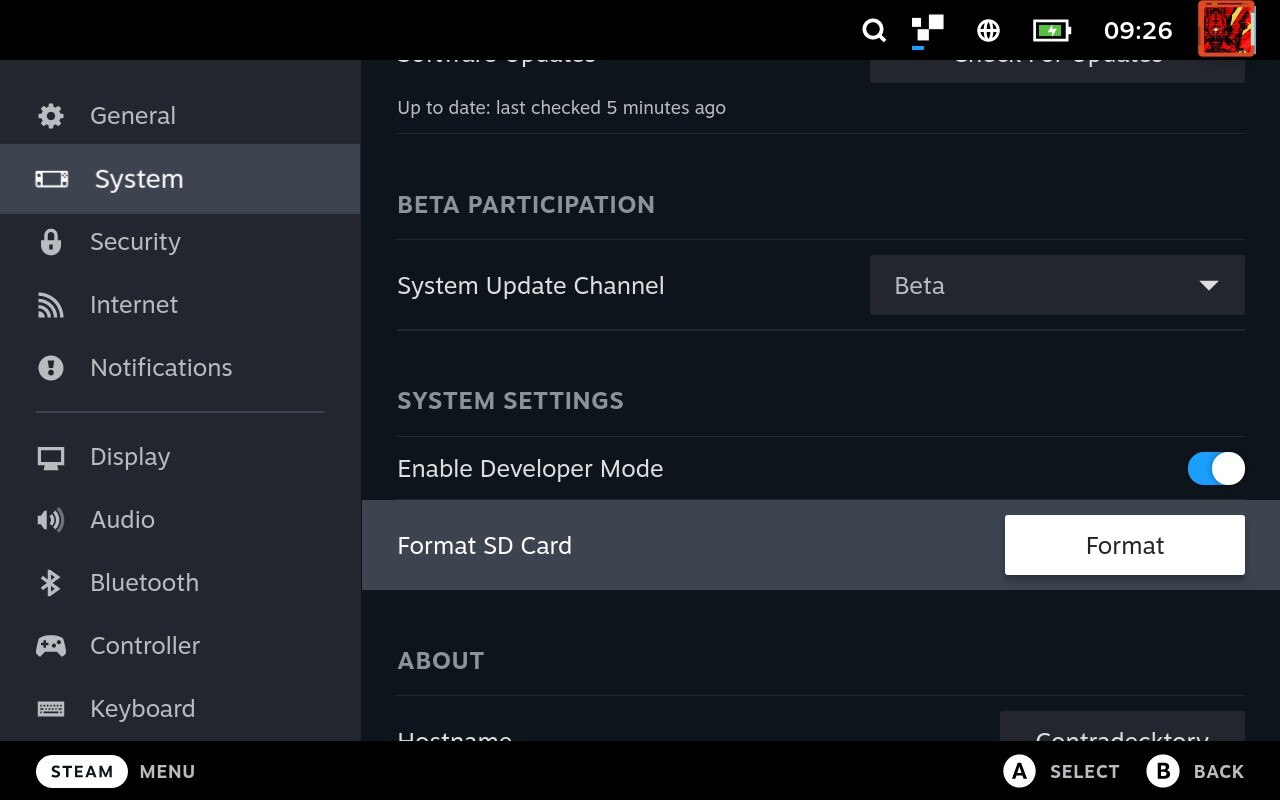
If you do have an SD card inserted into your Steam Deck, you’ll need to go a little out of your way before you can start using it. Fortunately, there’s a straightforward way to do it. First, hit the Steam Button and go to Settings.
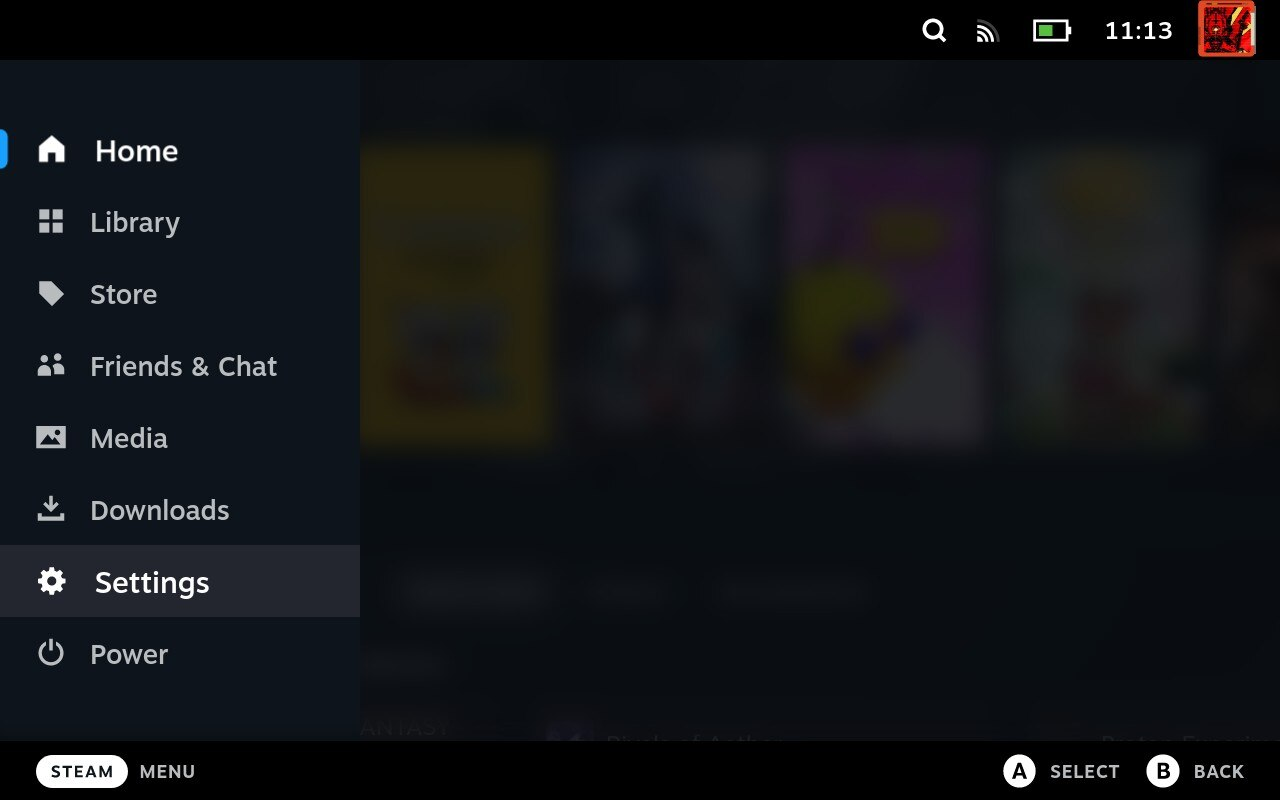
Within Settings, select “System”.
In this menu, find and select “Format SD Card” to format the SD card currently inserted into your Steam Deck.
Enabling Per-Game Profiles (Always Recommended)
Fortunately, this feature is pretty easy to enable!
All you need to do is press the Quick Access button after launching your game. Hit the Battery icon to open the Performance Menu, and press “Advanced View”.
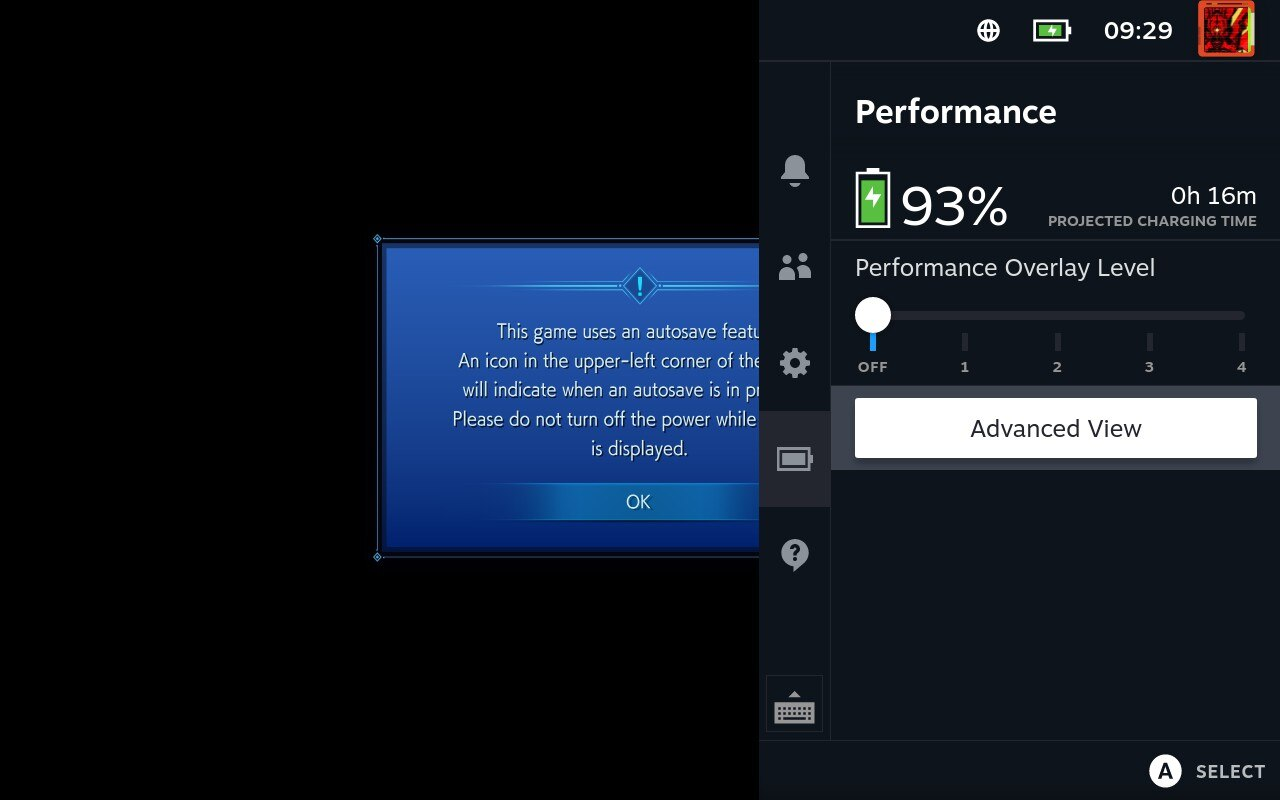
Once you press Advanced View, you’ll be given full access to all your Steam Deck performance controls: including saving a game-specific performance profile.
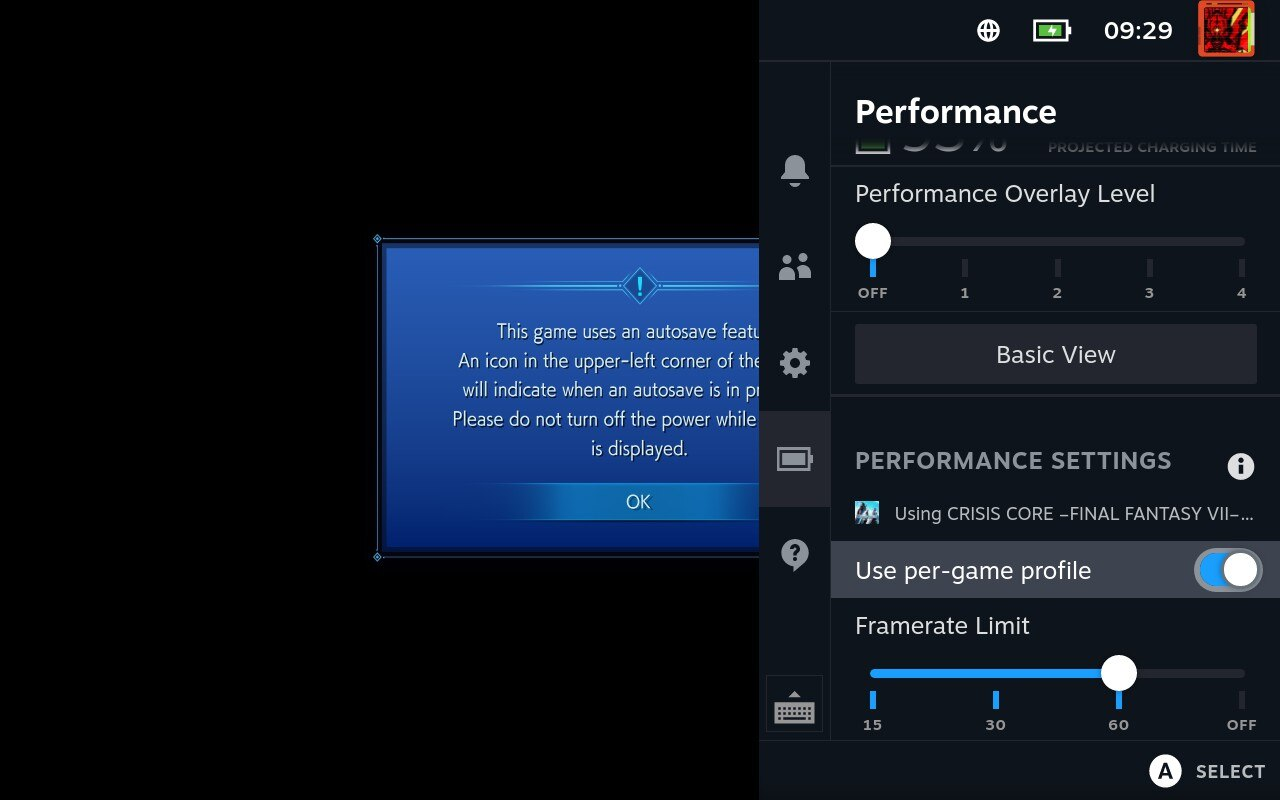
Use this functionality, as it’s one of the best features of the device for stabilizing performance, battery life, or both!
Getting Into Steam Deck: How Powerful Is The Steam Deck and What Games Can It Play?
As a console gamer, the best way to think about the Steam Deck is basically equating it to a handheld PS4. While it technically uses newer, higher-end hardware than what was available in the PS4, the TDP and thermal limitations of the handheld form factor mean that it’s still limited to about that level of graphics power, which is more than enough to play modern games at 720p or 800p and 30-60 FPS on the handheld.
Depending on the game in question, you’ll find that the Steam Deck is either slightly better or slightly worse than the PS4 at running whatever game you’re trying to play.

For example, with Crash Bandicoot 4, I found that the Steam Deck wasn’t bottlenecking on its graphics when trying to run at 60 FPS, but instead bottlenecking on CPU due to TDP limitations. To make up for this slight CPU power deficiency, I simply changed the Refresh Rate to 50 Hz for my Crash 4 per-game profile, and proceeded to enjoy playing the rest of the game without any noticeable frame stutter afterward.
Digital Foundry’s video on the Steam Deck vs the Xbox Series S prove surprisingly compelling for the handheld Deck.
Getting Into Steam Deck: Verified Games and How They Work
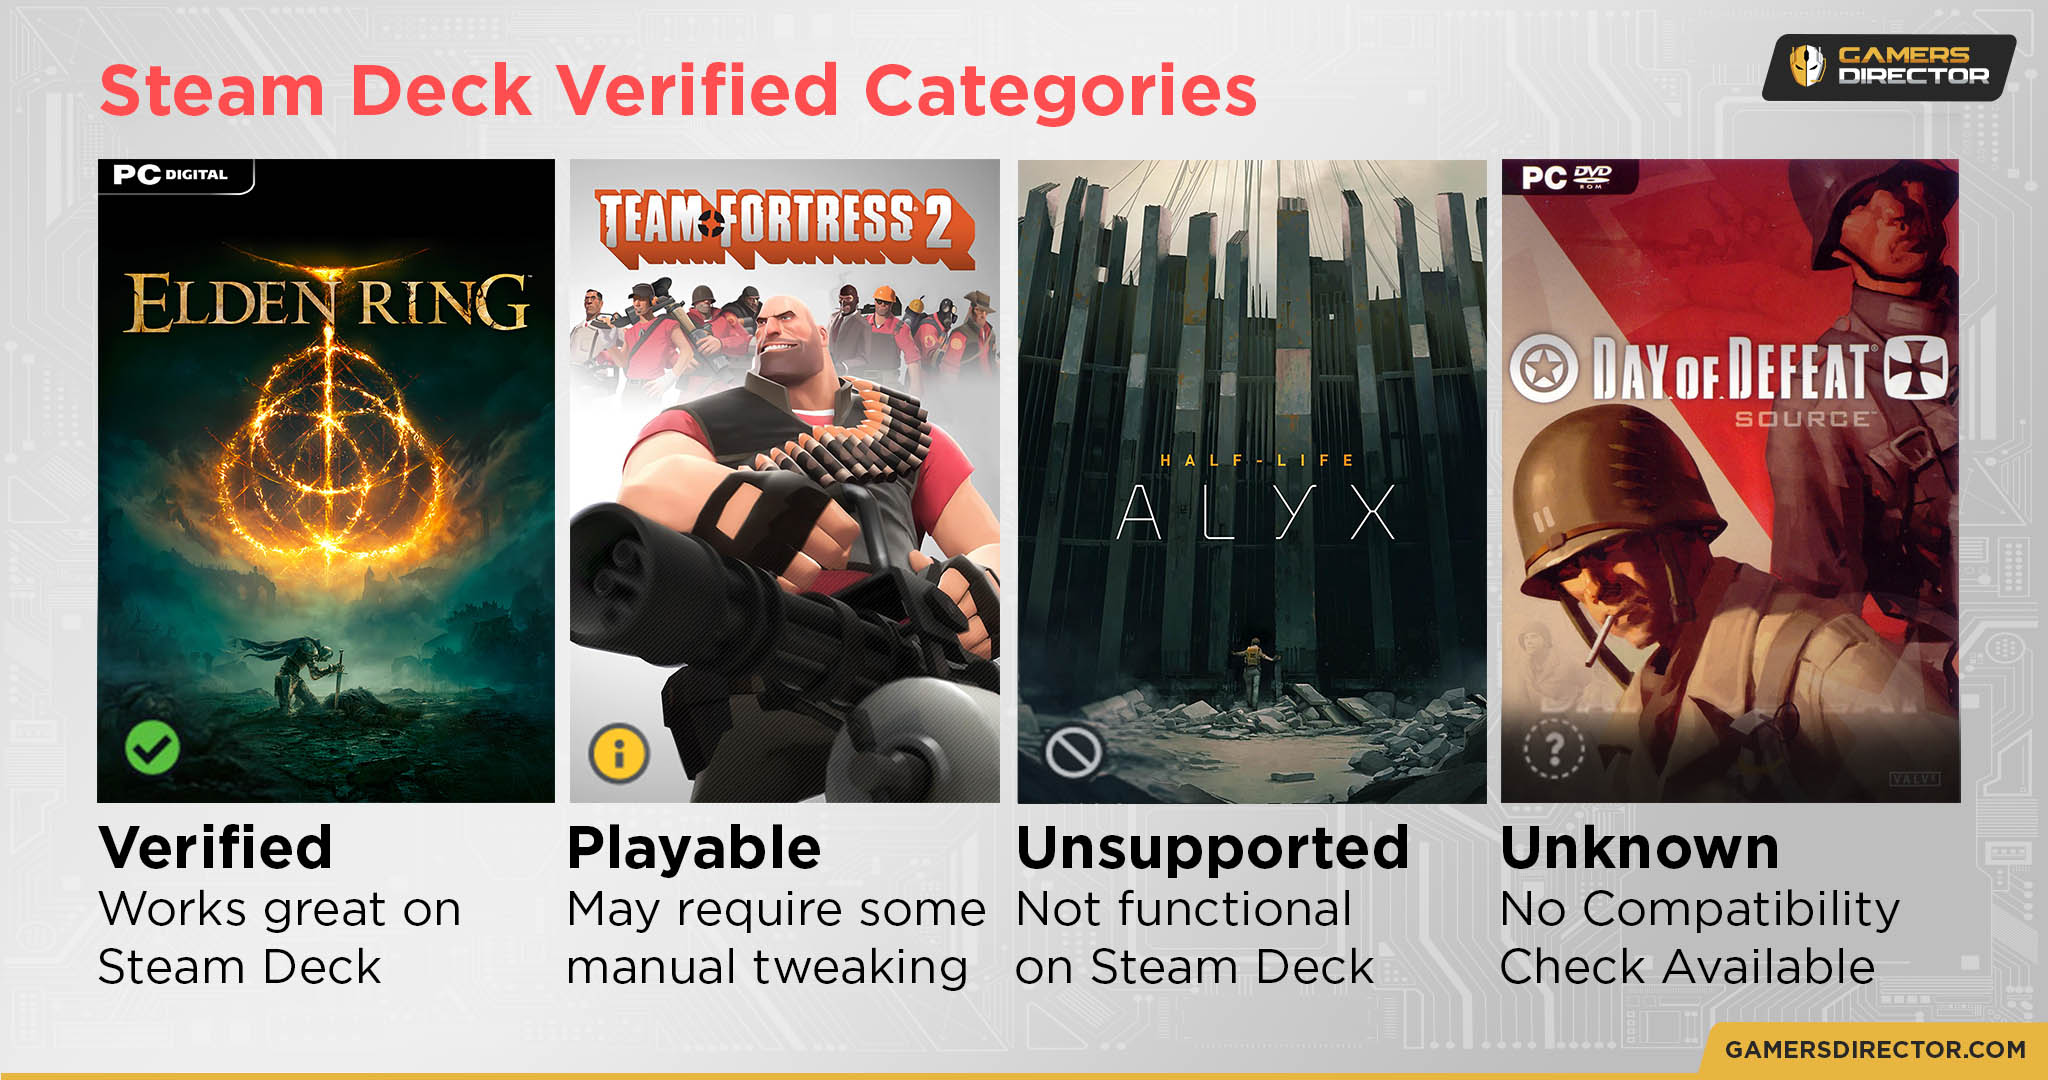 On Steam Deck, games are broken into one of four categories: Verified, Playable, Unplayable, and Unknown/Untested. Let’s break down what to expect from each of these categories!
Steam Deck Verified
- Verified and tested by Valve for a great experience on Steam Deck without required user tweaking. The console-esque “ideal” that you’ll be looking for when shopping for Steam Deck games.
- (You should still probably tweak and optimize with Verified games for the best experience, though.)
Steam Deck Playable
- Verified at least Playable on Steam Deck by Valve.
- These titles tend to be fairly good experiences, but may require additional tweaking to GFX settings or suffer from minor interfacing issues. The most common cause of a “Playable” instead of “Verified” badge is whenever a game requires you to pull up the Steam OS on-screen keyboard to type instead of allowing you to type with the controller in-game…which isn’t a big deal, in my honest opinion.
Steam Deck Unplayable
- Verified Unplayable on Steam Deck by Valve.
- The reasons for this can vary greatly. Sometimes you can still work around and make an “Unplayable” game work well on Steam Deck, especially using a different Proton version, and other times the game simply will not launch at all.
- Most commonly seen for VR games (not enough hardware power) and online multiplayer games with strict anticheat or third-party client requirements (OS issues).
Steam Deck Unknown/Untested
- Unknown and untested!
- Pretty self-explanatory. Experiment if you want, but probably don’t buy a game with this rating if the Steam Deck is your only device to play it on!
Getting Into Steam Deck: Configuration Tips
Picking Graphics Settings On Steam Deck
While I can’t really generalize graphics settings recommendations for every game you might play on Steam Deck, I can make some quick recommendations!
- Anti-Aliasing, Particles, and Shadows should be the first settings reduced if you are hurting for performance on Steam Deck.
- In-game V-Sync or FPS cap may perform and feel better or worse than Steam OS’ FPS cap. Alternate depending on the game you’re playing and the results you get.
- If you’re really struggling for performance, consider using a resolution below 720p in order to get Steam Deck’s built-in OS-level FSR scaling to kick in. It will look a bit fuzzier, but is ideal for those high-requirement games where every extra frame counts, like Elden Ring.
Use Proton Tweaks To Improve Game Compatibility
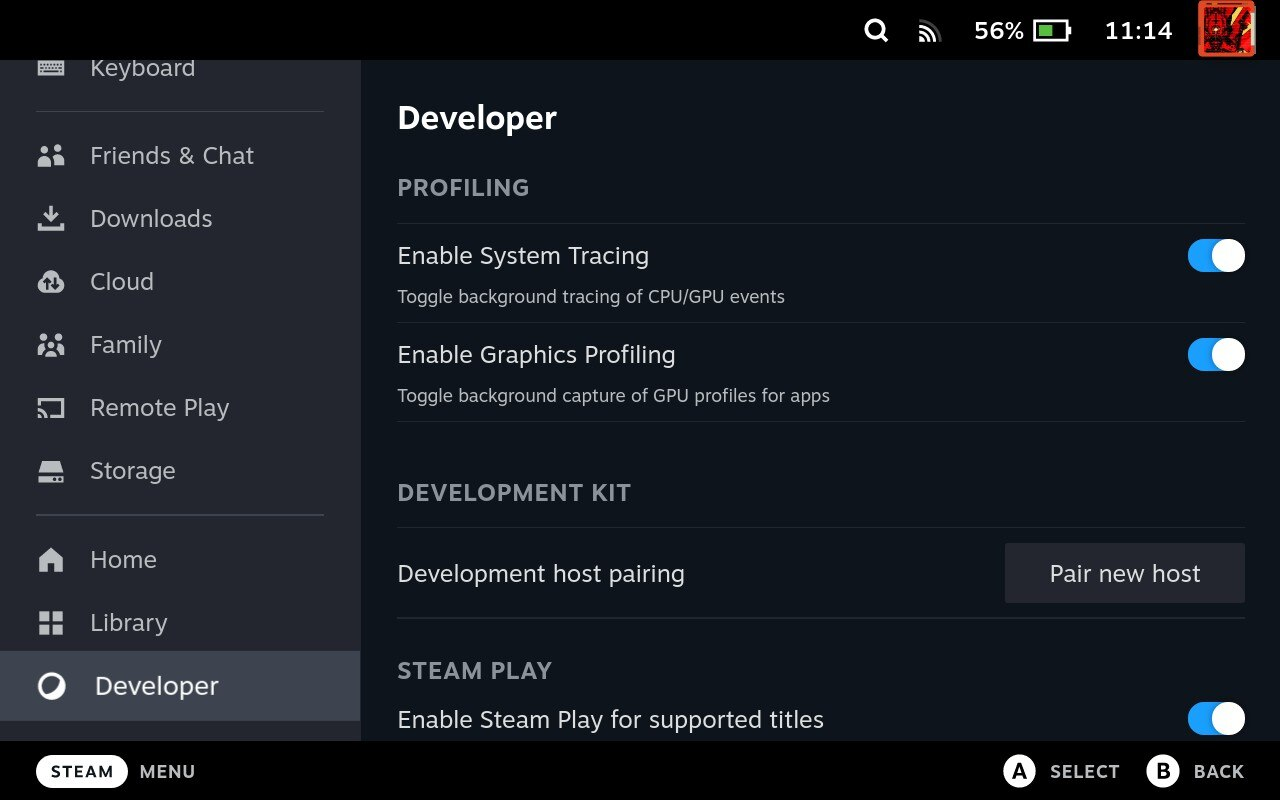
Want to worry a little less about game compatibility on your Steam Deck? Press the Steam Button and head into your Settings Menu, then find Developer Settings.
Within Developer Settings, scroll down to “Steam Play” and find the “Run other titles with” dropdown. Set it to “Proton Experimental” in order for the Deck to default to using Proton Experimental for Untested games.
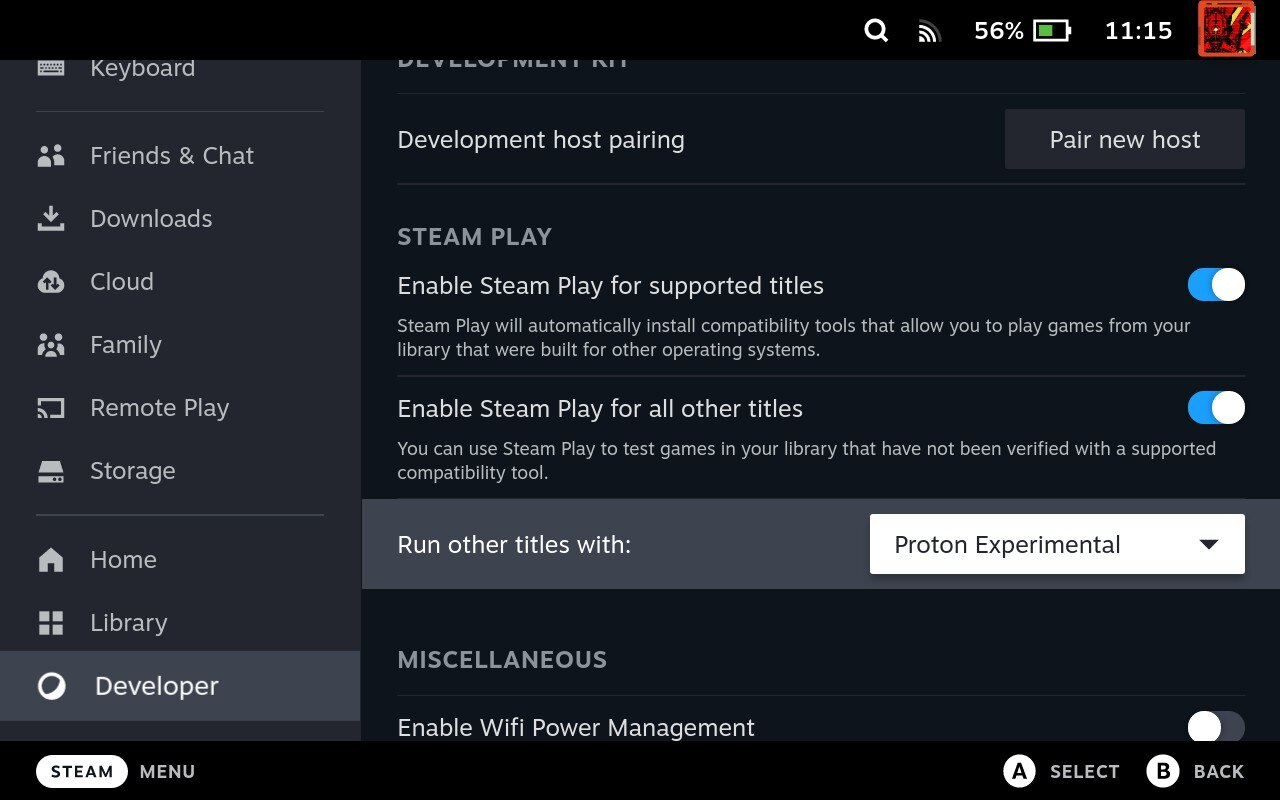
You can also set this on a per-game basis in that game’s options in Steam OS. There are also other, community-supplied builds of Proton you can set up for use on your Steam Deck! Forks like Proton-GE can serve to further improve game compatibility on Steam Deck.
Getting Into Steam Deck: Extra Tips
Last but not least, let’s go over a few final tips before we wrap this up.
Make Sure Your Cloud Saves Sync Before Putting Steam Deck to Sleep or Turning It Off
If the Steam Deck is your only PC gaming device, you can calmly skip over this tip.
But for anyone who is buying a Steam Deck in hopes of having it be a companion to a dedicated home gaming PC, please make sure that your cloud saves are syncing properly before powering off or putting the Deck to sleep. While it’s tempting to just put the device into sleep and set it aside at the end of whichever session (especially since the device does it so well), make sure that whenever you close a game you take a few moments to see your cloud save get uploaded.
Failing to do this will result in Steam Cloud save data conflicts, and if you’re particularly unfortunate like I am, you may even end up getting corrupted save data as a result of playing the same game on two different PCs and failing to properly sync the cloud saves. Don’t do that, kids!
Prevent Storage Space Loss By Periodically Using Steam Deck Cleaner
An unfortunate downside of the Steam Deck is that over time, it’ll end up accumulating a lot of “junk files” it isn’t easy to get rid of, even if you uninstall the games that those alleged junk files were being created for. Fortunately, using the Steam Deck Cleaner utility is a quick and easy way to fix this issue and get back any storage you may be losing due to excessive shader caching.
Tweaking Per-Game Performance Profiles On Steam Deck
Last but not least, I’d like to recommend my extended Steam Deck Settings Guide! While I’ve shown you quite a bit throughout this article, I kind of skimmed over one of the Steam Deck’s most major features: its Quick Access Menu and all the performance and power tweaking functions available therein. I highly recommend heading over there if you want more information on how to tweak your per-game performance profiles for the best experience!
Parting Words
And that’s all!
I covered everything I could think of that a New to Steam Deck user should need to know, but I’m sure some of you out here reading this still have other questions. Whatever questions you have about Steam Deck or PC gaming or PC hardware, please feel free to ask them to me in the comments section below! I’ll be happy to assist you, even if it’s just helping you pick settings for your favorite PC game.
Until then or until next time, happy gaming!